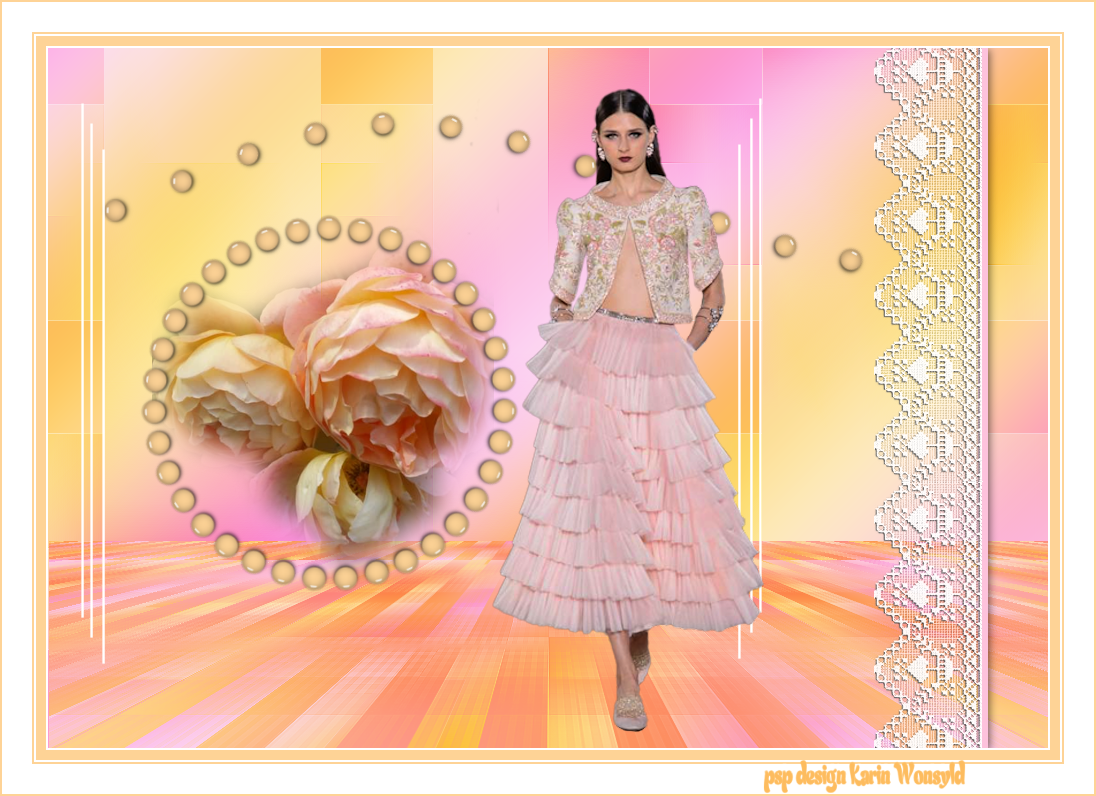
Tutorials Yellow roses
|
here you will find the original tutorials from Karin
|

|
|
You get your materials here
|
| ||
The lady tube is from smart design,
which is not included in the materials.
You will need your own tube.
Thanks to Martha smart design because I get to use your tubes in my Tutorials
Tubes from smart design that are in this tutorial
are not to be posted on your own website or blog
or shared without her permission.
And thanks for the idea for this tutorial
I used the following colors.
Color 1 #fdc2dc
Color 2 #fed396
Color 3 #fdbc5f
Color 4 #fc98c5

You will need these plugins
Mehdi / Wavy Lab 1.1
Filters Unlimited 2.0 / VM Natural / Weave Distortion
Mehdi / Sorting Tiles
Filters Unlimited 2.0 / Simple / Top Bottom Wrap
MuRa´s Meister/ Perspective Tiling
Alien Skin Eye Candy 5 Impact / Glass
MuRa´s Meister/ Copies
Let us begin
1
Open the pastel background 18
Window / Duplicate
Close the original
We will work on the copy
2
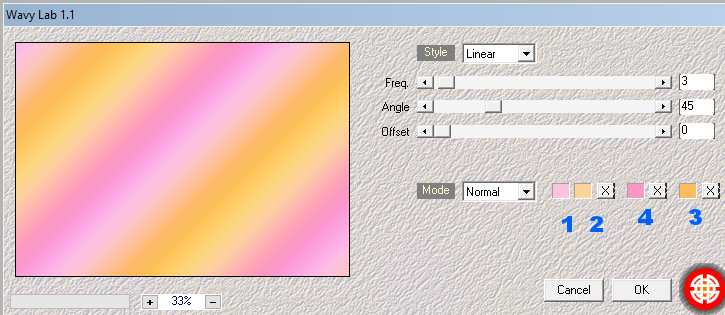
Plugins / Mehdi / Wavy Lab 1.1
(With these settings)
Mehdi / Wavy Lab 1.1
Filters Unlimited 2.0 / VM Natural / Weave Distortion
Mehdi / Sorting Tiles
Filters Unlimited 2.0 / Simple / Top Bottom Wrap
MuRa´s Meister/ Perspective Tiling
Alien Skin Eye Candy 5 Impact / Glass
MuRa´s Meister/ Copies
Let us begin
1
Open the pastel background 18
Window / Duplicate
Close the original
We will work on the copy
2
Plugins / Mehdi / Wavy Lab 1.1
(With these settings)
Layers / Duplicate
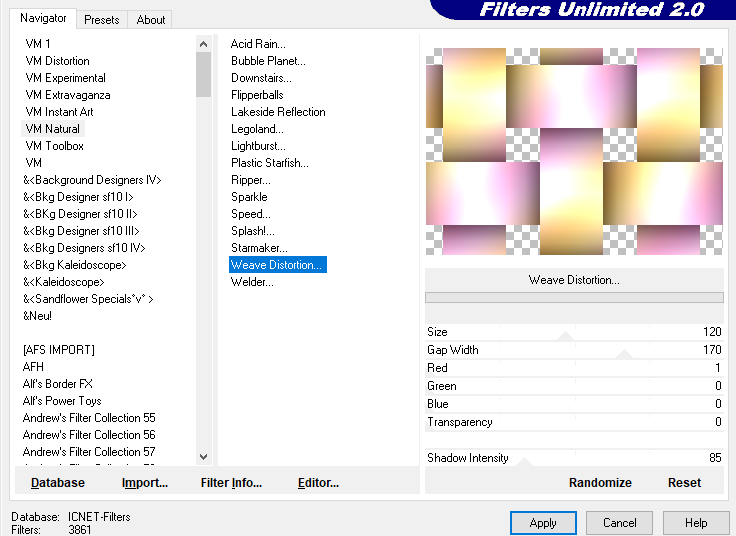
Plugins / Filters Unlimited 2.0 / VM Natural / Weave Distortion
(With these settings)
Plugins / Filters Unlimited 2.0 / VM Natural / Weave Distortion
(With these settings)
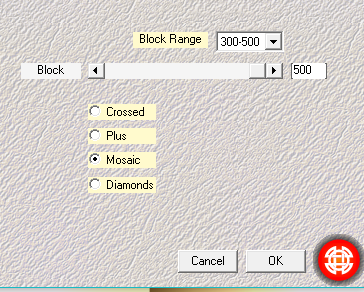
Plugins / Mehdi / Sorting Tiles
(With these settings)
(With these settings)
Layers / Properties / Blend Mode / Soft Light
Effects / Edge Effects / Enhance
Layers / Merge / Merge Down
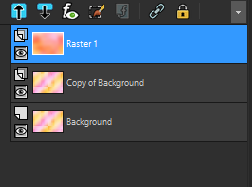
3
Layers / Duplicate
Plugins / Filters Unlimited 2.0 / Simple / Top Bottom Wrap
Reopen the pastel background 18
Edit / Copy
Edit / Paste as a New Layer
Now you should have this
Effects / Edge Effects / Enhance
Layers / Merge / Merge Down
3
Layers / Duplicate
Plugins / Filters Unlimited 2.0 / Simple / Top Bottom Wrap
Reopen the pastel background 18
Edit / Copy
Edit / Paste as a New Layer
Now you should have this
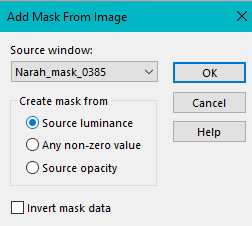
Open the Mask / Narah_mask_0385
Layers / New Mask Layer from Image
(With these settings)
Layers / New Mask Layer from Image
(With these settings)
Effects / Edge Effects / Enhance
Layers / Merge / Merge Group
Layers / Merge Down
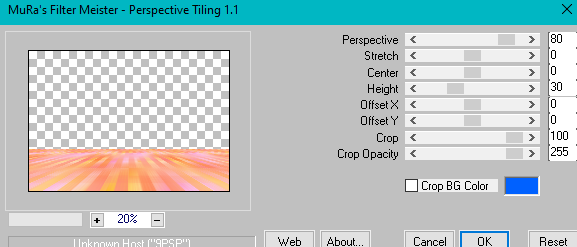
Plugins / MuRa´s Meister / Perspective Tiling
(With these settings)
Layers / Merge / Merge Group
Layers / Merge Down
Plugins / MuRa´s Meister / Perspective Tiling
(With these settings)
5
Open your tube kw/mist/blomst/28/10/10/7_orig
Edit / Copy
Edit / Paste as a New Layer
Image / Resize 45%
Place as in the Example
Set it aside for a moment
We will need to use it in a bit
6
Open a New Image 700 x 700
Selections / Load/Save Selection / Load Selection from Disk
Locate / kw yellow rose 2
(With these settings)
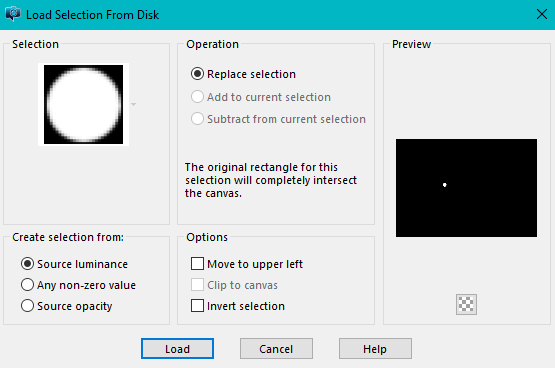
Flood Fill with Color 2 #fcd396
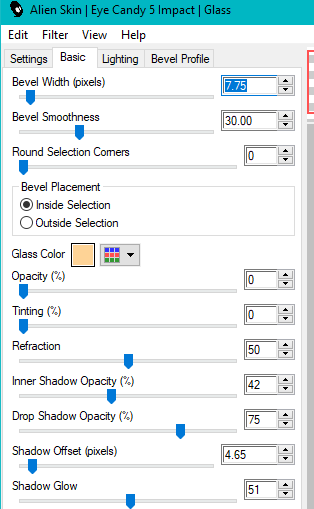
Plugins / Alien Skin Eye Candy 5 Impact / Glass
(With these settings)
Plugins / Alien Skin Eye Candy 5 Impact / Glass
(With these settings)
Selections / Select None
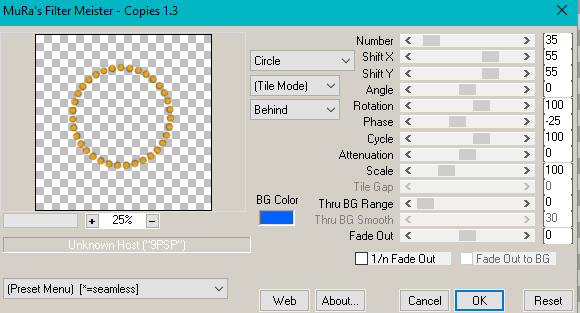
Plugins / MuRa´s Meister / Copies 1.3
(With these settings)
Plugins / MuRa´s Meister / Copies 1.3
(With these settings)
Edit / Copy
Over to the Image you set aside
Edit / Paste as a New Layer
Place as in the Example
7
Layers / New Raster Layer
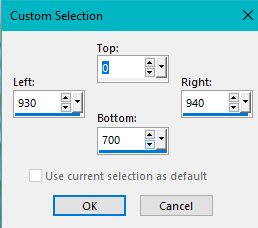
Activate the Selection Tool / Custom Selection
Over to the Image you set aside
Edit / Paste as a New Layer
Place as in the Example
7
Layers / New Raster Layer
Activate the Selection Tool / Custom Selection

(With these settings)
Flood Fill with Color 1 #fdc2dc
Selections / Select None
Effects / 3d Effects / Drop Shadow / 2 / 2 / 50 / 12 Black
8
Open the tube / GL Lace 071722.pspimage
Activate the Layer GL Lace 18
Edit / Copy
Back to your working Image
Edit / Paste as a New Layer
Image / Mirror Horizontal (Mirror in previous versions)
Place as in the Example
Layers / Duplicate
Move the 2nd Image Down so that they extend from Top to Bottom
9
Layers / New Raster Layer
Selections / Load/Save Selections / Load Selection from Disk
Same settings as Step 6
You will need kw yellow rose 4
Flood Fill with Color 2 #fed396
Plugins / Alien Skin Eye Candy 5 Impact / Glass
Same settings as Step 6
Selections / Select None
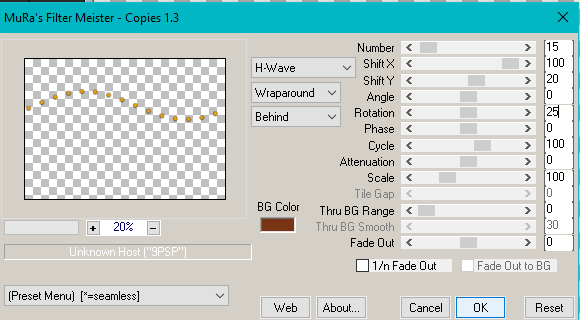
Plugins / MuRa´s Meister / Copies 1.3
Preset / Wave(horizontal) / 15/100/20/0/ Rotation 25 / the rest default
(With these settings)
Selections / Select None
Effects / 3d Effects / Drop Shadow / 2 / 2 / 50 / 12 Black
8
Open the tube / GL Lace 071722.pspimage
Activate the Layer GL Lace 18
Edit / Copy
Back to your working Image
Edit / Paste as a New Layer
Image / Mirror Horizontal (Mirror in previous versions)
Place as in the Example
Layers / Duplicate
Move the 2nd Image Down so that they extend from Top to Bottom
9
Layers / New Raster Layer
Selections / Load/Save Selections / Load Selection from Disk
Same settings as Step 6
You will need kw yellow rose 4
Flood Fill with Color 2 #fed396
Plugins / Alien Skin Eye Candy 5 Impact / Glass
Same settings as Step 6
Selections / Select None
Plugins / MuRa´s Meister / Copies 1.3
Preset / Wave(horizontal) / 15/100/20/0/ Rotation 25 / the rest default
(With these settings)
Take your Eraser Tool / Erase the last 3 out on the right side
Place as in the Example
10
Open the Tube / kw deco 1
Edit / Copy
Edit / Paste as a New Layer
Place on the right side (see Example)
Layers / Duplicate
Image / Mirror Horizontal (Mirror in previous versions)
11
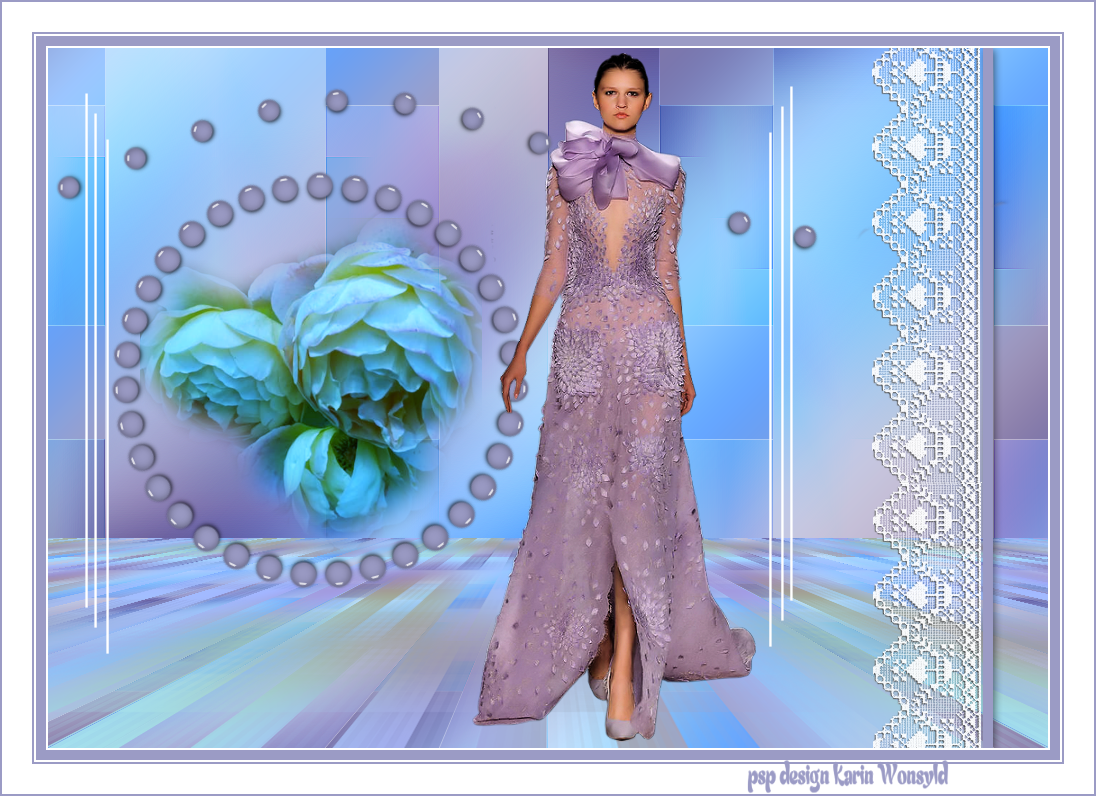
Open a lady tube of your choice
Edit / Copy
Edit / Paste as a New Layer
Place as in the Example
Resize if necessary
Adjust / Sharpness / Sharpen
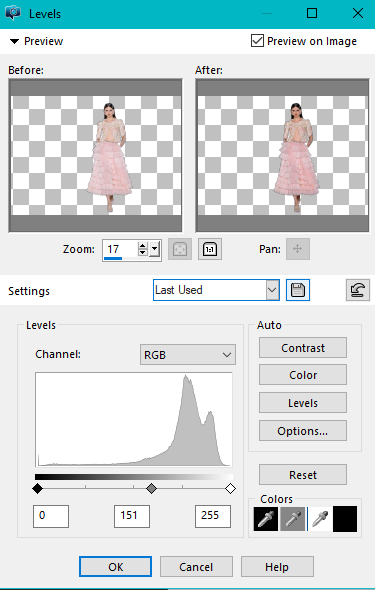
Since my lady tube is a little pale
Adjust / Brightness and Contrast / Levels
(With these settings)
Place as in the Example
10
Open the Tube / kw deco 1
Edit / Copy
Edit / Paste as a New Layer
Place on the right side (see Example)
Layers / Duplicate
Image / Mirror Horizontal (Mirror in previous versions)
11
Open a lady tube of your choice
Edit / Copy
Edit / Paste as a New Layer
Place as in the Example
Resize if necessary
Adjust / Sharpness / Sharpen
Since my lady tube is a little pale
Adjust / Brightness and Contrast / Levels
(With these settings)
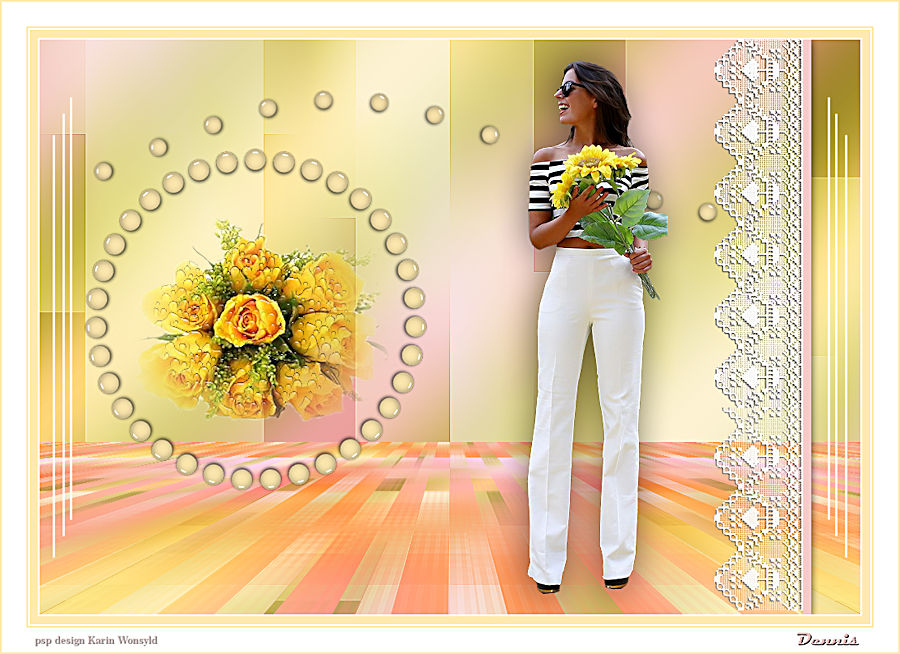
12
Image / Add Borders 2-pixels / White
Image / Add Borders 10-pixels Color 2 #fed396
Image / Add Borders 2-pixels White
Image / Add Borders 2-pixels Color 2 #fed396
Image / Add Borders 3-pixels White
Image / Add Borders 2-pixels Color 2 #fed396
Add your name or watermark
Save as jpg
Hugs Dennis
Image / Add Borders 2-pixels / White
Image / Add Borders 10-pixels Color 2 #fed396
Image / Add Borders 2-pixels White
Image / Add Borders 2-pixels Color 2 #fed396
Image / Add Borders 3-pixels White
Image / Add Borders 2-pixels Color 2 #fed396
Add your name or watermark
Save as jpg
Hugs Dennis
|
Karins B tags
|
Dennis b tags
|
