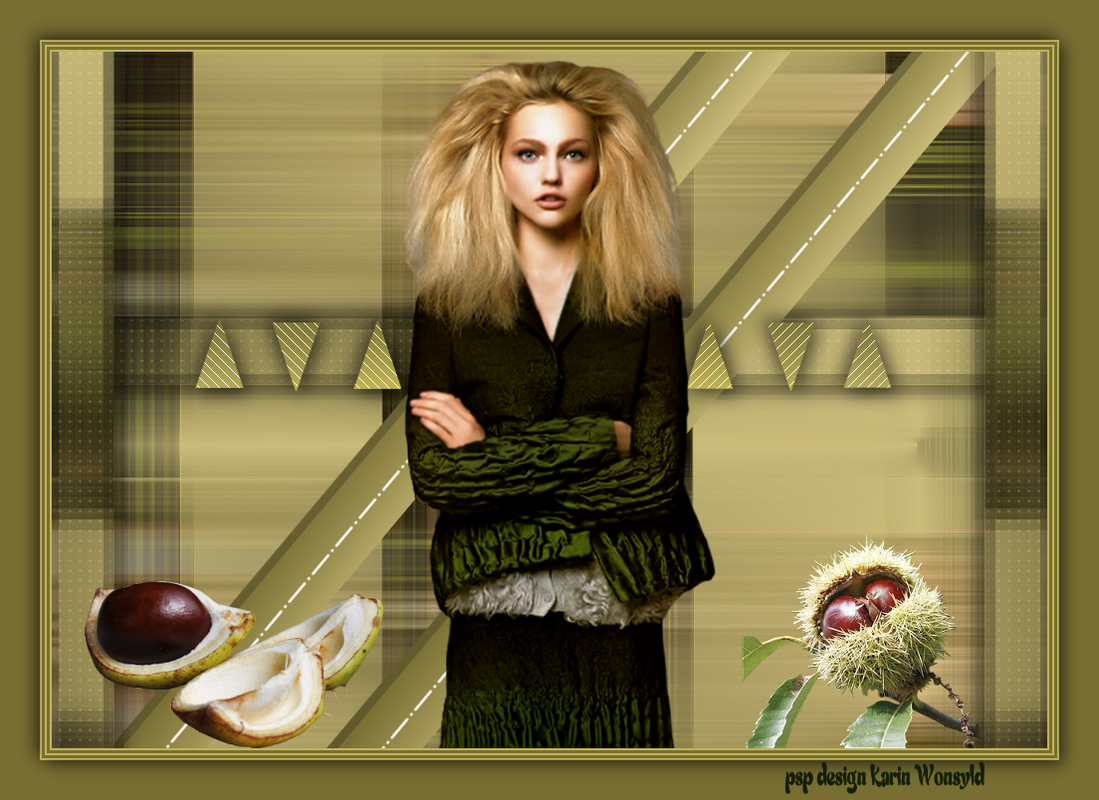
Soon Autumn Again
|
Download the Materials here
|
| ||
You get 3 Selections
Place them in the PSP Selections Folder
Thanks to Luz Cristina for letting me use her Tube
Thanks to Gyűrüsné Molnár Julianna for allowing me to use her tag as inspiration for my tutorials
I used the following 2 Colors
Color 1 #cbbc7b
Color 2 #786e31
Place them in the PSP Selections Folder
Thanks to Luz Cristina for letting me use her Tube
Thanks to Gyűrüsné Molnár Julianna for allowing me to use her tag as inspiration for my tutorials
I used the following 2 Colors
Color 1 #cbbc7b
Color 2 #786e31

Let us begin
1
Open a New Transparent Image 1000 x700
Flood File with Color 1 #cbbc7b
Open the Tube 7515-Luz Cristina
Note
Important you must use my Lady Tube, or you won't get the
same Effect as my Example using another tube with different Colors
You can change the Color on the Layer with the Lady's Tube
(Possibly. in this way)
(Layers - Properties - Blend Mode / and try with different settings)
Edit / Copy
Edit / Paste as a New Layer
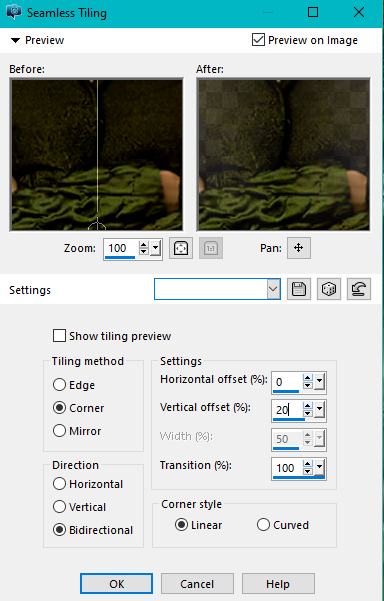
Effects / Image Effects / Seamless Tiling
(with these settings)
1
Open a New Transparent Image 1000 x700
Flood File with Color 1 #cbbc7b
Open the Tube 7515-Luz Cristina
Note
Important you must use my Lady Tube, or you won't get the
same Effect as my Example using another tube with different Colors
You can change the Color on the Layer with the Lady's Tube
(Possibly. in this way)
(Layers - Properties - Blend Mode / and try with different settings)
Edit / Copy
Edit / Paste as a New Layer
Effects / Image Effects / Seamless Tiling
(with these settings)
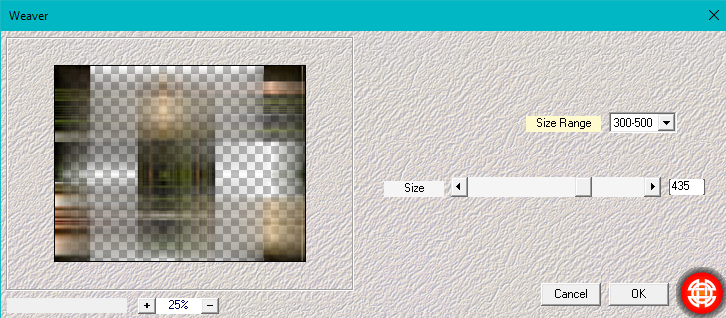
Effects / Plugins / Mehdi / Weaver
(with these settings)
(with these settings)
Effects / Edge Effects / Enhance
(Now you can change the color)
Layers / Merge / Merge Down
2
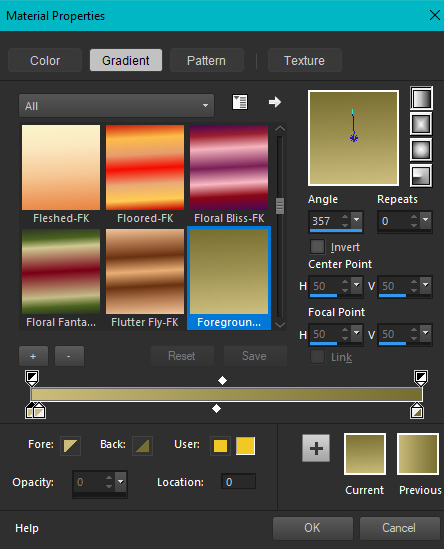
Foreground Color on Color 1 #cbbc7b
Background Color on Color 2 #786e31
Make a Linear Gradient on the Foreground Color
(with these settings) / 357 / 0 / Invert NOT checked
(Now you can change the color)
Layers / Merge / Merge Down
2
Foreground Color on Color 1 #cbbc7b
Background Color on Color 2 #786e31
Make a Linear Gradient on the Foreground Color
(with these settings) / 357 / 0 / Invert NOT checked
Layers / New Raster Layer
Selections / Load/Save Selection / Load Selection from Disk
Locate / kw Soon autumn again 1
(with these settings)
Selections / Load/Save Selection / Load Selection from Disk
Locate / kw Soon autumn again 1
(with these settings)

Flood Fill with the Gradient
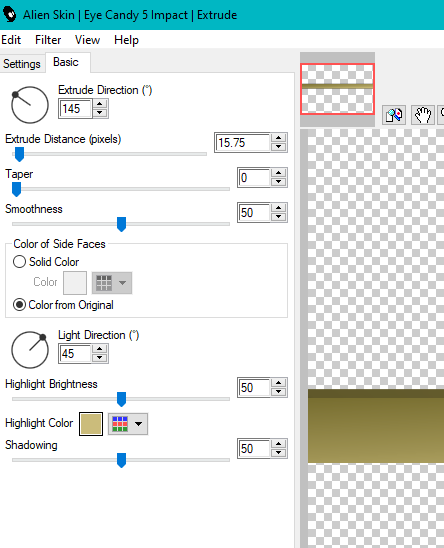
Effects / Plugins / Alien Skin Eye Candy 5: impact / Extrude
(with these settings)
Effects / Plugins / Alien Skin Eye Candy 5: impact / Extrude
(with these settings)
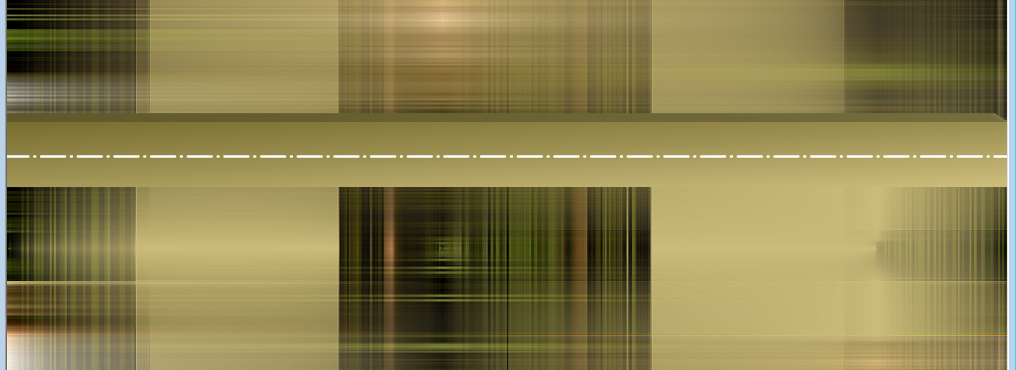
Selections / Select None
Open the Tube / kw deco 1 sonn autumn again
Edit / Copy
Edit / Paste as a New Layer
Place as in the Example below
Open the Tube / kw deco 1 sonn autumn again
Edit / Copy
Edit / Paste as a New Layer
Place as in the Example below
Layers / Merge / Merge Down
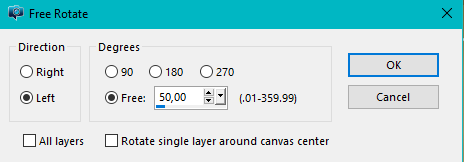
3
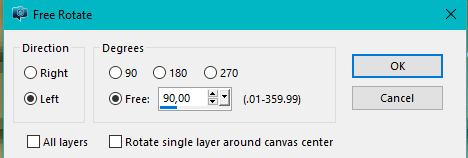
Image / Free Rotate
(with these settings)
3
Image / Free Rotate
(with these settings)
Activate the Pick Tool
Position X 42 / Position Y -42
See the Example below
Position X 42 / Position Y -42
See the Example below
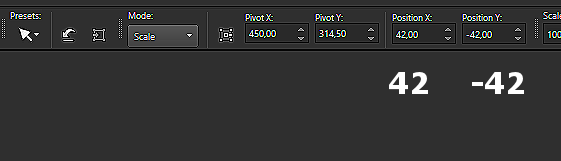
press m to exit the Pick Tool
4
Layers / Duplicate
Activate the Pick Tool
Position X 263 / Position Y -46
See the Example below
4
Layers / Duplicate
Activate the Pick Tool
Position X 263 / Position Y -46
See the Example below
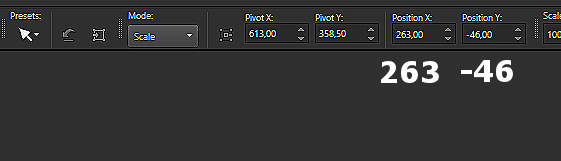
press m to exit the Pick Tool
5
Activate the bottom Layer
Selections / Load/Save Selection / Load Selection from Disk
Locate / kw Soon autumn again 1
same settings as Step 2
Selections / Promote Selection to Layer
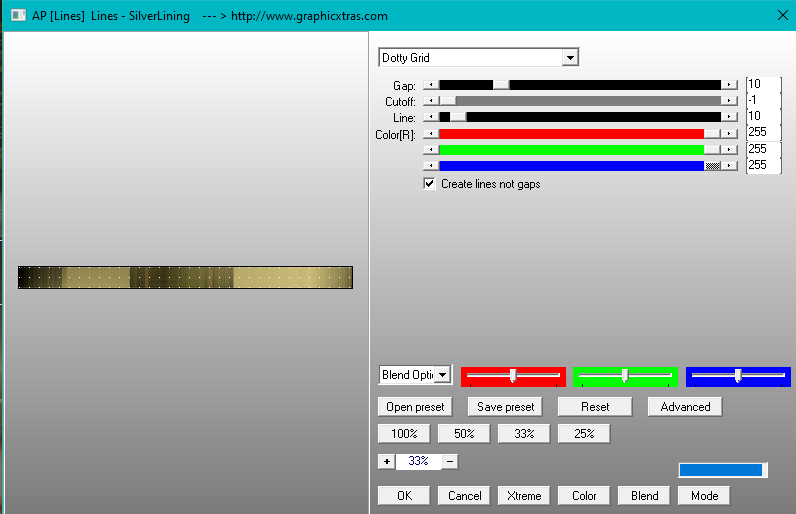
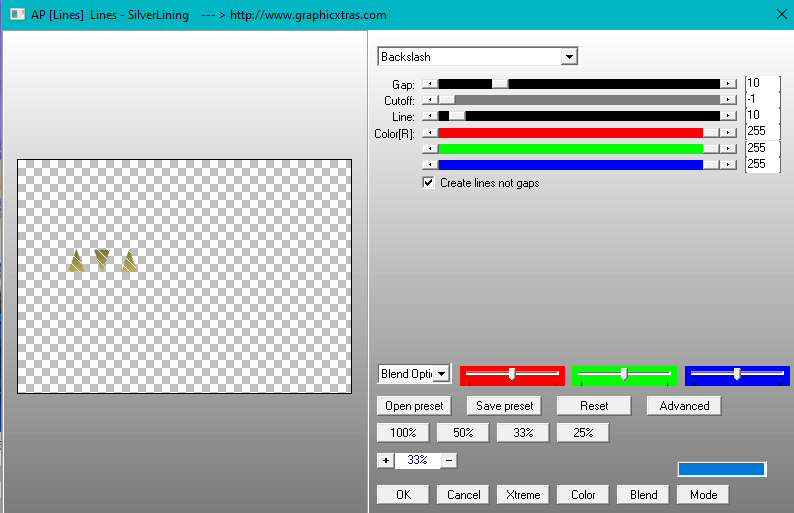
Effects / Plugins / AP [Lines] Lines - Silver Lining
(with these settings)
5
Activate the bottom Layer
Selections / Load/Save Selection / Load Selection from Disk
Locate / kw Soon autumn again 1
same settings as Step 2
Selections / Promote Selection to Layer
Effects / Plugins / AP [Lines] Lines - Silver Lining
(with these settings)
Effects / 3d Effects / Drop Shadow / 5 / 6 / 50 / 25 black
Repeat the Drop Shadow with (minus) / -5 / -6 / 50 / 25 black
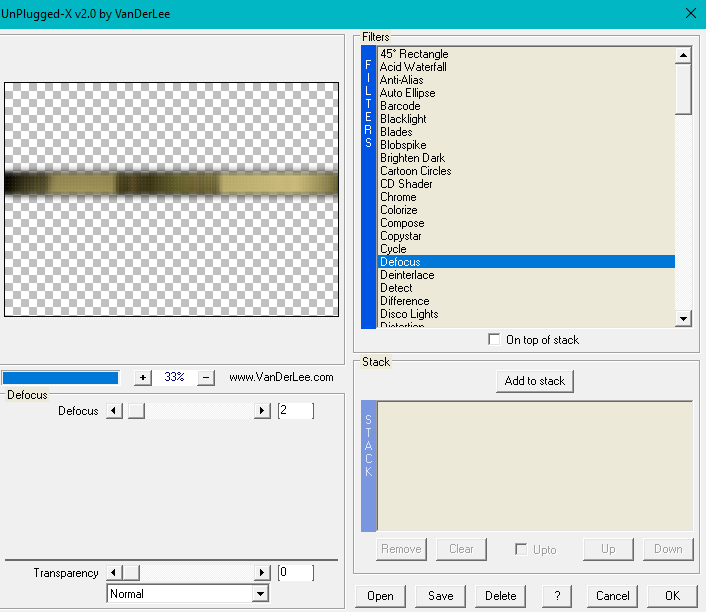
Effects / Plugins / VanDerLee / UnPlugged-X
Repeat the Drop Shadow with (minus) / -5 / -6 / 50 / 25 black
Effects / Plugins / VanDerLee / UnPlugged-X
Selections / Select None
6
Layers / Duplicate
Image / Free Rotate
(with these settings)
6
Layers / Duplicate
Image / Free Rotate
(with these settings)
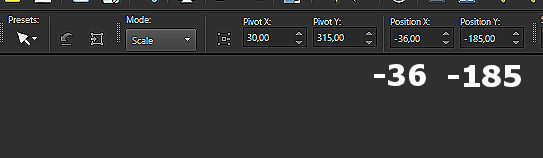
Activate the Pick Tool
Position X -36 / Position Y -185
See Example below
Position X -36 / Position Y -185
See Example below
Press ‘m’ to exit the Pick Tool
Layers / Duplicate
Layers / Merge Down
Image / Mirror
Layers / Merge / Merge Down
Layers / Arrange / Bring to Top
7
Layers / New Raster Layer
Selections / Load/Save Selection / Load Selection from Disk
Locate / kw Soon autumn again 3
same settings as Step 2
Flood Fill with your gradient from point 2
Effects / Plugins / AP(lines) Lines Silver Lining
(with these settings)
Selections / Select None
Layers / Duplicate
Image / Mirror
Layers / Merge / Merge Down
Effects / 3d Effects / Drop Shadow / 5 / 6 / 50 / 25 black
Repeat the Drop Shadow with (minus) -5 / -6 / 50 / 25 black
8
Open the Tube 7515-Luz Cristina
Edit / Copy
Edit / Paste as a New Layer
Image / Resize 1x90 percent
Place as in the Example
9
Open the Tube F-41
Edit / Copy
Edit / Paste as a New Layer
Place so that it goes slightly over the beam on the right side
take your easer tool and erase what goes over
(see my finished result)
10
Open the Tube VC_Farm_El72
Edit / Copy
Edit / Paste as a New Layer
Image / Resize 75 percent
Place on the Left Side as in the Example
11
Image / Add Borders / 2 pixels in Color 1 #cbbc7b
Image / Add Borders / 3 pixels in Color 2 #786e31
Image / Add Borders / 2 pixels in Color 1 #cbbc7b
Image / Add Borders / 3 pixels in Color 2 #786e31
Image / Add Borders / 2 pixels in Color 1 #cbbc7b
Image / Add Borders / 40 pixels in Color 2 #786e31
Activate the Magic Wand and Select the 40-pixel Border
Selections / Invert
Effects / 3d Effects / Drop Shadow / 5 / 6 / 50 / 25 black
Repeat the Drop Shadow with (minus) -5 / -6 / 50 / 25 black
Selections / Selects None
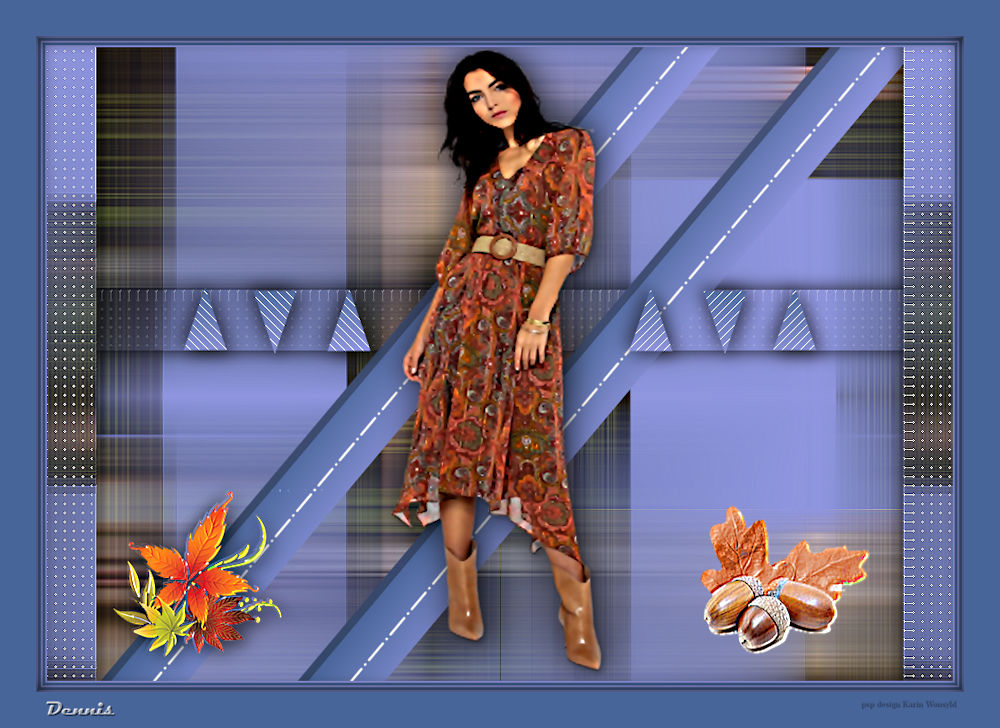
Add your name/watermark
Save as jpg
Hope you enjoyed my rant
Regards, Dennis
Layers / Duplicate
Image / Mirror
Layers / Merge / Merge Down
Effects / 3d Effects / Drop Shadow / 5 / 6 / 50 / 25 black
Repeat the Drop Shadow with (minus) -5 / -6 / 50 / 25 black
8
Open the Tube 7515-Luz Cristina
Edit / Copy
Edit / Paste as a New Layer
Image / Resize 1x90 percent
Place as in the Example
9
Open the Tube F-41
Edit / Copy
Edit / Paste as a New Layer
Place so that it goes slightly over the beam on the right side
take your easer tool and erase what goes over
(see my finished result)
10
Open the Tube VC_Farm_El72
Edit / Copy
Edit / Paste as a New Layer
Image / Resize 75 percent
Place on the Left Side as in the Example
11
Image / Add Borders / 2 pixels in Color 1 #cbbc7b
Image / Add Borders / 3 pixels in Color 2 #786e31
Image / Add Borders / 2 pixels in Color 1 #cbbc7b
Image / Add Borders / 3 pixels in Color 2 #786e31
Image / Add Borders / 2 pixels in Color 1 #cbbc7b
Image / Add Borders / 40 pixels in Color 2 #786e31
Activate the Magic Wand and Select the 40-pixel Border
Selections / Invert
Effects / 3d Effects / Drop Shadow / 5 / 6 / 50 / 25 black
Repeat the Drop Shadow with (minus) -5 / -6 / 50 / 25 black
Selections / Selects None
Add your name/watermark
Save as jpg
Hope you enjoyed my rant
Regards, Dennis
|
Dennis B tag
|
