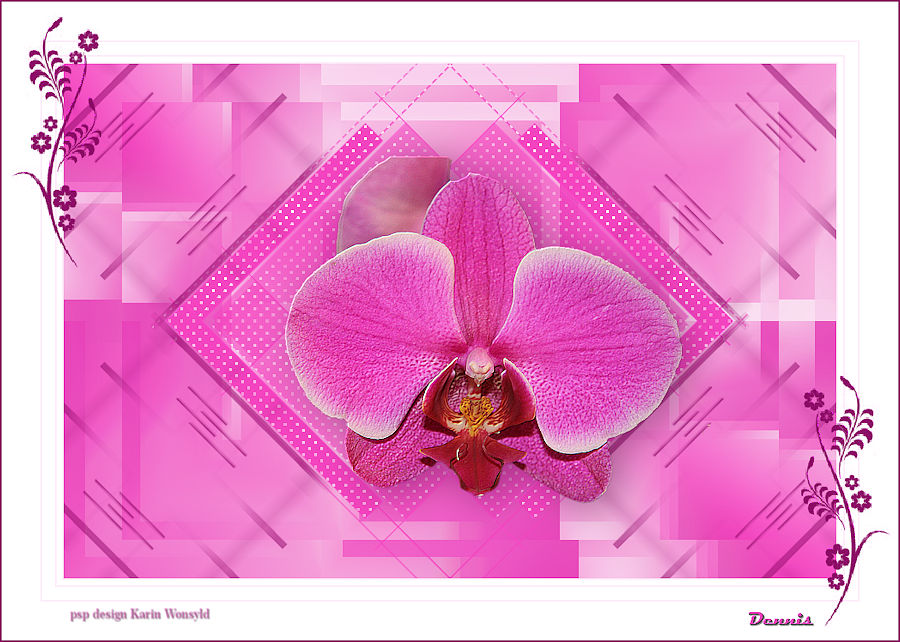
Tutorials Orquideas (Orchids)
|
You get your materials here
|
| ||
Plugins you should use in this tut
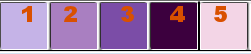
Plugins / Mehdi / Wavy Lab 1.1
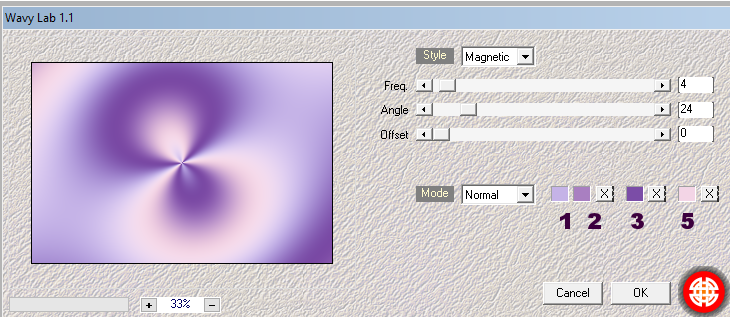
Plugins / Mehdi / Sorting Tiles
Effects / Plugins / Filters Unlimited 2.0 / Simple / Top Left Mirror
Effects / Plugins / AP [Lines] / Lines SilverLining
Thanks to Grisi because I can use your tubes in my tutorials
Tubes from Grisi that are in this tutorial should not be posted on other websites of forums
And also not share without permission from her
You get a Brush / File / Export / Custom Brush
remember to name it
You get a selection it should be placed in the the PSP Selections Folder
I used these Colors
Color 1 #c5b3e7
Color 2 #a97fc1
Color 3 #7b4da7
Color 4 #3c003e
Color 5 #f3d5e6
Plugins / Mehdi / Wavy Lab 1.1
Plugins / Mehdi / Sorting Tiles
Effects / Plugins / Filters Unlimited 2.0 / Simple / Top Left Mirror
Effects / Plugins / AP [Lines] / Lines SilverLining
Thanks to Grisi because I can use your tubes in my tutorials
Tubes from Grisi that are in this tutorial should not be posted on other websites of forums
And also not share without permission from her
You get a Brush / File / Export / Custom Brush
remember to name it
You get a selection it should be placed in the the PSP Selections Folder
I used these Colors
Color 1 #c5b3e7
Color 2 #a97fc1
Color 3 #7b4da7
Color 4 #3c003e
Color 5 #f3d5e6
Set your Foreground Color to Color One / #c5b3e7 / Background Color to Color 5 #f3d5e6
Let us begin
1.
Open a New Image 900 x 600
Plugins / Mehdi / Wavy Lab 1.1 (with the following settings)
Let us begin
1.
Open a New Image 900 x 600
Plugins / Mehdi / Wavy Lab 1.1 (with the following settings)
2.
Adjust / Blur / Gaussian Blur 35
Effects / Image Effects / Seamless Tiling (with the following settings)
Adjust / Blur / Gaussian Blur 35
Effects / Image Effects / Seamless Tiling (with the following settings)

4.
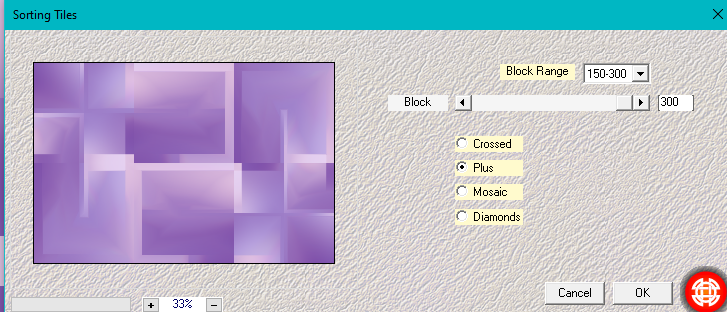
Plugins / Mehdi / Sorting Tiles (with the following settings)
Plugins / Mehdi / Sorting Tiles (with the following settings)
Effects / Plugins / Filters Unlimited 2.0 / Simple / Top Left Mirror
Plugins / Mehdi / Sorting Tiles (with the following settings)
Plugins / Mehdi / Sorting Tiles (with the following settings)
5.
Layers / Duplicate
Image / Resize 85%
Save the working image
6.
Open a New Image 500 x 500
Flood Fill with Color 3 #7b4ba7
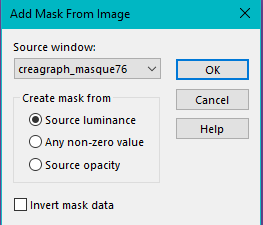
Open the Mask creagraph_masque76
Layers / New Mask Layer / from Image (with the following settings)
Layers / Duplicate
Image / Resize 85%
Save the working image
6.
Open a New Image 500 x 500
Flood Fill with Color 3 #7b4ba7
Open the Mask creagraph_masque76
Layers / New Mask Layer / from Image (with the following settings)
Layers / Merge / Merge / Group
Edit / Copy
Open the working Image you saved before
Edit / Paste as a New Layer
Don’t move, it’s fine
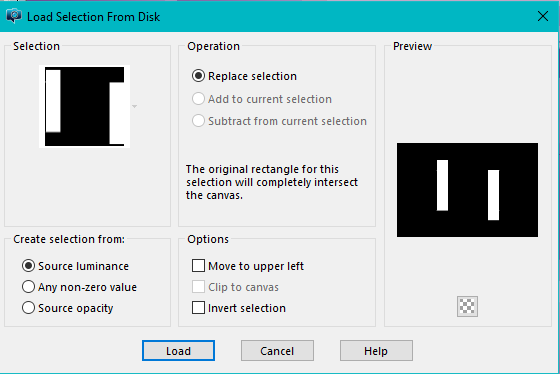
Selections / Load/Save Selection / Load Selections from Disk
Locate / Orquídeas kw (with the following settings)
Edit / Copy
Open the working Image you saved before
Edit / Paste as a New Layer
Don’t move, it’s fine
Selections / Load/Save Selection / Load Selections from Disk
Locate / Orquídeas kw (with the following settings)
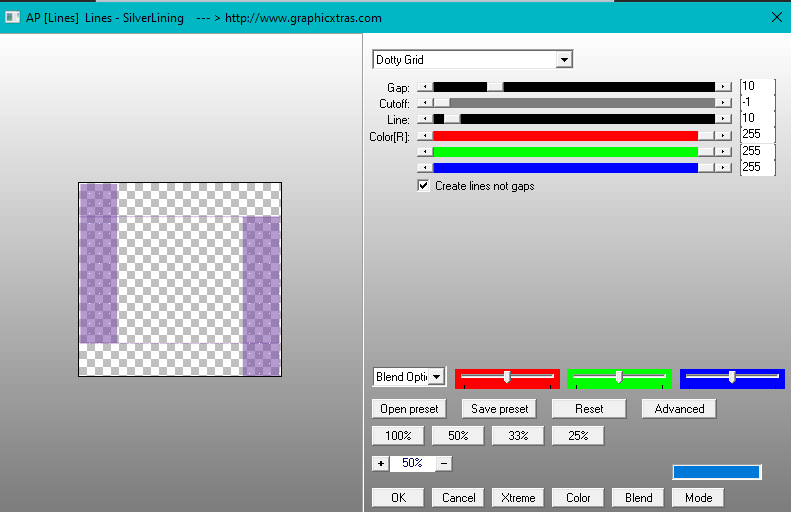
Effects / AP [Lines] / Lines SilverLining
(with the following settings)
(with the following settings)
Selections / Select None
7.
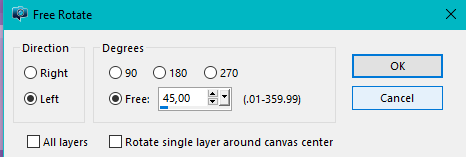
Image / Free Rotate (with the following settings)
7.
Image / Free Rotate (with the following settings)
Effects / Edge Effects / Dilate (it sits just above Enhance)
Layers / Duplicate
Image / Mirror Horizontal (Mirror in previous versions)
Save the working image
8.
Open a New Image 500 x 500
Flood Fill with Color 4 #3c003e
Open the Mask creation tine.png
Layers / New Mask Layer from Image
(with the same settings as Step Six)
Layers Merge Group
Edit / Copy
the working Image you saved before
Edit / Paste as New Layer
Image / Resize 60%
Image / Free Rotate 45˚ Left
Activate the Pick Tool (with the following settings
Press “M” on the Keyboard to close the Pick Tool
9.
Layers / Duplicate
Image / Mirror Horizontal (Mirror in earlier versions)
Layers / Merge / Merge Down
Layers / Duplicate
Image / Mirror Vertical (Flip in earlier versions)
Layers / Merge / Merge Down
10.
Open the Tube Grisi_Tube_Orquideas.pspImage
Edit / Copy
Edit / Paste as a New Layer
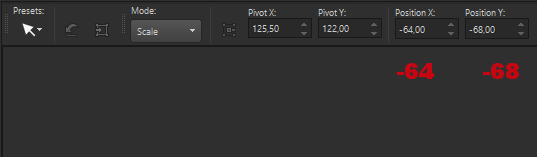
Activate the Pick Tool (with the following settings)
Change the Settings to x 255 to and position y to 124
Press “M” on the Keyboard to close the Pick Tool
11.
Image Add Borders 2 pixels in Color 5 #f3d5e6
Image Add Borders 6 pixels in Color #ffffff
Image Add Borders 2 pixels in Color 5 #f3d5e6
Image Add Borders 15 pixels in Color #ffffff
Image Add Borders 2 pixels in Color 5 #f3d5e6
Image Add Borders 45 pixels Color #ffffff
Image Add Borders 2 pixels Color 4 #7b4da7
12.
Layers / New Raster Layer
Activate the Paint Brush Tool / Locate Floral_Deco_Brushes_by_ro_stock
1 set size the to 400 / Stamp 2 times with your Color 1 #c5b3e7
In the top left corner (see the example)
Layers / Duplicate
Image / Mirror
Place it in the right bottom corner
Layers / Merge / Merge Down
Effects / Plugins / 3D Effects / Drop Shadow 3 / /3 / 35 / 20 Color 4
#3c003e
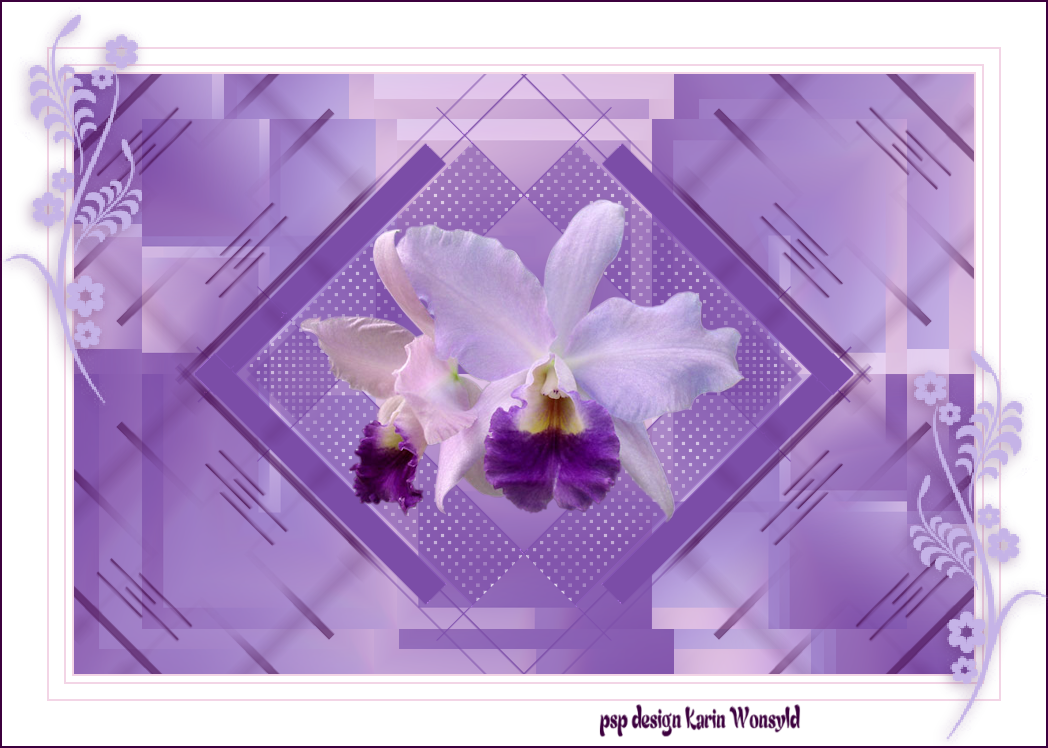
Add your name or watermark
File / Export / jpg Optimizer
Save
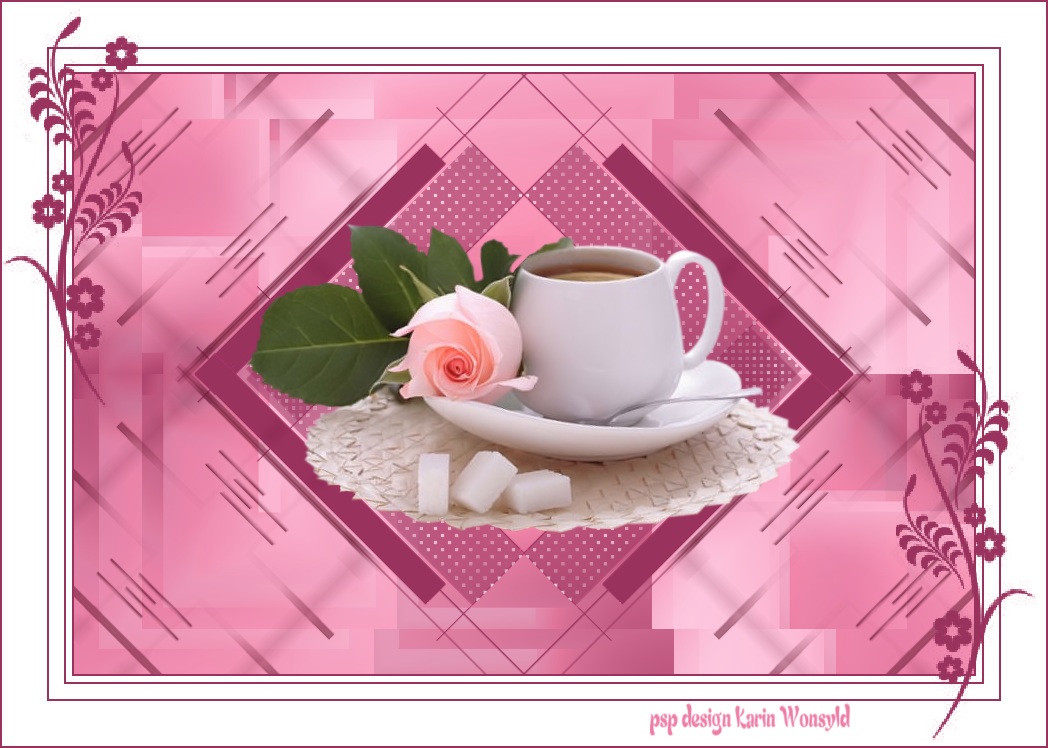
Regards Dennis
9.
Layers / Duplicate
Image / Mirror Horizontal (Mirror in earlier versions)
Layers / Merge / Merge Down
Layers / Duplicate
Image / Mirror Vertical (Flip in earlier versions)
Layers / Merge / Merge Down
10.
Open the Tube Grisi_Tube_Orquideas.pspImage
Edit / Copy
Edit / Paste as a New Layer
Activate the Pick Tool (with the following settings)
Change the Settings to x 255 to and position y to 124
Press “M” on the Keyboard to close the Pick Tool
11.
Image Add Borders 2 pixels in Color 5 #f3d5e6
Image Add Borders 6 pixels in Color #ffffff
Image Add Borders 2 pixels in Color 5 #f3d5e6
Image Add Borders 15 pixels in Color #ffffff
Image Add Borders 2 pixels in Color 5 #f3d5e6
Image Add Borders 45 pixels Color #ffffff
Image Add Borders 2 pixels Color 4 #7b4da7
12.
Layers / New Raster Layer
Activate the Paint Brush Tool / Locate Floral_Deco_Brushes_by_ro_stock
1 set size the to 400 / Stamp 2 times with your Color 1 #c5b3e7
In the top left corner (see the example)
Layers / Duplicate
Image / Mirror
Place it in the right bottom corner
Layers / Merge / Merge Down
Effects / Plugins / 3D Effects / Drop Shadow 3 / /3 / 35 / 20 Color 4
#3c003e
Add your name or watermark
File / Export / jpg Optimizer
Save
Regards Dennis
|
Karin b tags
|
Dennis b tags
|
