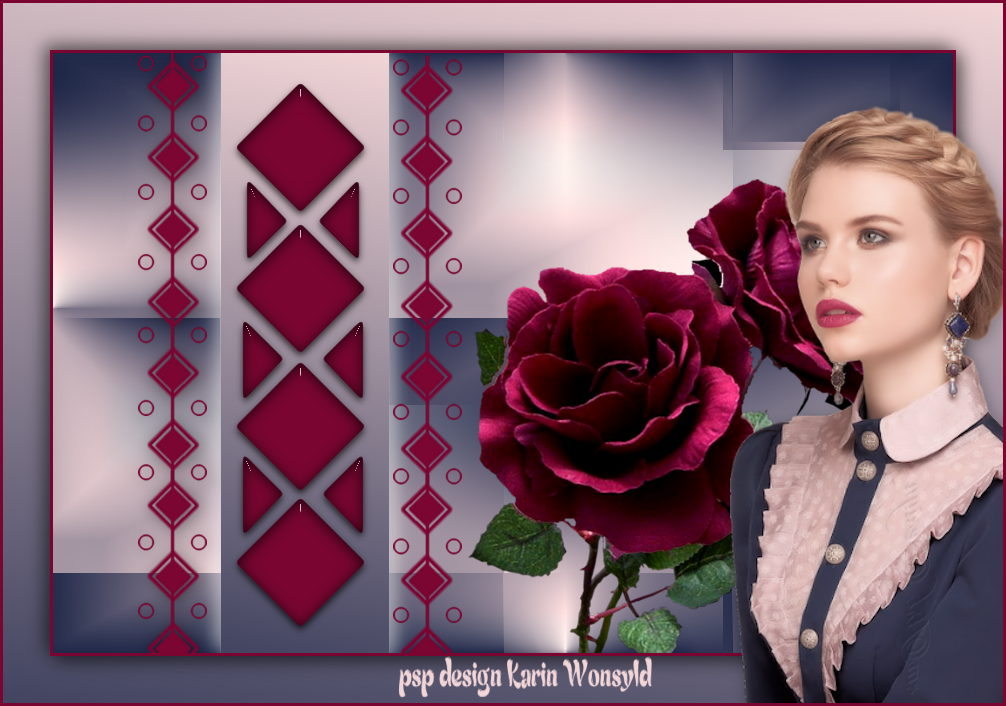
Tutorials lady in blue and roses
|
here you will find the original tutorials from Karin
|

|
|
Materialer here
|
| ||
Thank you, Karin for allowing me to translate your tutorials
Lady Tube of your choice
I used a tube from “smart design
Thank you, Martha Smart for allowing me to use your images in my tutorial
Tubes that are “smart design that are used in the tutorial are not to be used for other purposes or posted on any web site without permission from Martha.
Thank you, Martha for the idea for this tutorial
Included in the Materials are 3 Selections
Place them in your PSP Selections Folder
I used the following colors
Color 1 #f1d5d7 / Color 2 #424460 / Color 3 #7a0631

Let us begin
1.
Open a New Image 900 x 600
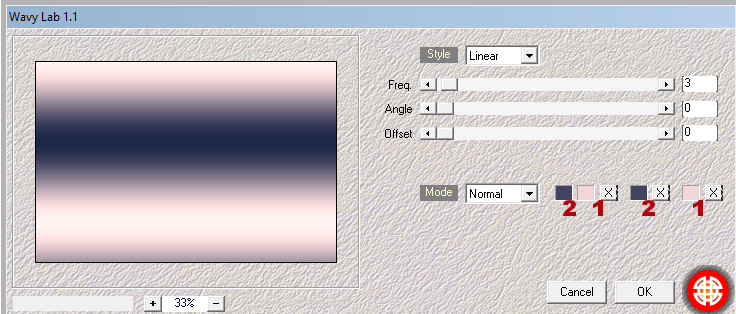
Effects / Plugins / Mehdi Wavy Lab 1.0 (with the following settings)
1.
Open a New Image 900 x 600
Effects / Plugins / Mehdi Wavy Lab 1.0 (with the following settings)
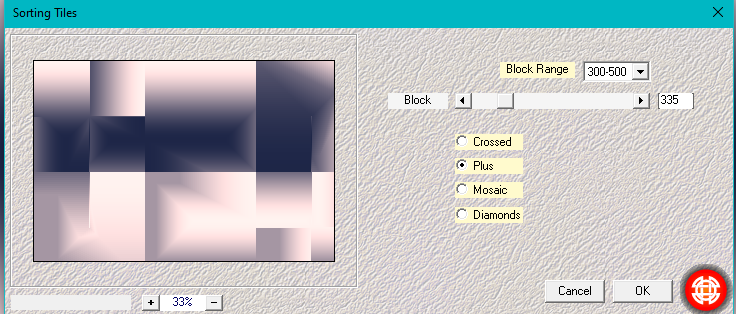
Effects / Plugins / Mehdi Sorting Tiles (with the following settings)
2.
Effects / Image Effects / Seamless Tiling (with the following settings)
Effects / Image Effects / Seamless Tiling (with the following settings)
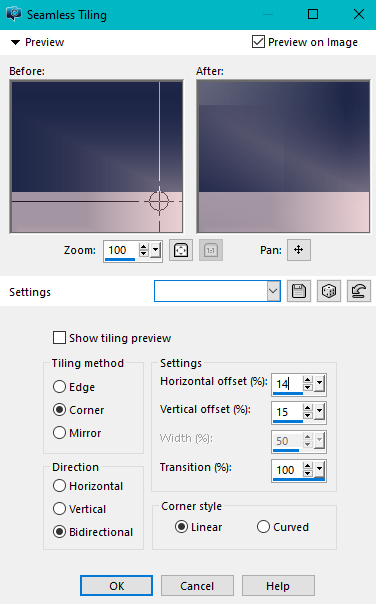
Image / Mirror / Mirror Vertical
3.
Set the Foreground Color to Color 1 / #f1d5d7
Background Color to Color 2 / #424460
Make a Linear Gradient (with the following settings)
3.
Set the Foreground Color to Color 1 / #f1d5d7
Background Color to Color 2 / #424460
Make a Linear Gradient (with the following settings)

Layers / New Raster Layer
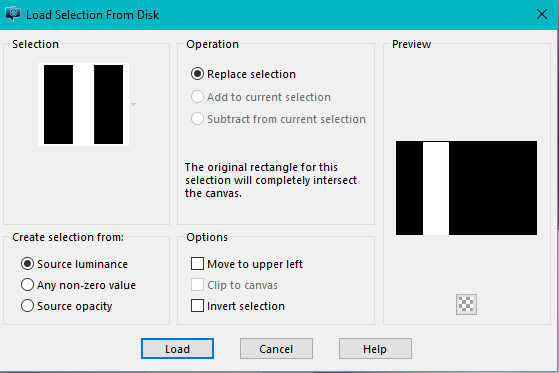
Selections / Load/Save Selections / Load Selection from Disk
Locate the Selection kw 1-2-3 / Load
Selections / Load/Save Selections / Load Selection from Disk
Locate the Selection kw 1-2-3 / Load
Flood Fill with the Gradient
Selections / Select None
Effects / 3d Effects / Drop Shadow / 5 / 6 / 50 / 25 Black
Repeat the Drop Shadow with -5 / -6 / 50 / 25 Black
4.
Layers / New Raster Layer
Selections / Load/Save Selections / Load Selection from Disk
Locate kw 1 / Load
Flood Fill with Color 3 / #7a0631
Keep Selected
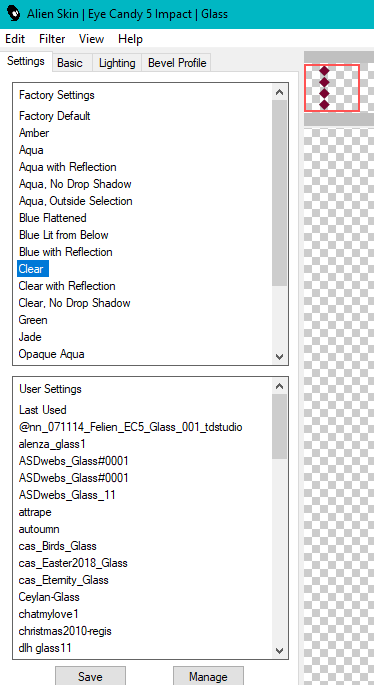
Effects / Plugins / Alien Skin Eye Candy 5 Impact / Glass
Settings Tab / Clear
Selections / Select None
Effects / 3d Effects / Drop Shadow / 5 / 6 / 50 / 25 Black
Repeat the Drop Shadow with -5 / -6 / 50 / 25 Black
4.
Layers / New Raster Layer
Selections / Load/Save Selections / Load Selection from Disk
Locate kw 1 / Load
Flood Fill with Color 3 / #7a0631
Keep Selected
Effects / Plugins / Alien Skin Eye Candy 5 Impact / Glass
Settings Tab / Clear
Selections / Select None
5.
Layers / New Raster Layer
Selections / Load/Save Selections / Load Selection from Disk
Locate Selection kw 1-2 / Load
Flood Fill with Color 3 / #7a0631
Keep Selected
Effects / Plugins / Alien Skin Eye Candy 5 Impact / Glass
Settings Tab / Clear
6.
Open the Tube kw deco lady in blue and roses 2
Edit / Copy
Edit / Paste as a New Layer
Effects / 3d Effects / Drop Shadow / 2 / 2 / 30 / 25 Black
Layers / Duplicate
Place as in the Example
7
. Open the Tube kw Two part roses
Edit / Copy
Edit / Paste as a New Layer
Place as in the Example
Effects / 3d Effects / Drop Shadow / 2 / 2 / 30 / 25 Black
8.
Image Add Borders 2 pixels Color 3 / #7a0631
Layers / Promote Background Layer
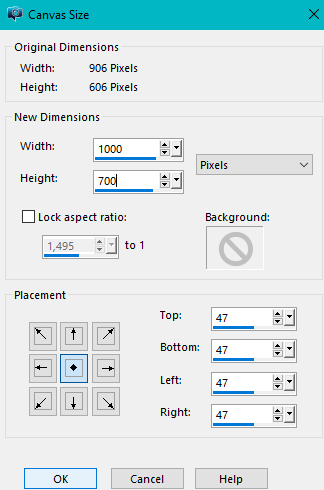
Image / Canvas Size (with the following settings)
5.
Layers / New Raster Layer
Selections / Load/Save Selections / Load Selection from Disk
Locate Selection kw 1-2 / Load
Flood Fill with Color 3 / #7a0631
Keep Selected
Effects / Plugins / Alien Skin Eye Candy 5 Impact / Glass
Settings Tab / Clear
6.
Open the Tube kw deco lady in blue and roses 2
Edit / Copy
Edit / Paste as a New Layer
Effects / 3d Effects / Drop Shadow / 2 / 2 / 30 / 25 Black
Layers / Duplicate
Place as in the Example
7
. Open the Tube kw Two part roses
Edit / Copy
Edit / Paste as a New Layer
Place as in the Example
Effects / 3d Effects / Drop Shadow / 2 / 2 / 30 / 25 Black
8.
Image Add Borders 2 pixels Color 3 / #7a0631
Layers / Promote Background Layer
Image / Canvas Size (with the following settings)
Layers / New Raster Layer
Flood Fill with the Gradient (from Step 3)
Layers / Arrange / Send to Bottom
Activate the Top Raster Layer
Effects / 3d Effects / Drop Shadow / 5 / 6 / 50 / 25 Black
Repeat the Drop Shadow with -5 / -6 / 50 / 25 Black
9.
Open a Lady Tube of your choice
Image / Mirror Vertical (head and shoulder face the middle)
Resize if necessary
Effects / 3d Effects / Drop Shadow / 2 / 2 / 30 / 25 Black
Layers / New Raster Layer
Add your name or watermark
Image / Add Borders / 2 pixels Color 3 #7a0631
File Export / jpg Optimizer
Save
Hugs Dennis
|
Dennis b tags

|
Karins b tags

|
