Tutorials Inge
|
here you will find the original tutorials from Karin
|

|
|
You get The materials here
|
| ||
This Tutorial is dedicated to Inge to always be good at helping
and testing my tuts when the time is right
and good talk
Thanks to Martha smart design because I may use your tubes in my Tutorials
Tubes from smart design's in this tutorial
may not be placed on any other websites. Forums or shared without permission from her
Thank you, Karin for allowing me to translate your tutorials
You get a texture fbdmnmceohpiljjj
Place it in the folder PSP Textures
You get an Alpha Channel
I used the following Colors
Color 1 #e59689
Color 2 #d75945
Color 3 #6d2317
Color 4 #f3cc87

Let us begin
1.
Open your Alpha Channel / Window Duplicate We will work on the Copy if something goes wrong, you still have the Original
Flood Fill with Color 1 #e59689
Selections / Select All
Open the Tube smArt_1026
Edit Copy
Edit / Paste into Selection
Selections / Select None
Effects / Image Effects / Seamless Tiling
(with the following settings)

2.
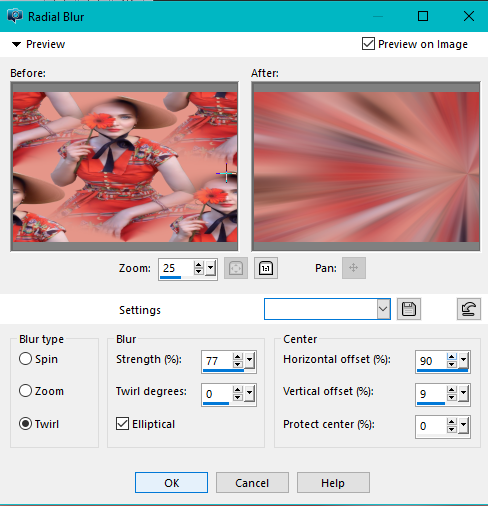
Adjust / Blur / Radial Blur
Adjust / Blur / Radial Blur
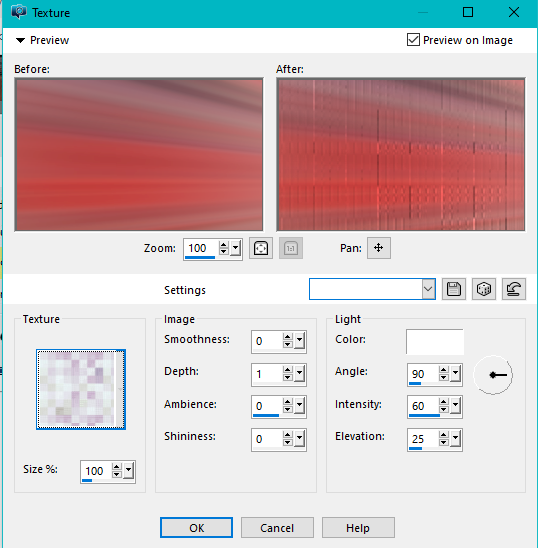
Effects / Texture Effects / Texture / fbdmnmceohpiljjj
(with the following settings)
(with the following settings)
3.
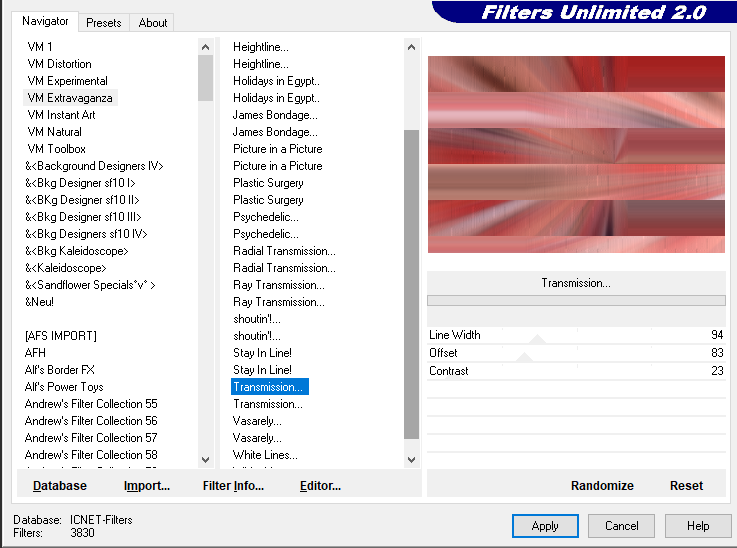
Plugins / Filters Unlimited 2.0 / VM Extravaganza / Transmission
(with the following settings)
Plugins / Filters Unlimited 2.0 / VM Extravaganza / Transmission
(with the following settings)
Plugins / Filters Unlimited 2.0 / Simple / Blintzes
Layers Duplicate
Image / Mirror Vertical (Flip in earlier versions)
Layers / Properties / Opacity 35
Layers Merge Down
Effects / Edge Effects / Enhance
4.
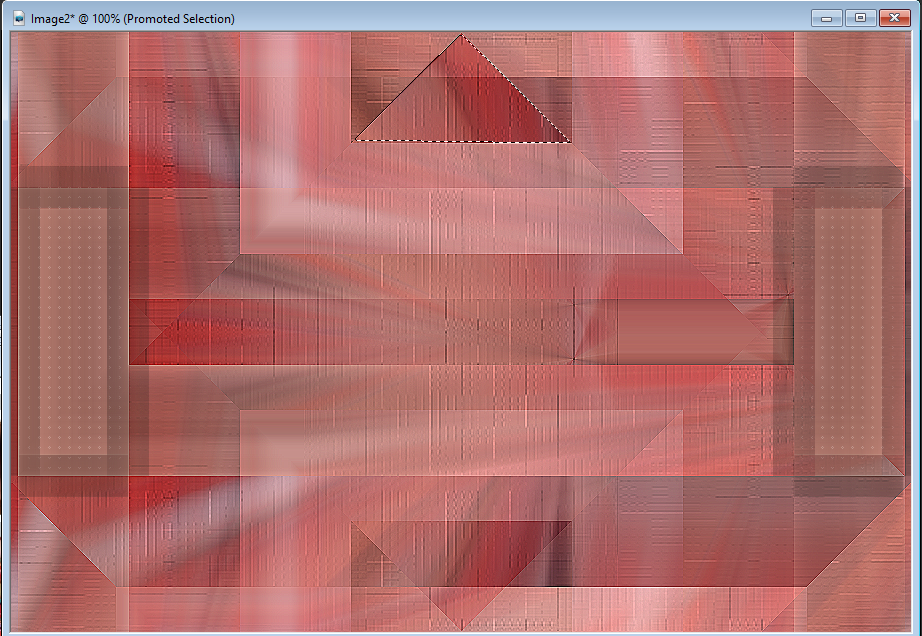
Activate the Selection Tool
Make a Selection like I did (see example below)
Layers Duplicate
Image / Mirror Vertical (Flip in earlier versions)
Layers / Properties / Opacity 35
Layers Merge Down
Effects / Edge Effects / Enhance
4.
Activate the Selection Tool
Make a Selection like I did (see example below)
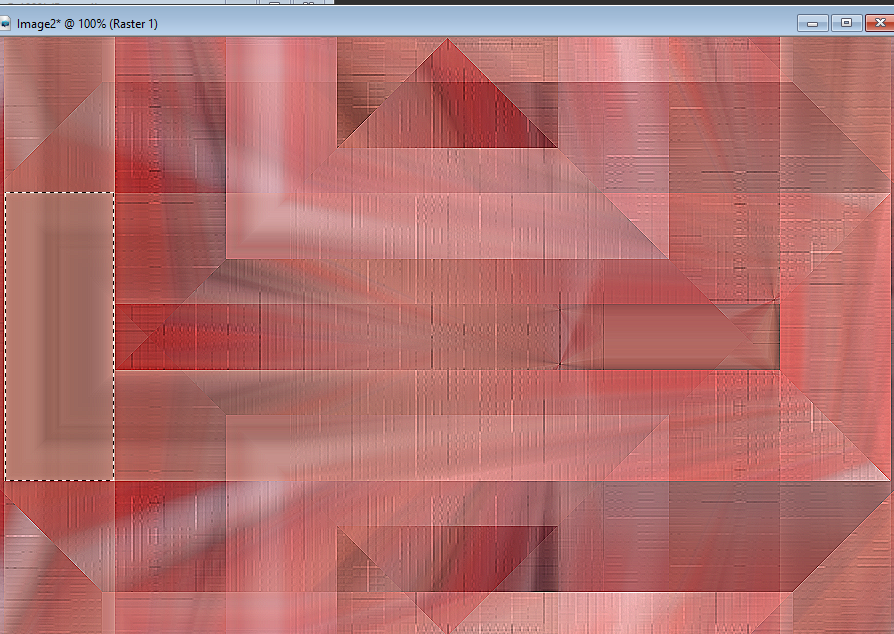
Selections / Promote Selections to Layer
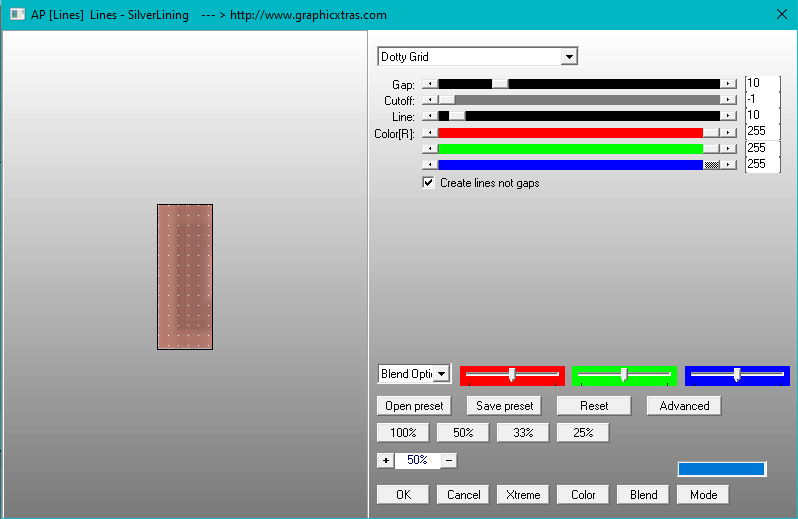
AP [Lines] Lines / SilverLining
(with the following settings)
AP [Lines] Lines / SilverLining
(with the following settings)
Selections / Select None
Layers Duplicate
Image Mirror Horizontal (Mirror in previous versions)
Layers / Merge Down
5.
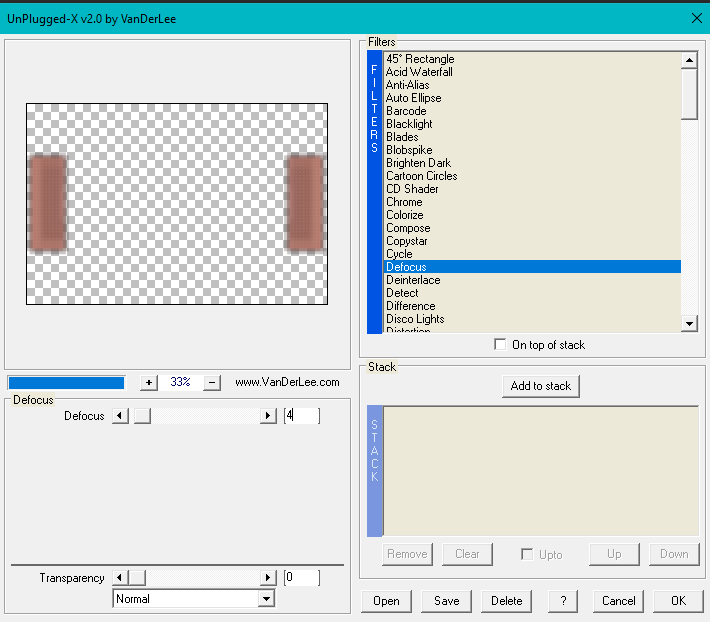
Plugins / VanDerLee / Unplugged X
(with the following settings)
Layers Duplicate
Image Mirror Horizontal (Mirror in previous versions)
Layers / Merge Down
5.
Plugins / VanDerLee / Unplugged X
(with the following settings)
6.
Activate the Bottom Raster Layer
Activate the Freehand Selection Tool
(with the following settings)
Activate the Bottom Raster Layer
Activate the Freehand Selection Tool
(with the following settings)
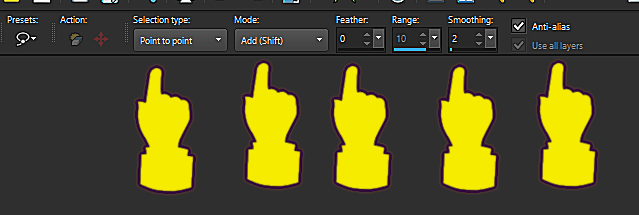
And draw a Selections like I have done
(see the example below)
(see the example below)
Selections / Select None
Selections / Promote Selection to Layer
AP [Lines] Lines / SilverLining
(same settings as Step 4)
Selections / Select None
Layers / Duplicate
Image Mirror Vertical (Flip in previous versions)
Layers / Merge / Merge Down
7.
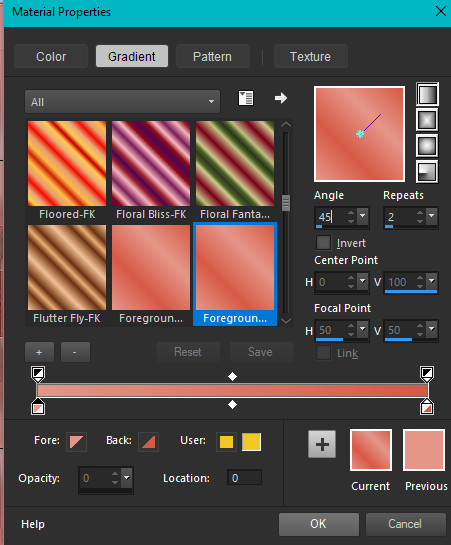
In the Materials Palette make a Linear Gradient
with Colors 1 #e59689 and 2 #d75945
Selections / Promote Selection to Layer
AP [Lines] Lines / SilverLining
(same settings as Step 4)
Selections / Select None
Layers / Duplicate
Image Mirror Vertical (Flip in previous versions)
Layers / Merge / Merge Down
7.
In the Materials Palette make a Linear Gradient
with Colors 1 #e59689 and 2 #d75945
Activate the Top Raster Layer
Layers / New Raster Layer
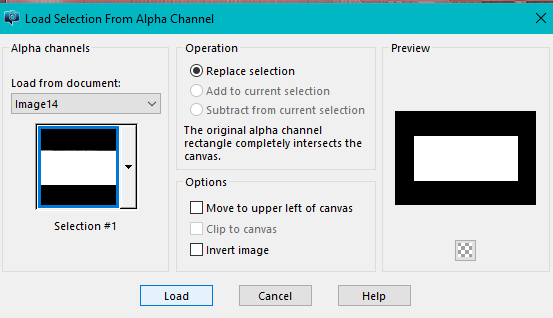
Selections / Load/Save Selection / Load Selection from Alpha Channel
Locate No. 1
(with the following settings)
Layers / New Raster Layer
Selections / Load/Save Selection / Load Selection from Alpha Channel
Locate No. 1
(with the following settings)
Flood Fill with the Gradient
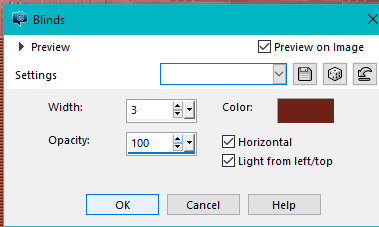
Effects / Texture Effects / Blinds (with the following settings)
Effects / Texture Effects / Blinds (with the following settings)
Selections / Select None
Layers / Properties / Opacity 75
8.
Activate the Lower Raster Layer
Selections / Load/Save Selection / Load Selection from Alpha Channel
Locate No. 2
(with the same settings as in Step 7)
Selections / Promote Selection to a Layer
Selections / Select None
Layers / Arrange / Bring to Top
Effects / 3d Effects / Drop Shadow 5 / 5 / 100 / 10 Color 3 #6d2317
Layers / Duplicate
Image / Mirror Horizontal (Mirror in previous versions
9.
Activate the Top Raster Layer
Layers / New Raster Layer
Selections / Load/Save Selection / Load Selection from Alpha Channel
Locate No. 3
(with the same settings as in Step 7)
Flood Fill with Color 4 #f3cc87
Selection / Modify / Contract by 30
Flood Fill with the Gradient
(with the same settings as in Step 7)
Open the tube smArt_deco_39
Edit / Copy
Edit / Paste into Selection
Keep Selected
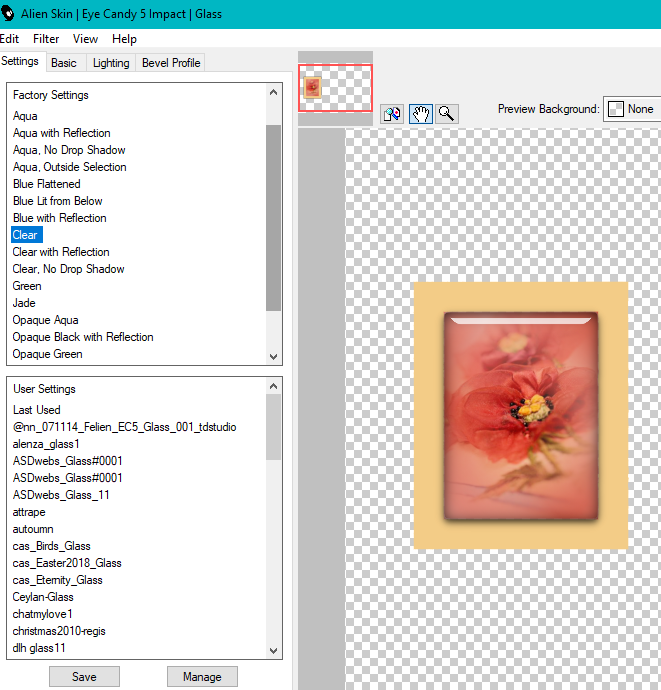
Effects / Plugins / Alien Skin Eye Candy 5 Impact / Glass
(with the following settings)
Layers / Properties / Opacity 75
8.
Activate the Lower Raster Layer
Selections / Load/Save Selection / Load Selection from Alpha Channel
Locate No. 2
(with the same settings as in Step 7)
Selections / Promote Selection to a Layer
Selections / Select None
Layers / Arrange / Bring to Top
Effects / 3d Effects / Drop Shadow 5 / 5 / 100 / 10 Color 3 #6d2317
Layers / Duplicate
Image / Mirror Horizontal (Mirror in previous versions
9.
Activate the Top Raster Layer
Layers / New Raster Layer
Selections / Load/Save Selection / Load Selection from Alpha Channel
Locate No. 3
(with the same settings as in Step 7)
Flood Fill with Color 4 #f3cc87
Selection / Modify / Contract by 30
Flood Fill with the Gradient
(with the same settings as in Step 7)
Open the tube smArt_deco_39
Edit / Copy
Edit / Paste into Selection
Keep Selected
Effects / Plugins / Alien Skin Eye Candy 5 Impact / Glass
(with the following settings)
Selections / Select None
Layers / Duplicate
Image Mirror (Mirror in previous versions
10.
Activate the lower Raster Layer
Layers / New Raster Layer
Flood Fill with Color 1 #e59689
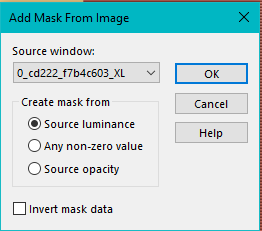
Open the Mask / 0_cd222_f7b4c603_XL
Layers / New Mask Layer / from Image (with the following settings)
Layers / Duplicate
Image Mirror (Mirror in previous versions
10.
Activate the lower Raster Layer
Layers / New Raster Layer
Flood Fill with Color 1 #e59689
Open the Mask / 0_cd222_f7b4c603_XL
Layers / New Mask Layer / from Image (with the following settings)
Layers / Merge Group
Adjust / Sharpness / Sharpen
11.
Image / Add Borders 1-pixel Color 3 #6d2317
Image / Add Borders 20-pixels Color 4 #f3cc87
Image / Add Borders 1-pixel Color 3 #6d2317
Image / Add Borders 5-pixels Color 1 #e59689
Image / Add Borders 1-pixel Color 3 #6d2317
Image / Add Borders 30-pixels Color 4 #f3cc87
12.
Open the Tube smArt_1026
Edit / Copy
Edit / Paste as a New Layer
Image / Resize 120%
Activate the Pick Tool / Position X 302.00 / Position Y 140.00
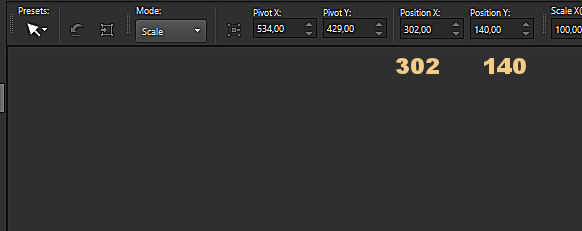
Press “m” on the Keyboard to close the Pick Tool
13. Image / Add Borders 1-pixel Color 3 #6d2314
Open the kw deco
Edit / Copy
Edit / Paste as a New Layer
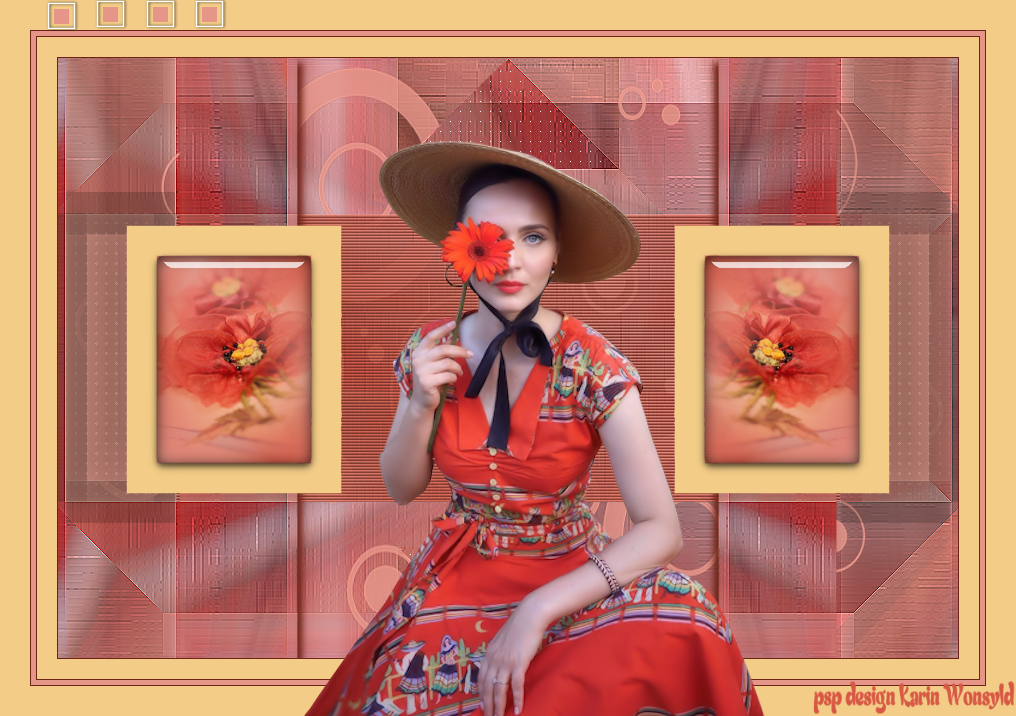
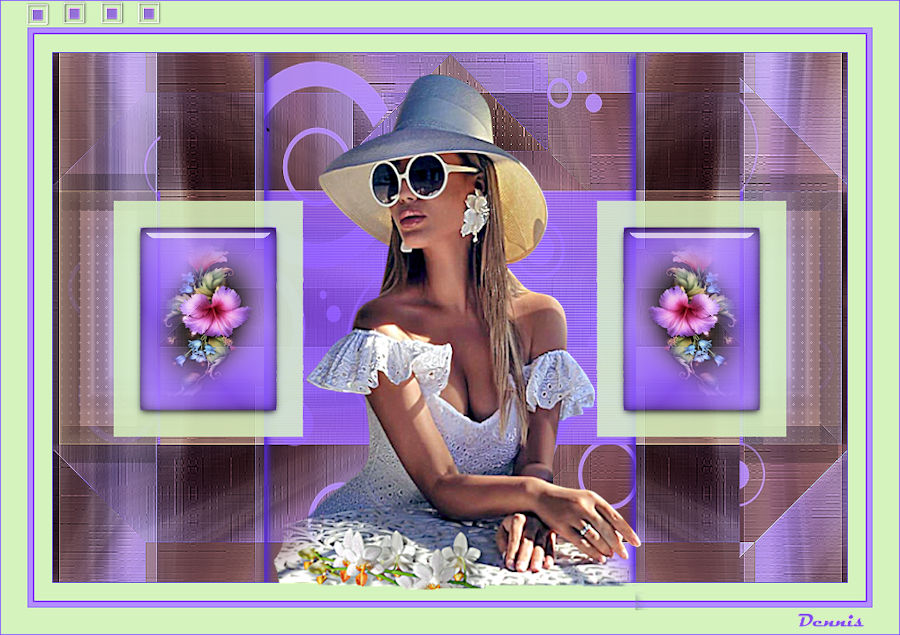
Place as in the Example
Add your name or watermark
File / Export / jpeg Optimizer
Save
Hugs Dennis
13. Image / Add Borders 1-pixel Color 3 #6d2314
Open the kw deco
Edit / Copy
Edit / Paste as a New Layer
Place as in the Example
Add your name or watermark
File / Export / jpeg Optimizer
Save
Hugs Dennis
|
dennis b tags
|
karin b tags
|
