Tutorial Veronica
|
here you will find the original tutorials from Karin
|

|
|
You get the materials here
|
| ||
Download file
You get 2 Selections they should be placed in the PSP Selections Folder
The Lady Tube is from LB Tubes
the rest are my own
This Tutorial is dedicated to Veronika
She always tries my Tutorials
which I am so proud that she does
You only need White #ffffff
(Or another light color of choice)
You will need these Plugins
Mehdi / Sorting Tiles
Filters Unlimited 2.0 / Simple / Center Tile
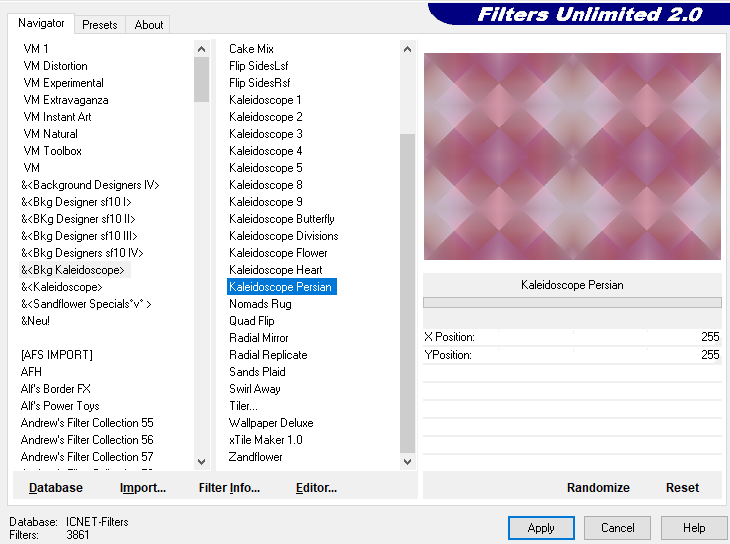
Filters Unlimited 2.0 / & Bkg Kaleidoscope / Kaleidoscope / Persian
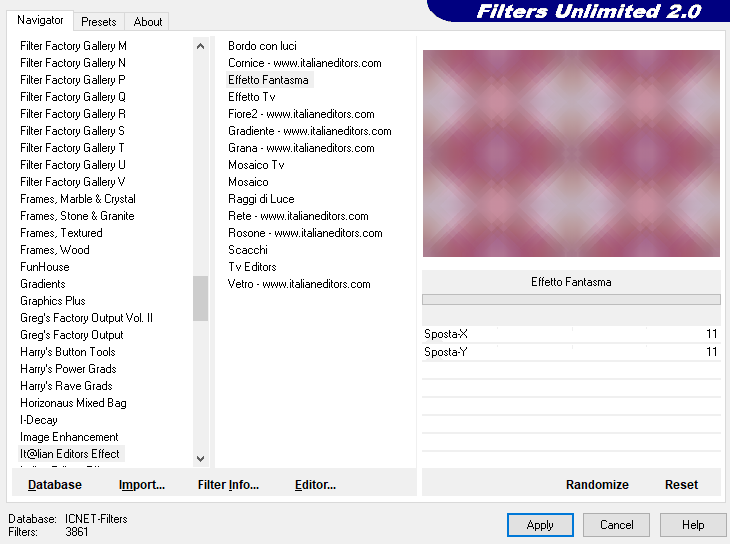
Filters Unlimited 2.0 / Italian Editors Effect / Effetto Fatasma
Let us begin
1
Open the pastel background 8
Windows duplicate Shift + D
We will work on the copy if something goes wrong,
we still have the original
2
Plugins / Mehdi / Sorting Tiles
(with these settings)
You get 2 Selections they should be placed in the PSP Selections Folder
The Lady Tube is from LB Tubes
the rest are my own
This Tutorial is dedicated to Veronika
She always tries my Tutorials
which I am so proud that she does
You only need White #ffffff
(Or another light color of choice)
You will need these Plugins
Mehdi / Sorting Tiles
Filters Unlimited 2.0 / Simple / Center Tile
Filters Unlimited 2.0 / & Bkg Kaleidoscope / Kaleidoscope / Persian
Filters Unlimited 2.0 / Italian Editors Effect / Effetto Fatasma
Let us begin
1
Open the pastel background 8
Windows duplicate Shift + D
We will work on the copy if something goes wrong,
we still have the original
2
Plugins / Mehdi / Sorting Tiles
(with these settings)

Plugins / Filter Unlimited 2.0 / Simple / Center Tile
Effects / Edge Effects / Enhance
3
Plugins / Filter Unlimited 2.0 / & Bkg Kaleidoscope / Kaleidoscope Persian (default)
Effects / Edge Effects / Enhance
3
Plugins / Filter Unlimited 2.0 / & Bkg Kaleidoscope / Kaleidoscope Persian (default)
Plugins / Filter Unlimited 2.0 / Italian Editors Effect / Effetto Fantasma
(with these settings)
(with these settings)
Effects / Edge Effects / Enhance
4
Layers / New Raster Layer
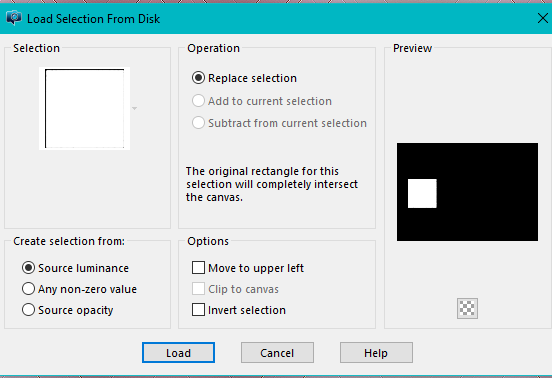
Selections / Load/Save Selection / Load Selection from Disk
(with these settings)
Locate Kw Veronika 1
4
Layers / New Raster Layer
Selections / Load/Save Selection / Load Selection from Disk
(with these settings)
Locate Kw Veronika 1
Flood Fill with White
Selections / Modify / Contract by 20
Press Delete on the Keyboard
Rename this Layer / Frame 1
Keep Selected
Activate the Bottom Layer
Layers New Raster Layer
Open the tube kw/blomster/30/10/20/11_orig
Edit / Copy
Edit / Paste into Selection
Selections / Select / None
5
Activate the Top Layer (Frame 1)
Layers / New Raster Layer
Selections / Load/Save Selection / Load Selection from Disk
Locate Kw veronika 2
Same setting as Step 5
Flood Fill with White
Selections / Modify / Contract by 20
Press Delete on the Keyboard
Rename this Layer / Frame 2
Selections / Select / None
Layers / Duplicate
Image / Mirror Vertical / (Flip in earlier versions)
Move a little down (see my finished picture)
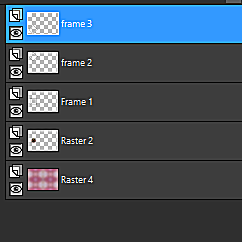
Rename this Layer / Frame 3
Now the Layers Palette looks like this
Selections / Modify / Contract by 20
Press Delete on the Keyboard
Rename this Layer / Frame 1
Keep Selected
Activate the Bottom Layer
Layers New Raster Layer
Open the tube kw/blomster/30/10/20/11_orig
Edit / Copy
Edit / Paste into Selection
Selections / Select / None
5
Activate the Top Layer (Frame 1)
Layers / New Raster Layer
Selections / Load/Save Selection / Load Selection from Disk
Locate Kw veronika 2
Same setting as Step 5
Flood Fill with White
Selections / Modify / Contract by 20
Press Delete on the Keyboard
Rename this Layer / Frame 2
Selections / Select / None
Layers / Duplicate
Image / Mirror Vertical / (Flip in earlier versions)
Move a little down (see my finished picture)
Rename this Layer / Frame 3
Now the Layers Palette looks like this
Make sure you are on the Top Raster Layer
Layers Merge / Merge Down
Layers / Properties / Blend Mode on Soft Light
Open the Tube kw ve deco 1
Edit / Copy
Edit / Paste as a New Layer
(place as in my picture)
7
Open the Tube kw ve deco 2
Edit / Copy
Edit / Paste as a New Layer
Place In the Upper Right Corner
8
Open the Tube kw ve deco 4
Edit / Copy
Edit / Paste as a New Layer
(place as in my picture)
9
Open the Tube kw ve deco 3
Edit / Copy
Edit / Paste as a New Layer
(place as in my picture)
10
Open the Tube 2423 / woman / LB TUBES
Edit / Copy
Edit / Paste as a New Layer
(place as in my picture)
11
Activate the Bottom Raster Layer
Edit / Copy
it stays in memory
Image / Add Borders 2 pixels White
Image / Add Borders 50-pixels / in a color you do not have in your Image
Activate the Magic Wand Tool / Select the 50-pixel Border
Edit / Paste into Selection
Selections / Modify / Contact by 20
Layers / New Raster Layer
Flood Fill with White
Selections / Select / None
Add your name or watermark
save as jpg
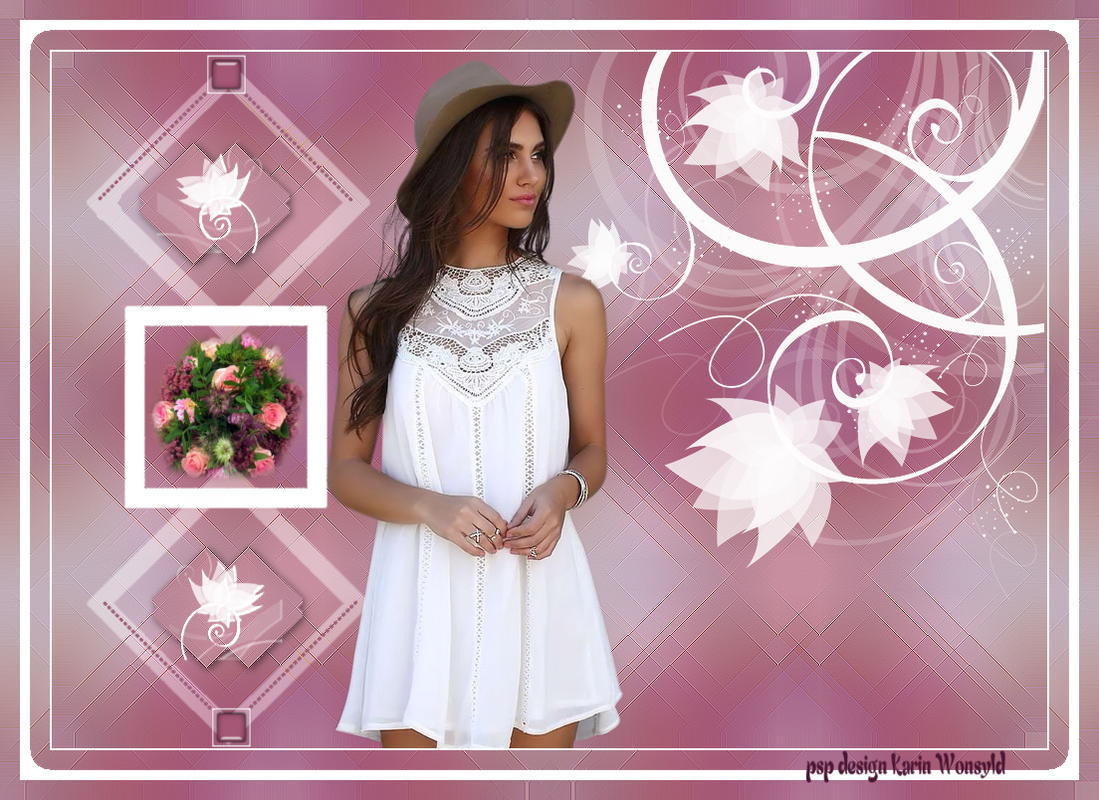
Hope you enjoyed my Tutorial
Regards Karin
Layers Merge / Merge Down
Layers / Properties / Blend Mode on Soft Light
Open the Tube kw ve deco 1
Edit / Copy
Edit / Paste as a New Layer
(place as in my picture)
7
Open the Tube kw ve deco 2
Edit / Copy
Edit / Paste as a New Layer
Place In the Upper Right Corner
8
Open the Tube kw ve deco 4
Edit / Copy
Edit / Paste as a New Layer
(place as in my picture)
9
Open the Tube kw ve deco 3
Edit / Copy
Edit / Paste as a New Layer
(place as in my picture)
10
Open the Tube 2423 / woman / LB TUBES
Edit / Copy
Edit / Paste as a New Layer
(place as in my picture)
11
Activate the Bottom Raster Layer
Edit / Copy
it stays in memory
Image / Add Borders 2 pixels White
Image / Add Borders 50-pixels / in a color you do not have in your Image
Activate the Magic Wand Tool / Select the 50-pixel Border
Edit / Paste into Selection
Selections / Modify / Contact by 20
Layers / New Raster Layer
Flood Fill with White
Selections / Select / None
Add your name or watermark
save as jpg
Hope you enjoyed my Tutorial
Regards Karin
|
Dennis b tags

|
