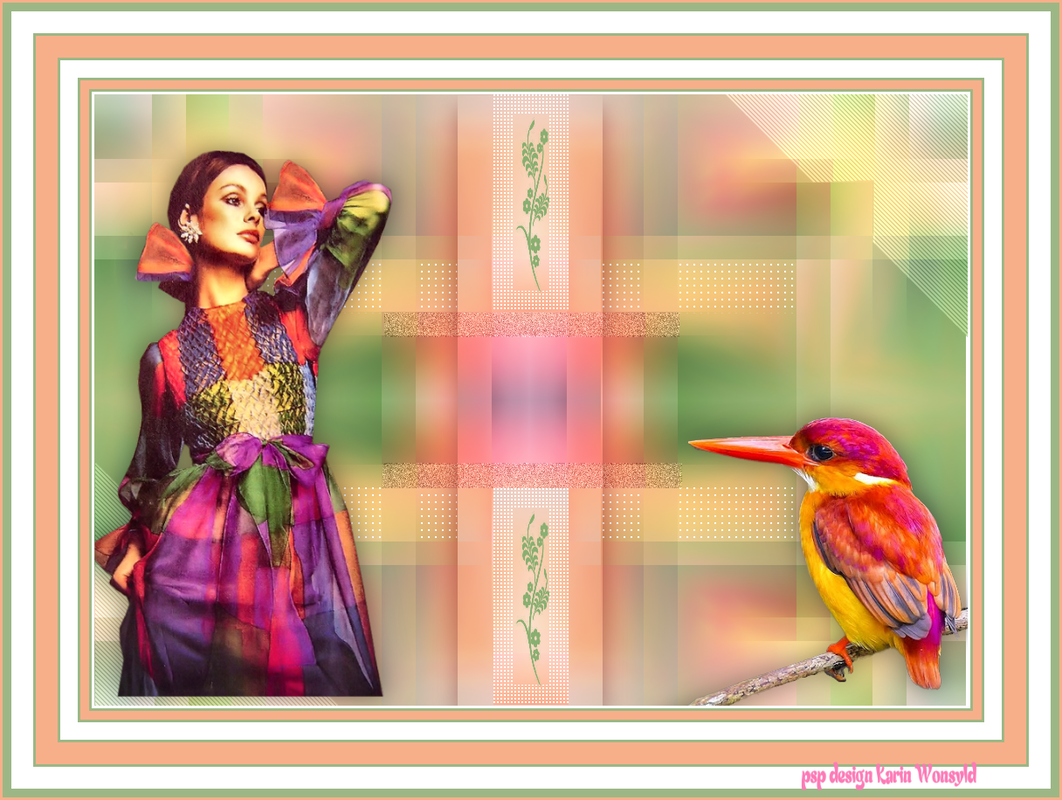
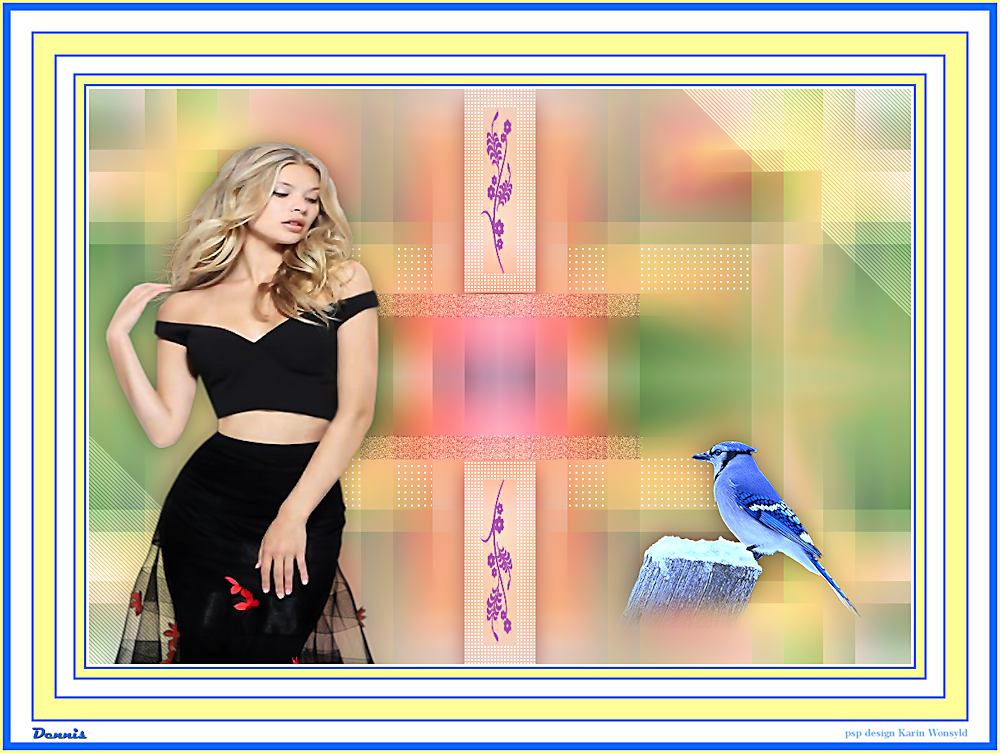
Tutorial the Lady in the Variegated Dress
|
here you will find the original tutorials from Karin
|

|
|
You get your materials here
|
| ||
You get a folder with Selections they need be placed in the folder PSP Selections.
You get a Background / pastel/background/25_orig.png
Open it and Window Duplicate or Shift + D
We will work on the Copy if something goes wrong, we always have the Original.
I made a Color Palette for the Frame
It is located at the beginning of the frame sequence.
Let us begin
1
Open the Background pastel-background/25_orig.png
if you have not done it yet,
Window / Duplicate or Shift + D
Close the original if something should go wrong you have the original.
Re-name this Layer Background
2
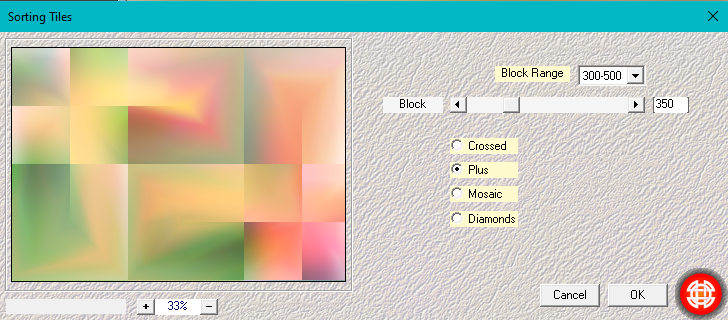
Plugins / Mehdi Sorting Tiles
(with these settings)
You get a Background / pastel/background/25_orig.png
Open it and Window Duplicate or Shift + D
We will work on the Copy if something goes wrong, we always have the Original.
I made a Color Palette for the Frame
It is located at the beginning of the frame sequence.
Let us begin
1
Open the Background pastel-background/25_orig.png
if you have not done it yet,
Window / Duplicate or Shift + D
Close the original if something should go wrong you have the original.
Re-name this Layer Background
2
Plugins / Mehdi Sorting Tiles
(with these settings)
Filters Unlimited 2.0 / Toadies / What Are You 20/20 (default)
Filters Unlimited 2.0 / Tile & Mirror / Mirrored & Scaled
3
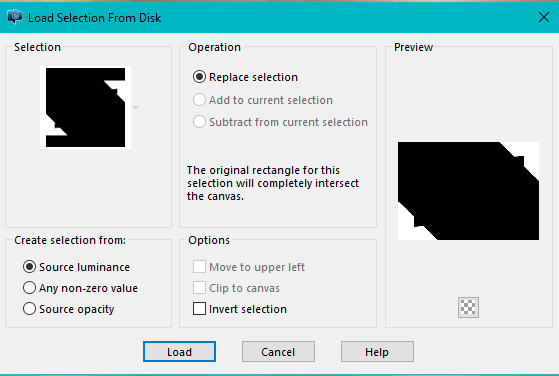
Selections / Load/Save Selection / Load Selection from Disk
Locate / kw the lady in the variegated dress
(with these settings)
Filters Unlimited 2.0 / Tile & Mirror / Mirrored & Scaled
3
Selections / Load/Save Selection / Load Selection from Disk
Locate / kw the lady in the variegated dress
(with these settings)
4
Selections / Promote Selection to Layer
Plugins / Carolaine and Sensibility / CS DLines
Plugins / Carolaine and Sensibility / CS DLines Control 0 = 40 and Control 1 = 5 (default)
Selections / Select None
5
Activate the Layer you Named Background
Selections / Load/Save Selection / Load Selection from Disk
Locate / kw the lady in the variegated dress 1
(same settings as point three)
Selections / Promote Selection to Layer
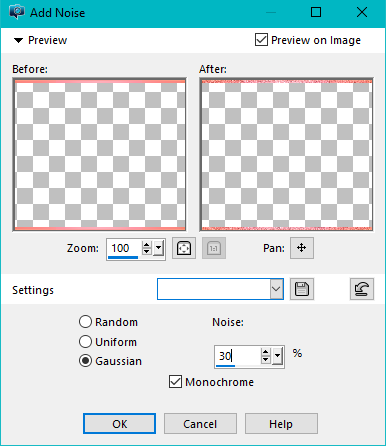
Adjust / Add / Remove Noise / Add Noise
(with these settings)
Selections / Promote Selection to Layer
Plugins / Carolaine and Sensibility / CS DLines
Plugins / Carolaine and Sensibility / CS DLines Control 0 = 40 and Control 1 = 5 (default)
Selections / Select None
5
Activate the Layer you Named Background
Selections / Load/Save Selection / Load Selection from Disk
Locate / kw the lady in the variegated dress 1
(same settings as point three)
Selections / Promote Selection to Layer
Adjust / Add / Remove Noise / Add Noise
(with these settings)
Selections Select None
6
Activate the Layer you Named Background
Selections / Load/Save Selection / Load Selection from Disk
Locate / kw the lady in the variegated dress 2
(same settings as point three)
Selections / Promote Selection to Layer
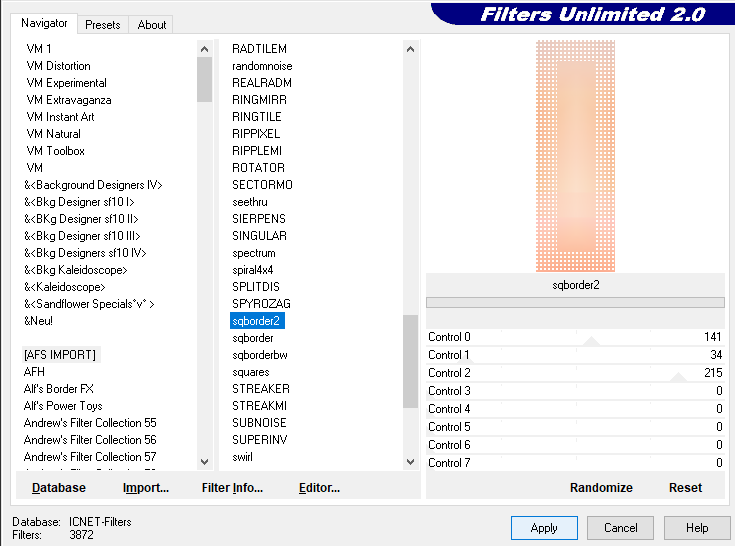
Effects / Plugins / Filters Unlimited 2.0 / (AFS IMPORT) / sqborder 2 (with these settings)
6
Activate the Layer you Named Background
Selections / Load/Save Selection / Load Selection from Disk
Locate / kw the lady in the variegated dress 2
(same settings as point three)
Selections / Promote Selection to Layer
Effects / Plugins / Filters Unlimited 2.0 / (AFS IMPORT) / sqborder 2 (with these settings)
Selections / Select None
Open the kw deco lady in the variegated dress 1
Edit / Copy
Edit / Paste as a New Layer
Layers / Merge / Merge Down
Layers / Duplicate
Place as in the Example
Layers / Arrange / Bring to Top
7
Selections / Load /Save Selection / Load Selection from Disk
Locate / kw the lady in the variegated dress 4
same settings as point three
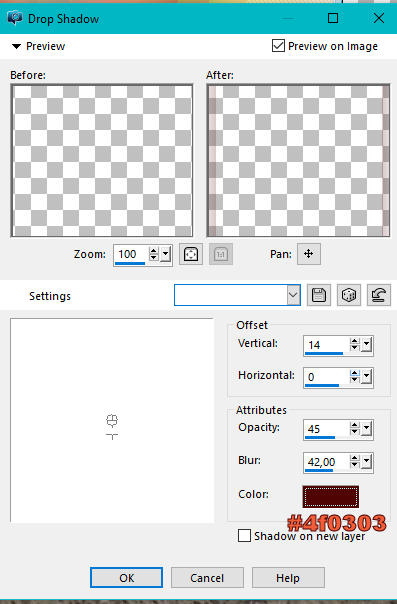
Effects / 3D Effects / Drop Shadow with these settings
Open the kw deco lady in the variegated dress 1
Edit / Copy
Edit / Paste as a New Layer
Layers / Merge / Merge Down
Layers / Duplicate
Place as in the Example
Layers / Arrange / Bring to Top
7
Selections / Load /Save Selection / Load Selection from Disk
Locate / kw the lady in the variegated dress 4
same settings as point three
Effects / 3D Effects / Drop Shadow with these settings
Selections / Select None
8
Activate the Layer you Named Background
Selections / Load/Save Selection / Load Selection from Disk
Locate / kw the lady in the variegated dress 3
(same settings as point three)
Selections / Promote Selection to Layer
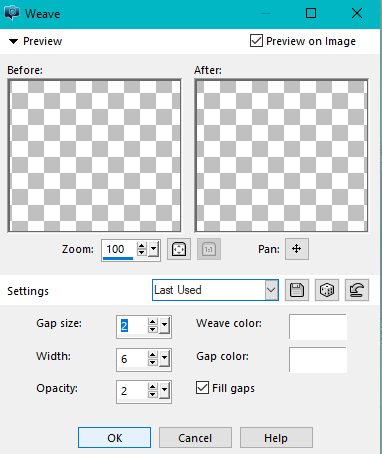
Effects / Texture Effects / Weave with these settings
8
Activate the Layer you Named Background
Selections / Load/Save Selection / Load Selection from Disk
Locate / kw the lady in the variegated dress 3
(same settings as point three)
Selections / Promote Selection to Layer
Effects / Texture Effects / Weave with these settings
Selections / Select None
9
Activate the Top Layer
Open your tube 4328-luzcristina.pspImage
Edit / Copy
Edit / Paste as a New Layer
Image / Resize 2x90 %
Place as in the Example
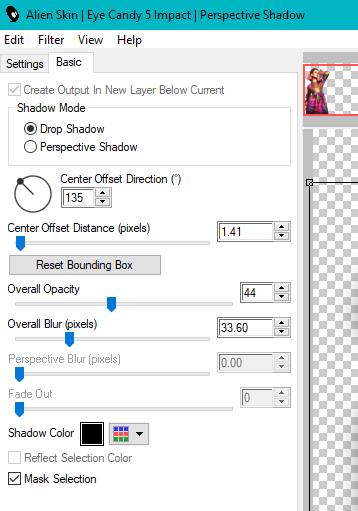
Effects / Plugins / Alien Skin / Eye Candy 5 Impact / Perspective Shadow (with these settings)
9
Activate the Top Layer
Open your tube 4328-luzcristina.pspImage
Edit / Copy
Edit / Paste as a New Layer
Image / Resize 2x90 %
Place as in the Example
Effects / Plugins / Alien Skin / Eye Candy 5 Impact / Perspective Shadow (with these settings)
10
Open the Tube / oiseaux_3_franiemargot.pspImage
Edit Copy
Edit / Paste as a New Layer
Image / Mirror / Mirror Horizontal
Place as in the Example
Effects / Plugins / Alien Skin / Eye Candy 5 Impact / Perspective Shadow
(same settings as point 9)
11
I used the following 3 Colors in the Frame
Color 1 #ffffff
Color 2 #9cb785
Color 3 #f7af8a

Image / Add Borders / 3-pixels #ffffff Color 1
Image / Add Borders / 3-pixels #9cb785 Color 2
Image / Add Borders / 10-pixels #f7af8a Color 3
Image / Add Borders / 3-pixels #9cb785 Color 2
Image / Add Borders / 20-pixels #ffffff Color 1
Image / Add Borders / 3-pixels #9cb785 Color 2
Image / Add Borders / 25-pixels #f7af8a Color 3
Image / Add Borders / 3-pixels #9cb785 Color 2
Image / Add Borders / 25-pixels Color 1 #ffffff
Image / Add Borders / 10-pixels #9cb785 Color 2
Image / Add Borders / 3-pixels #f7af8a Color 3
Add your name or watermark
Save as jpg
Hope you enjoyed my tutorial
Regards Karin are you doing it in the B version please send it to me by mail [email protected]
Here are results from others who have tried this tutorial you may also like to send your result to me then they will come here in but like with other tubes and colors
Image / Add Borders / 3-pixels #9cb785 Color 2
Image / Add Borders / 10-pixels #f7af8a Color 3
Image / Add Borders / 3-pixels #9cb785 Color 2
Image / Add Borders / 20-pixels #ffffff Color 1
Image / Add Borders / 3-pixels #9cb785 Color 2
Image / Add Borders / 25-pixels #f7af8a Color 3
Image / Add Borders / 3-pixels #9cb785 Color 2
Image / Add Borders / 25-pixels Color 1 #ffffff
Image / Add Borders / 10-pixels #9cb785 Color 2
Image / Add Borders / 3-pixels #f7af8a Color 3
Add your name or watermark
Save as jpg
Hope you enjoyed my tutorial
Regards Karin are you doing it in the B version please send it to me by mail [email protected]
Here are results from others who have tried this tutorial you may also like to send your result to me then they will come here in but like with other tubes and colors
|
Dennis b tags
|
