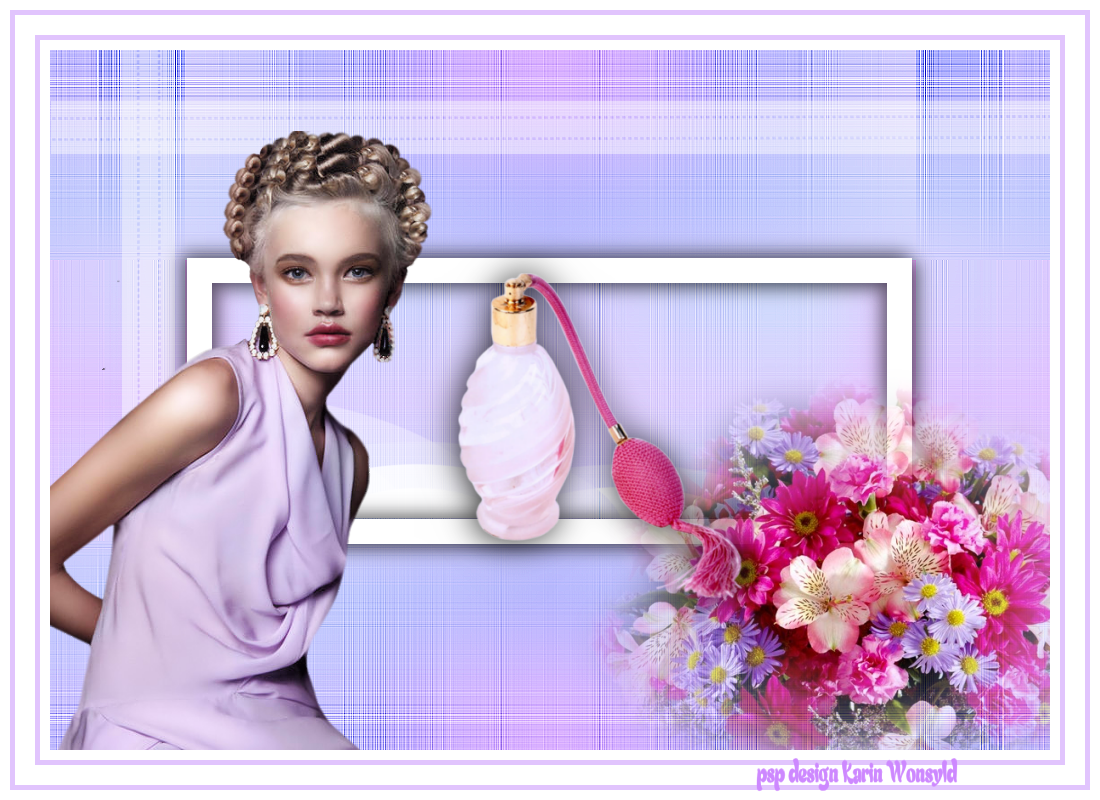
Tutorial Pastel Colored Flowers
|
here you will find the original tutorials from Karin
|

|
|
You get your materials here
|
| ||
Included in the materials is a lady tube from Smart design that you do not get.
You need to find a “lady” tube of your own.
Included is a Folder with Selections they should be placed in the PSP / Selections Folder
I used the following Colors
Color1 #e1c4fd
Color 2 #cd88ff
Color 3 #aabbe7
Color 4 #8590ec
You need to find a “lady” tube of your own.
Included is a Folder with Selections they should be placed in the PSP / Selections Folder
I used the following Colors
Color1 #e1c4fd
Color 2 #cd88ff
Color 3 #aabbe7
Color 4 #8590ec

du skal bruge disse plugins
Effects / Plugins / Filters Unlimited 2.0 / Toadies / Weaver
Effects / Plugins / Filters Unlimited 2.0 / & Bkg Kaleidoscope / Kaleidoscope Persian
Effects / Plugins / Alien Skin Eye Candy 5 Impact / Perspective Shadow
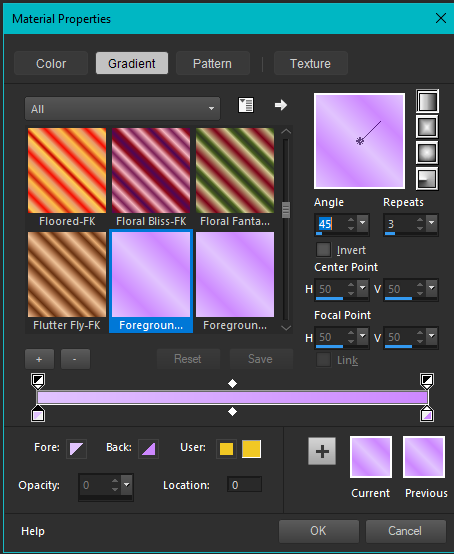
Set your Foreground Color to Color 1 #e1c4fd
Background Color to Color 2 #cd88ff
Make a Linear Gradient on your Foreground Color
(with these settings)
Effects / Plugins / Filters Unlimited 2.0 / Toadies / Weaver
Effects / Plugins / Filters Unlimited 2.0 / & Bkg Kaleidoscope / Kaleidoscope Persian
Effects / Plugins / Alien Skin Eye Candy 5 Impact / Perspective Shadow
Set your Foreground Color to Color 1 #e1c4fd
Background Color to Color 2 #cd88ff
Make a Linear Gradient on your Foreground Color
(with these settings)
Let us begin
1
Open a New Image 1000 x 700
Flood Fill with the Gradient
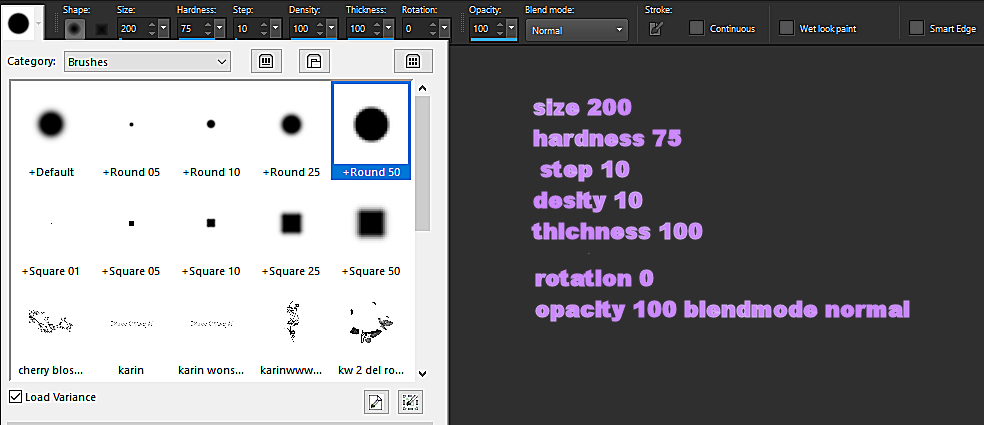
Activate the Paint Brush Tool
(with these settings)
1
Open a New Image 1000 x 700
Flood Fill with the Gradient
Activate the Paint Brush Tool
(with these settings)
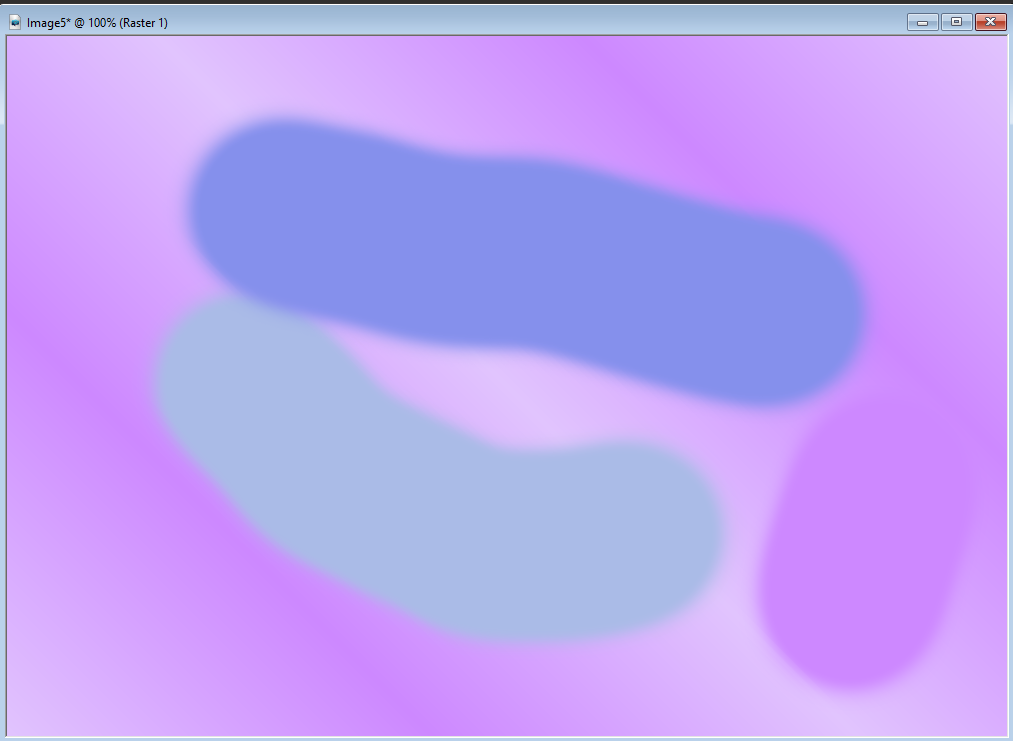
Use these 3 Colors / Color 2 # / 3 # / 4 #
Draw approximately where I have done
(see the example below)
Draw approximately where I have done
(see the example below)
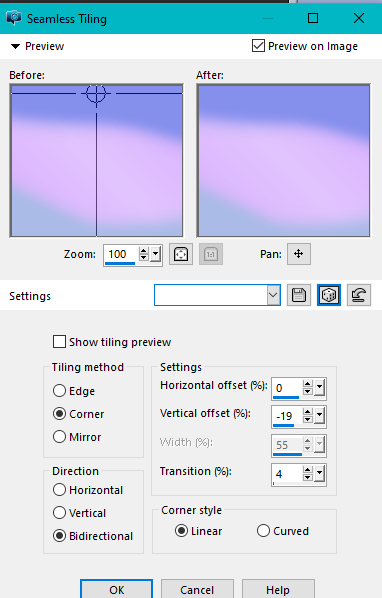
Effects / Image Effects / Seamless Tiling
(with these settings)
(with these settings)
Adjust / Blur / Gaussian Blur 50
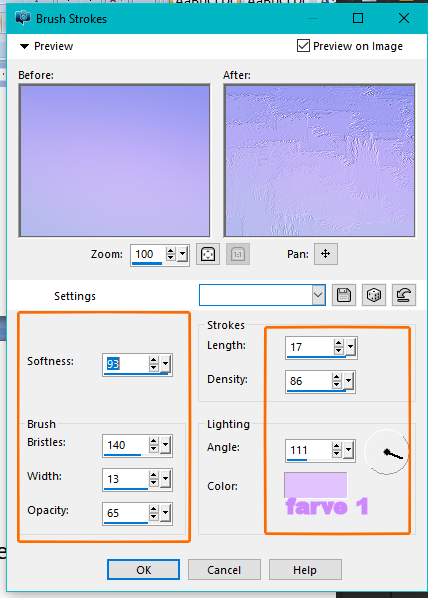
Effects / Art Media Effects / Brush Strokes
(with these settings)
Effects / Art Media Effects / Brush Strokes
(with these settings)
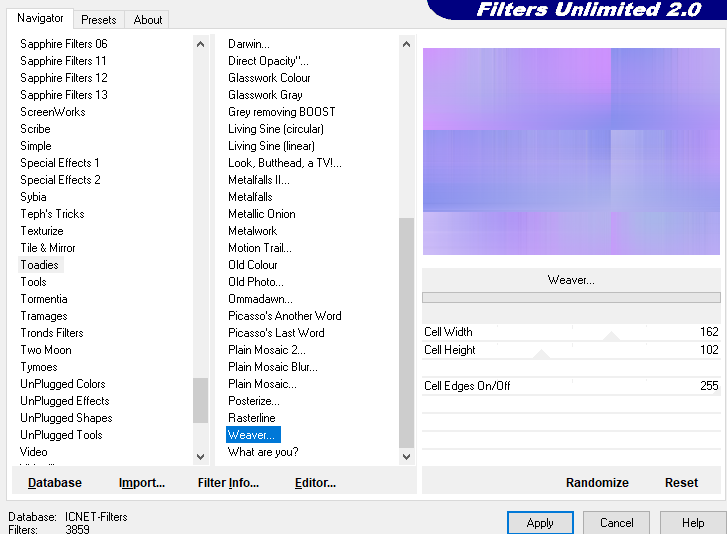
Effects / Plugins / Filters Unlimited 2.0 / Toadies / Weaver
(with these settings)
(with these settings)
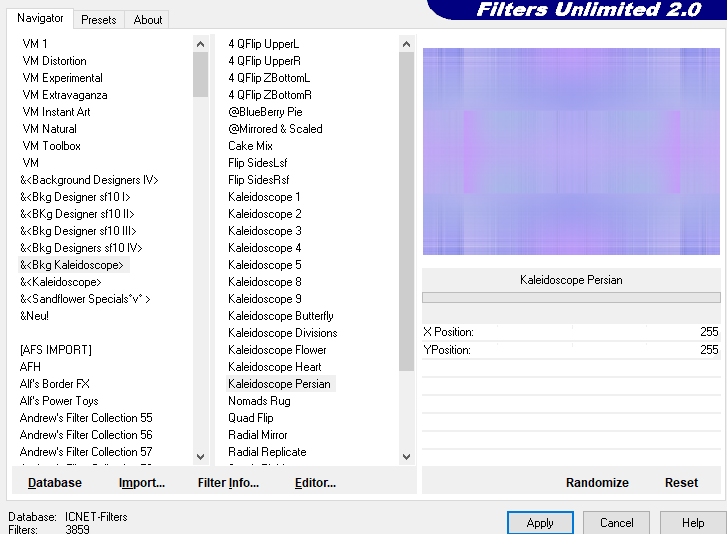
Effects / Plugins / Filters Unlimited 2.0 / & Bkg Kaleidoscope / Kaleidoscope Persian (default)
(with these settings)
(with these settings)
Layers / Duplicate
Layers / Properties / Blend Mode / Overlay
Effects / Edge Effects / Enhance
5
Layers / New Raster Layer
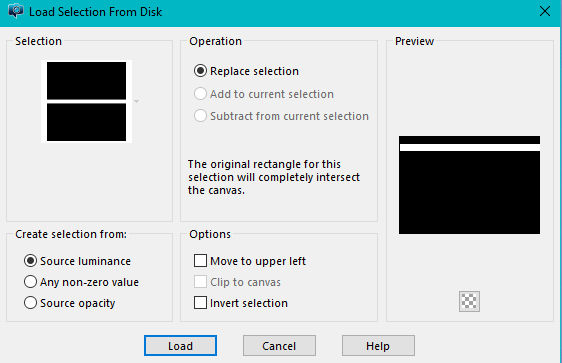
Selections / Load/Save Selection / Load Selection from Disk
(with these settings)
Locate pastel Colored flowers 1
Layers / Properties / Blend Mode / Overlay
Effects / Edge Effects / Enhance
5
Layers / New Raster Layer
Selections / Load/Save Selection / Load Selection from Disk
(with these settings)
Locate pastel Colored flowers 1
Flood Fill with White
Selections / Select None
Layers / Properties / Blend Mode / Soft Light
Open kw deco 1
Edit / Copy
Edit / Paste as a New Layer
Move it up into the White
Layers / Merge / Merge Down
6
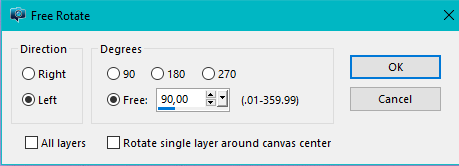
Layers / Duplicate
Image / Free Rotate
(with these settings)
Selections / Select None
Layers / Properties / Blend Mode / Soft Light
Open kw deco 1
Edit / Copy
Edit / Paste as a New Layer
Move it up into the White
Layers / Merge / Merge Down
6
Layers / Duplicate
Image / Free Rotate
(with these settings)
Place as in the Example
7
Layers / New Raster Layer
selections / Load/Save Selection / Load Selection from Disk
Locate pastel Colored flowers 2
(same settings as Step 5)
Flood Fill with White
Selections / Modify / Contact by 25
Press the Delete Key on the Keyboard
Selections / Select None
Effects / 3d Effects / Drop Shadow / 5 / 6 / 50 / 25 Black
Repeat the Drop Shadow
Effects / 3d Effects / Drop Shadow / -5 / -6 / 50 / 25 Black
8
Open the Tube kw flowers 291020 1
Edit / Copy
Edit / Paste as a New Layer
Image / Resize 85%
Place as in the Example
9
Activate the Bottom Layer
Layers / New Raster Layer
Selections / Load/Save Selection / Load Selection from Disk
Locate pastel Colored flowers 3
(same settings as Step 5)
Open kw deco 2
Edit / Copy
Edit / Paste into Selection
Selections / Select None
Image / Mirror / Mirror Horizontal
Layers / Properties / Blend Mode Overlay
10
Open / tube perfume
Edit / Copy
Edit / Paste as a New Layer
Place as in the Example
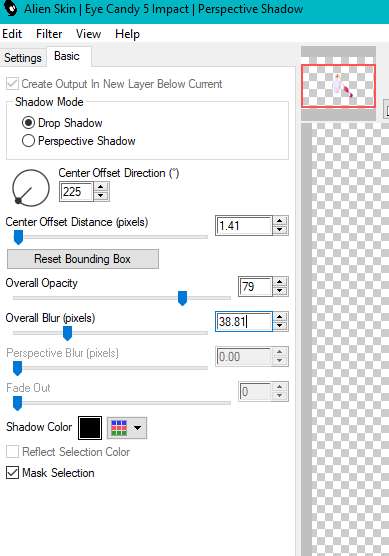
Effects / Plugins / Alien Skin Eye Candy 5 Impact / Perspective Shadow
(with these settings)
7
Layers / New Raster Layer
selections / Load/Save Selection / Load Selection from Disk
Locate pastel Colored flowers 2
(same settings as Step 5)
Flood Fill with White
Selections / Modify / Contact by 25
Press the Delete Key on the Keyboard
Selections / Select None
Effects / 3d Effects / Drop Shadow / 5 / 6 / 50 / 25 Black
Repeat the Drop Shadow
Effects / 3d Effects / Drop Shadow / -5 / -6 / 50 / 25 Black
8
Open the Tube kw flowers 291020 1
Edit / Copy
Edit / Paste as a New Layer
Image / Resize 85%
Place as in the Example
9
Activate the Bottom Layer
Layers / New Raster Layer
Selections / Load/Save Selection / Load Selection from Disk
Locate pastel Colored flowers 3
(same settings as Step 5)
Open kw deco 2
Edit / Copy
Edit / Paste into Selection
Selections / Select None
Image / Mirror / Mirror Horizontal
Layers / Properties / Blend Mode Overlay
10
Open / tube perfume
Edit / Copy
Edit / Paste as a New Layer
Place as in the Example
Effects / Plugins / Alien Skin Eye Candy 5 Impact / Perspective Shadow
(with these settings)
Open a lady Tube of your choice
Edit / Copy
Edit / Paste as a New Layer
Resize if necessary
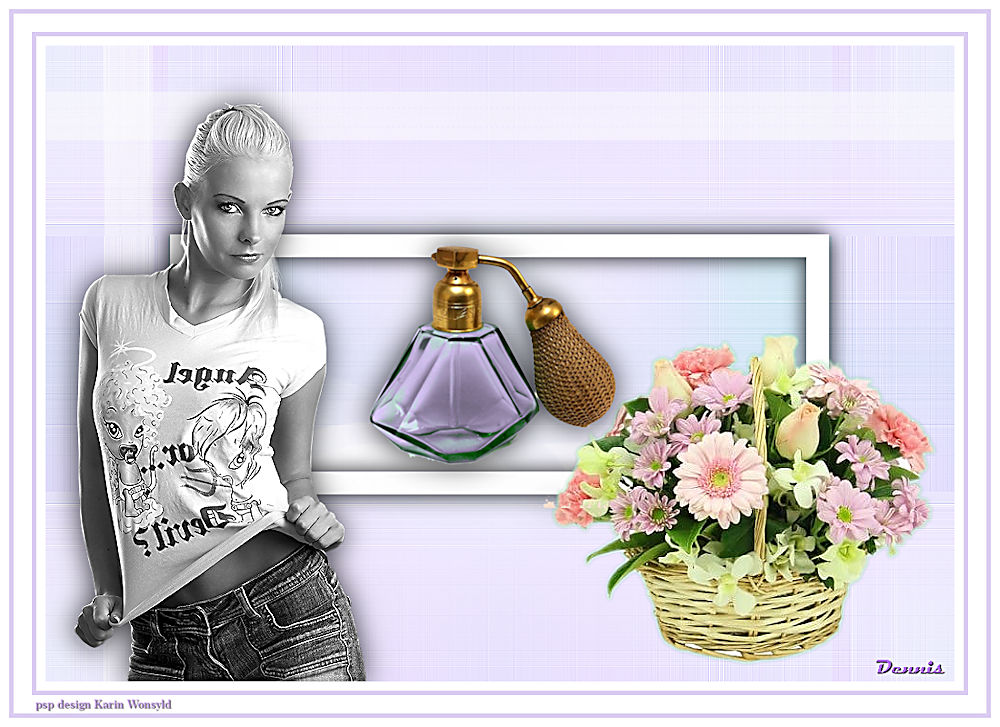
Place as in the Example
12
Image / Add Borders 10 pixels White
Image / Add Borders 5 pixels Color 1 #e1c4fd
Image / Add Borders 20 pixels White
Image / Add Borders 5 pixels Color 1 #e1c4fd
Image / Add Borders 10 pixels White
Add your name or watermark
Save as jpg
Hugs Dennis
Edit / Copy
Edit / Paste as a New Layer
Resize if necessary
Place as in the Example
12
Image / Add Borders 10 pixels White
Image / Add Borders 5 pixels Color 1 #e1c4fd
Image / Add Borders 20 pixels White
Image / Add Borders 5 pixels Color 1 #e1c4fd
Image / Add Borders 10 pixels White
Add your name or watermark
Save as jpg
Hugs Dennis
|
Dennis b tags
|
