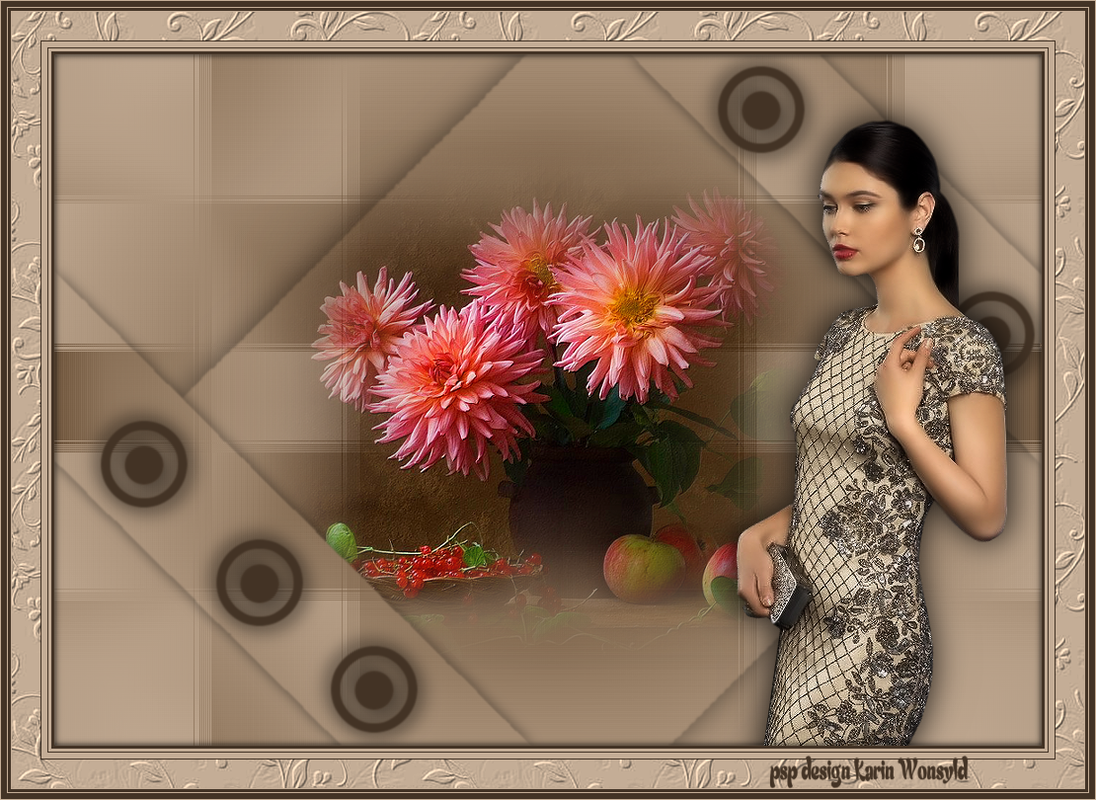
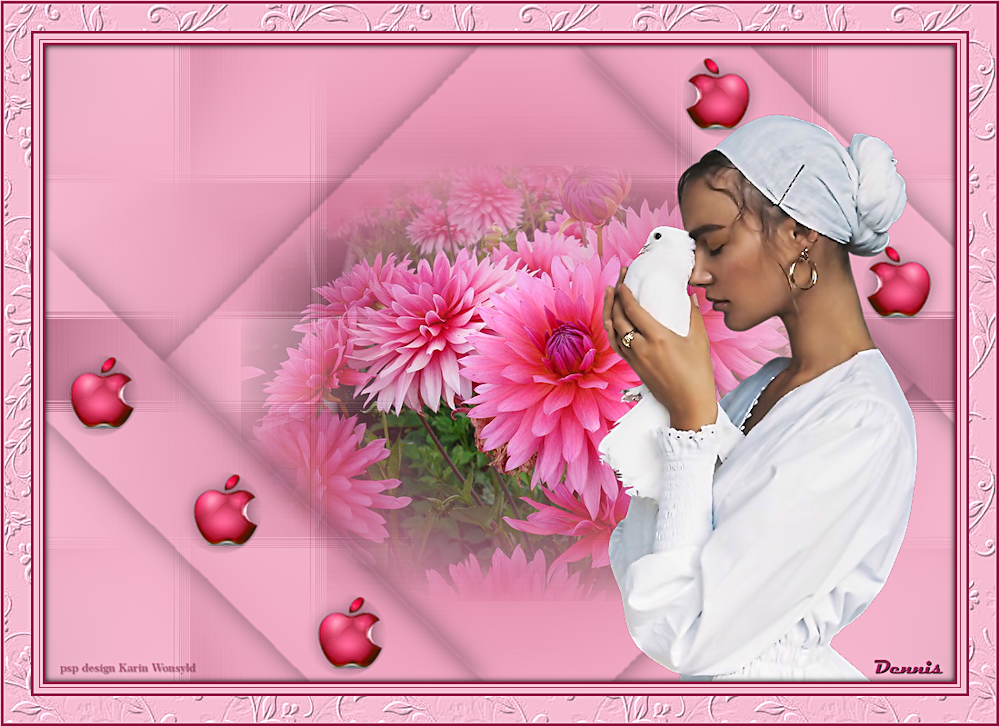
Tutorial Dahlias and Apples
|
here you will find the original tutorials from Karin
|

|
|
You get your supplies here
|
| ||
Women tube of your choice
The Woman tube I have used is from Smart design and is not included in my materials.
You can apply to Marta by writing to her through her Facebook Page
https://www.facebook.com/martasumegismArtDesign
She is Hungarian but understands English, so make your request in English.
You get a folder with Selections, they should be placed in your PSP Selections Folder.
You get a texture, TD_Textura_Nostalgia it should be placed in your PSP Texture Folder
I used the following Colors
Color 1 #c4ad96
Color 2 #7b5f45
Color 3 #433325

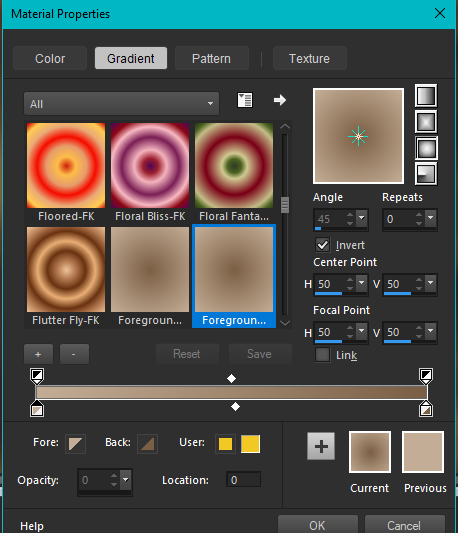
Set your Foreground Color to Color 1 #c4ad96 and your Background Color to Color 2 #7b5f45
Make a Sunburst Gradient
(with these settings)
Make a Sunburst Gradient
(with these settings)
Let us begin
1
Open a New Image 1000 x 700
Flood Fill with the Gradient
Open the tube 2456/luzcristina
Edit / Copy
Edit / Paste as a New Layer
No need to move
Layers / Properties / Blend Mode / Luminance (Legacy)
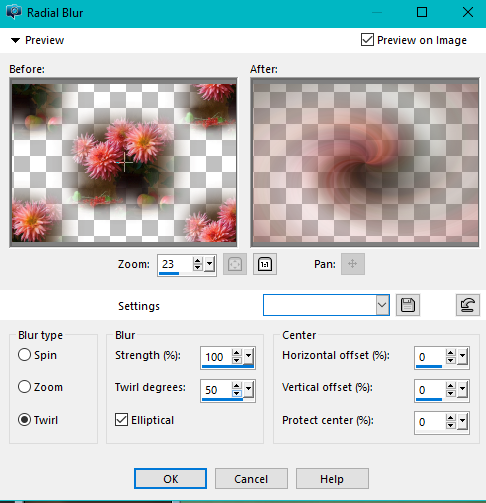
Adjust / Blur / Radial Blur
(with these settings)
1
Open a New Image 1000 x 700
Flood Fill with the Gradient
Open the tube 2456/luzcristina
Edit / Copy
Edit / Paste as a New Layer
No need to move
Layers / Properties / Blend Mode / Luminance (Legacy)
Adjust / Blur / Radial Blur
(with these settings)
Layers / Merge / Merge Down
2
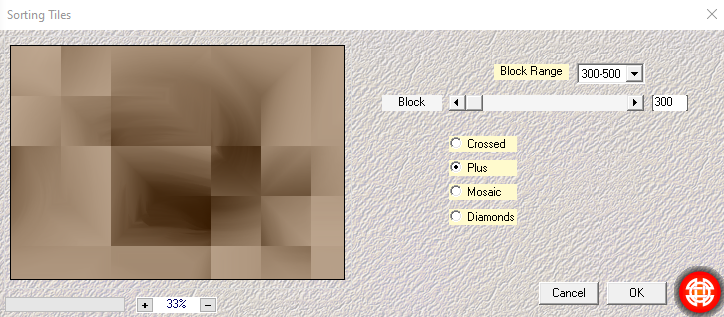
Effects / Plugins / Mehdi / Sorting Tiles
(with these settings)
2
Effects / Plugins / Mehdi / Sorting Tiles
(with these settings)
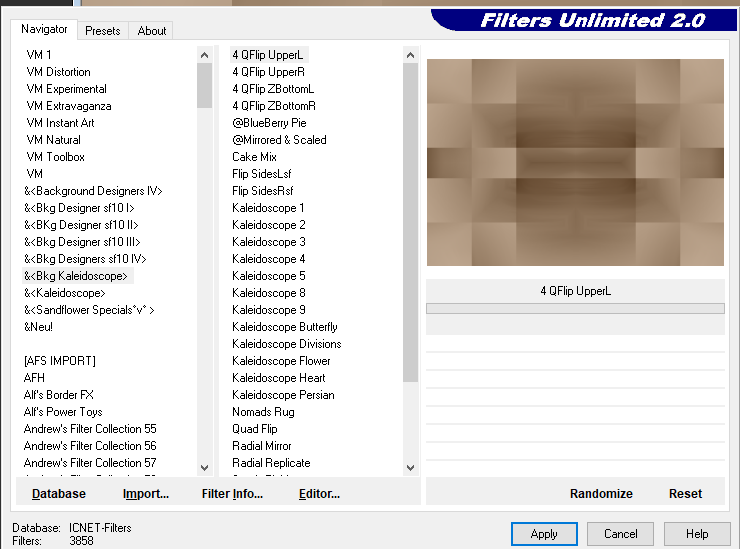
Effects / Plugins / Filters Unlimited 2.0 / & Bkg Kaleidoscope / 4Q Flip Upper L
(with these settings) (default)
(with these settings) (default)
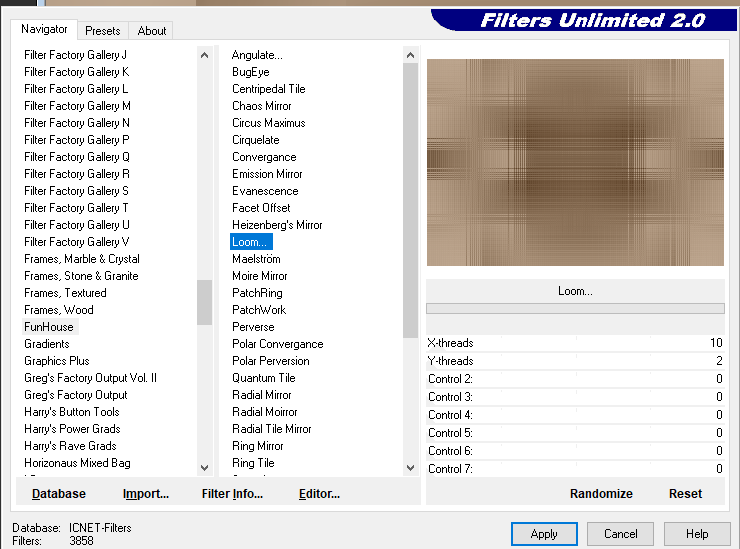
Effects / Plugins / Filters Unlimited 2.0 / Fun House / Loom
(with these settings) (default)
(with these settings) (default)
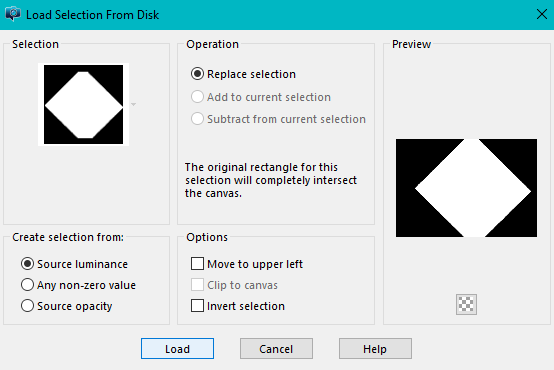
Selections / Load/Save Selection / Load Selection from Disk
Locate / kw sel dahlias and apples
(with these settings)
Locate / kw sel dahlias and apples
(with these settings)
Selections / Promote Selection to Layer
Selections / Select None
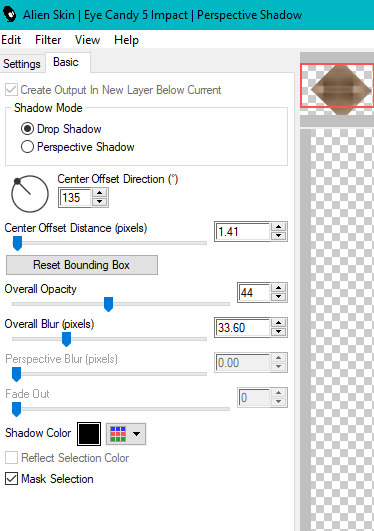
Effects / Plugins / Alien Skin Eye Candy 5 Impact / Perspective Shadow
(with these settings)
Selections / Select None
Effects / Plugins / Alien Skin Eye Candy 5 Impact / Perspective Shadow
(with these settings)
4
Open the tube 2456/luzcristina.pspimage
Edit / Copy
Edit / Paste as a New Layer
Do not move
5
Activate the Bottom Raster Layer
Selections / Load/Save Selection / Load Selection from Disk
Locate kw sel dahlias and apples 1
(same settings as Step 3)
Selections / Promote Selection to Layer
Selections / Select None
Layers / Arrange / Bring to Top
Effects / Plugins / Alien Skin Eye Candy 5 Impact / Perspective Shadow
(Same settings as before)
6
Layers / New Raster Layer
Selections / Load/Save Selection / Load Selection from Disk
Locate Selection kw sel dahlias and apples 2
(same settings as Step 3)
Flood Fill with Color 3 #433325
Selections / Modify / Contract by 10
Press the Delete Key on the Keyboard
Selections / Select None
7
Stay on the Raster Layer you are on
Selections / Load/Save Selection / Load Selection from Disk
Locate Selections kw sel dahlias and apples 3
(same settings as Step 3)
Flood Fill with Color 3 #433325
Selections / Select None
Layers / Duplicate 2x
Place as in the Example
Layers Merge Down 2x
Layers / Duplicate
Place it where mine is at the top right
Layers / Merge / Merge Down
Effects / 3d Effects / Drop Shadow / 5 / 5 / 50 / 25 Black
Repeat the Drop Shadow / -5 / -5 / 50 / 25 Black
8
Open the woman tube of your choice
Edit / Copy
Edit / Paste as New Layer
Place as in the Example
I have chosen to Add some Levels as I thought she should have
a slight Warm Color
Your choice / if your Image needs it, you can do it like this
Adjust / Brightness and Contrast / Levels
(with the following settings)
(Be careful, it can make your image blurry)

Effects / Plugins / Alien Skin Eye Candy 5 Impact / Perspective Shadow
(same settings as Step 3)
Place on the Right side as in the Example
9
Image / Add Borders 3-pixels Color 3 #433325
Activate the Magic Wand
Select this 3-pixel Border
Selections / Invert
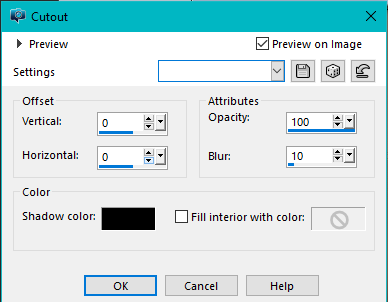
Effects / 3d Effects / Cutout
(with these settings)
(same settings as Step 3)
Place on the Right side as in the Example
9
Image / Add Borders 3-pixels Color 3 #433325
Activate the Magic Wand
Select this 3-pixel Border
Selections / Invert
Effects / 3d Effects / Cutout
(with these settings)
Selections / Select None
10
Image / Add Borders 3-pixels Color 1 #c4ad96
Image / Add Borders 1-pixel Color 3 #433325
Image / Add Borders 6-pixels Color 1 #c4ad96
Image / Add Borders 1-pixel Color 3 #433325
Image / Add Borders 30-pixels Color 1 #c4ad96
Activate the Magic Wand
Select the 30-pixel Border
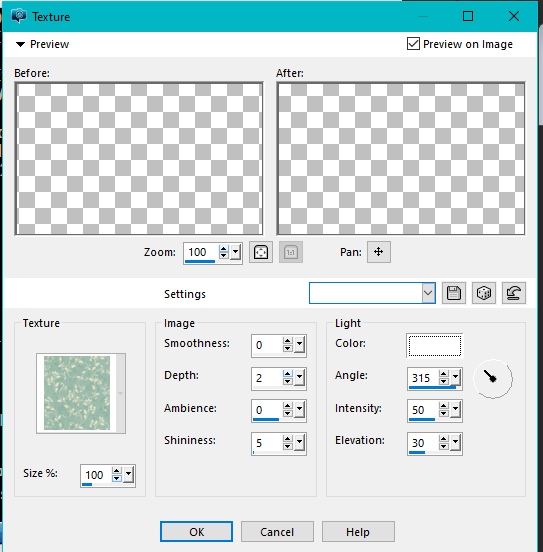
Effects / Texture Effects / Texture
(with these settings)
10
Image / Add Borders 3-pixels Color 1 #c4ad96
Image / Add Borders 1-pixel Color 3 #433325
Image / Add Borders 6-pixels Color 1 #c4ad96
Image / Add Borders 1-pixel Color 3 #433325
Image / Add Borders 30-pixels Color 1 #c4ad96
Activate the Magic Wand
Select the 30-pixel Border
Effects / Texture Effects / Texture
(with these settings)
Selections / Select None
Image / Add Borders 3-pixels Color 3 #433325
Image / Add Borders 1-pixel Color 1 #c4ad96
Image / Add Borders 6-pixels Color 3 #433325
Image / Add Borders 1-pixel Color 1 #c4ad96
Add your name or watermark
Save as jpg
hugs Dennis
Image / Add Borders 3-pixels Color 3 #433325
Image / Add Borders 1-pixel Color 1 #c4ad96
Image / Add Borders 6-pixels Color 3 #433325
Image / Add Borders 1-pixel Color 1 #c4ad96
Add your name or watermark
Save as jpg
hugs Dennis
|
Dennis
|
