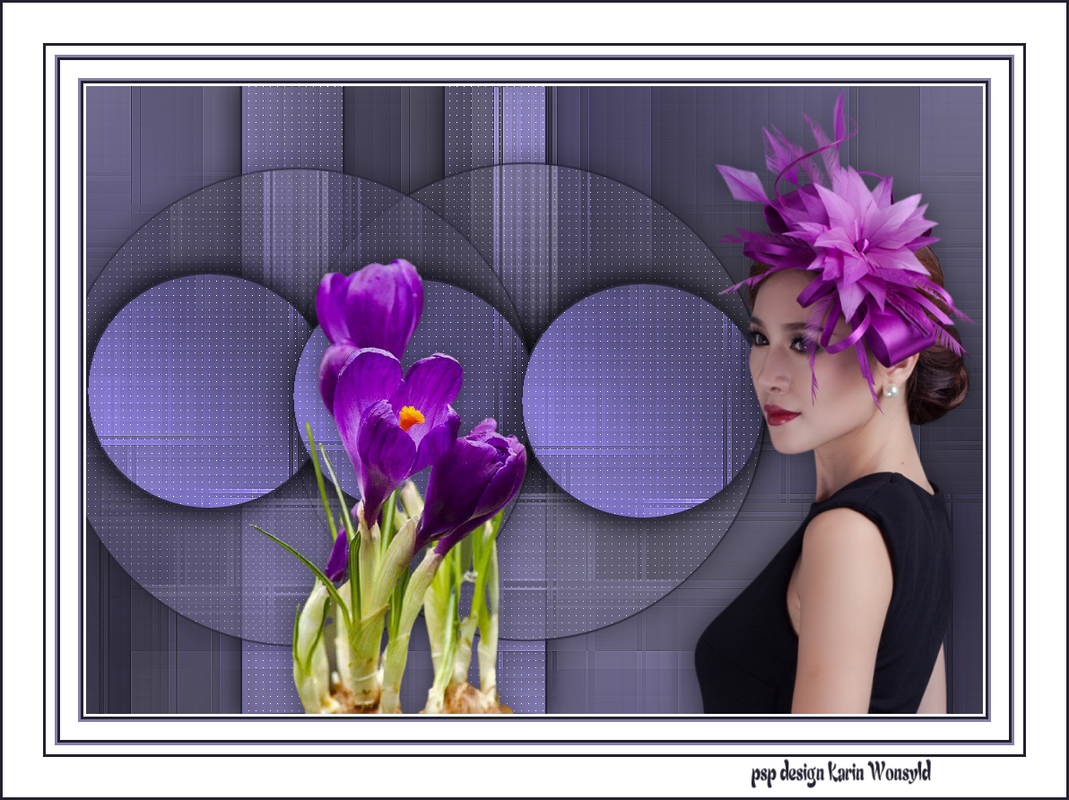
The Lady with Purple Flowers in Her Hair
|
here you will find the original tutorials from Karin
|

|
|
You get your materials here
|
| ||
You get a folder with Selections / place in the folder PSP Selections.
I used the following Colors
Color 1 # 8680a6
Color 2 # 23212f
Color 3 #ffffff
I used the following Colors
Color 1 # 8680a6
Color 2 # 23212f
Color 3 #ffffff

You will need these Plugins
Mehdi / Sorting Tiles
Filters Unlimited 2.0 / & <Bkg Designer sf 10 l> / Cruncher
Filters Unlimited 2.0 / VM Distortion / Flipper
Filters Unlimited 2.0 / & <Background Designer lV> /
Refractor
AP [Lines] Lines - Lines SilverLining
Alien Skin Eye Candy 5: Impact / Perspective Shadow
Let us begin
1
Open the Background / background the lady with purple flowers in her hair
Window / Duplicate
close the original and work on the copy
2
Effects / Plugins / Mehdi / Sorting Tiles
(with these settings)

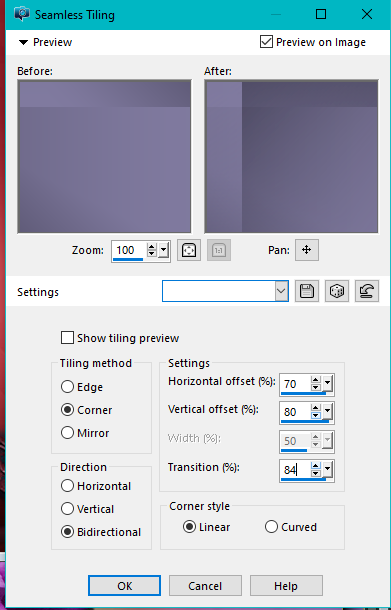
Effects / Image Effects / Seamless Tiling
(with these settings)
(with these settings)
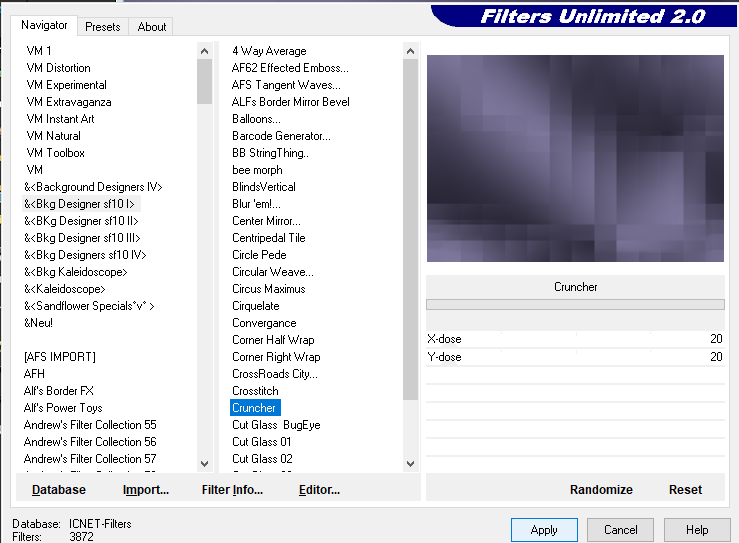
Effects / Layers / Filters Unlimited 2.0 / & <Bkg Designer sf 10 l> / Cruncher (default)
(with these settings)
(with these settings)
3
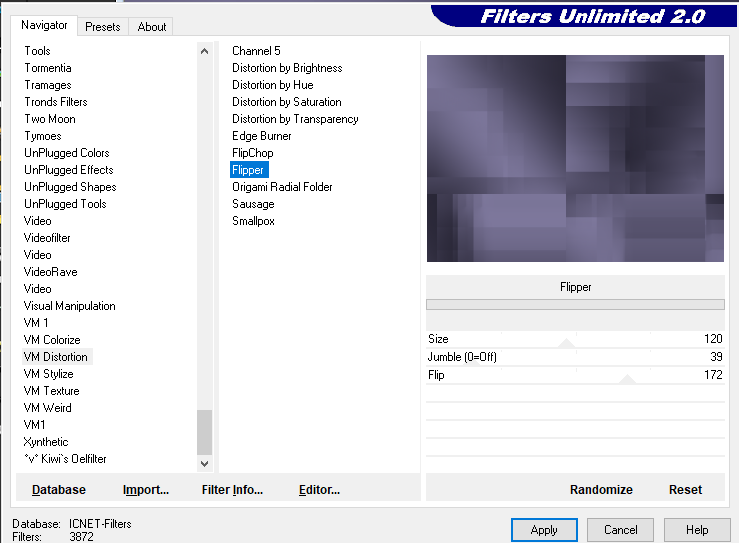
Effects / Layers / Filters Unlimited 2.0 / VM Distortion / Flipper
(with these settings)
Effects / Layers / Filters Unlimited 2.0 / VM Distortion / Flipper
(with these settings)
Layers / Duplicate
Image / Mirror / Mirror Horizontal (Mirror in previous versions)
Layers / Properties / Opacity 50
Layers / Merge / Merge Down
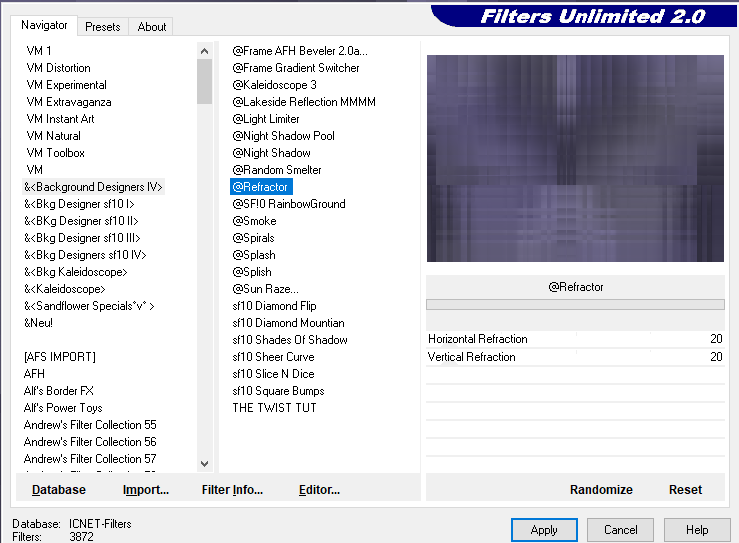
Effects / Layers / Filters Unlimited 2.0 / & <Background Designer lV> / Refractor (default)
(with these settings)
Image / Mirror / Mirror Horizontal (Mirror in previous versions)
Layers / Properties / Opacity 50
Layers / Merge / Merge Down
Effects / Layers / Filters Unlimited 2.0 / & <Background Designer lV> / Refractor (default)
(with these settings)
Effects / Edge Effects / Enhance
4
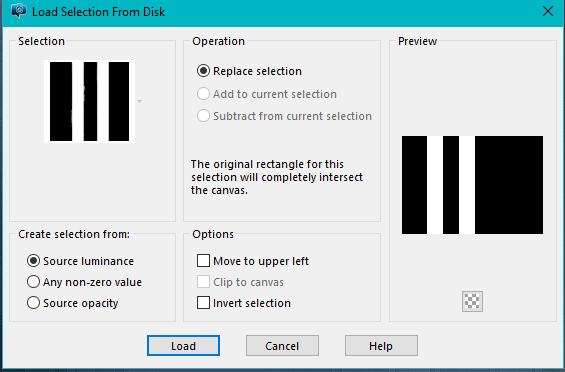
Selections / Load/Save Selection / Load Selection from Disk
(with these settings)
Locate / kw the lady with purple flowers in her hair 1
4
Selections / Load/Save Selection / Load Selection from Disk
(with these settings)
Locate / kw the lady with purple flowers in her hair 1
Selections / Promote Selection to Layer
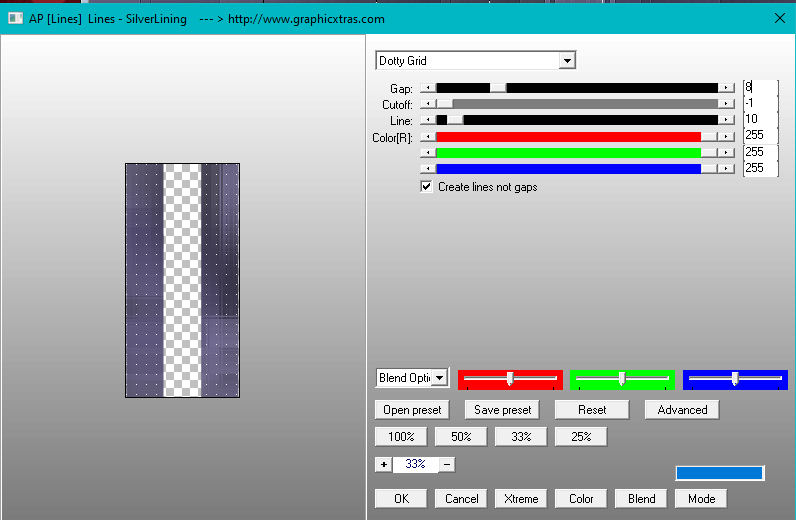
Layers / AP[Lines] - Lines SilverLining
(with these settings)
Layers / AP[Lines] - Lines SilverLining
(with these settings)
Keep Selected
Layers / New Raster Layer
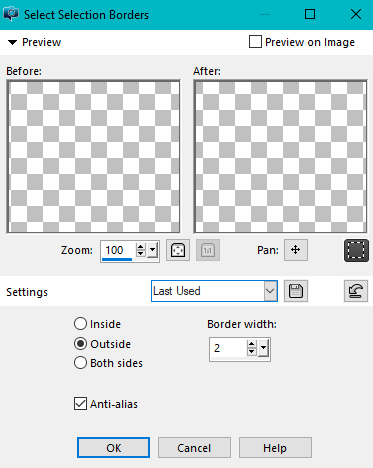
Selections / Modify / Select Selection Borders
(with these settings)
Layers / New Raster Layer
Selections / Modify / Select Selection Borders
(with these settings)
Flood Fill with Color 2
Selections / Select None
Layers / Merge Down
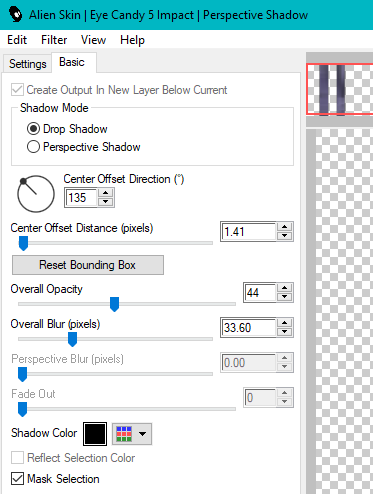
Effects / Plugins / Alien Skin Eye Candy 5: Impact / Perspective Shadow
(with these settings)
Selections / Select None
Layers / Merge Down
Effects / Plugins / Alien Skin Eye Candy 5: Impact / Perspective Shadow
(with these settings)
Layers / Duplicate
Layers / Properties / Blend Mode Dodge / Opacity 55
Layers / Merge / Merge Down
5
Activate the Bottom Layer
Selections / Load/Save Selection / Load Selection from Disk
Locate / kw the lady with purple flowers in her hair 2
same settings as point 4
Selections / Promote Selection to Layer
Layers / Arrange Bring to Top
Effects / Plugins / AP [Lines] - Lines SilverLining
same settings as point 4
Keep Selected
Layers / New Raster Layer
Selections / Modify / Select Selection Borders
same settings as point 4
Flood Fill with Color 2
Selections / Select None
Layers / Merge / Merge Down
Effects / Plugins / Alien Skin Eye Candy 5: Impact / Perspective Shadow
same settings as point 4
Layers / Duplicate
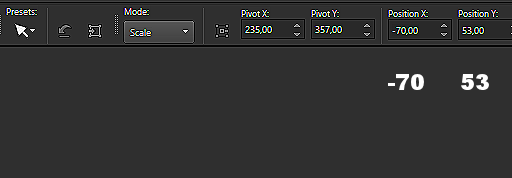
Activate the Pick Tool with these settings / Position X -70 and Position Y 53
Layers / Properties / Blend Mode Dodge / Opacity 55
Layers / Merge / Merge Down
5
Activate the Bottom Layer
Selections / Load/Save Selection / Load Selection from Disk
Locate / kw the lady with purple flowers in her hair 2
same settings as point 4
Selections / Promote Selection to Layer
Layers / Arrange Bring to Top
Effects / Plugins / AP [Lines] - Lines SilverLining
same settings as point 4
Keep Selected
Layers / New Raster Layer
Selections / Modify / Select Selection Borders
same settings as point 4
Flood Fill with Color 2
Selections / Select None
Layers / Merge / Merge Down
Effects / Plugins / Alien Skin Eye Candy 5: Impact / Perspective Shadow
same settings as point 4
Layers / Duplicate
Activate the Pick Tool with these settings / Position X -70 and Position Y 53
press m to exit
Activate the Bottom of these two circles
Layers / Properties / Opacity 75
Activate the Top Circle
Layers / Properties / Opacity 65
6
Activate the Bottom Layer
Selections / Load/Save Selection / Load Selection from Disk
Locate / kw the lady with purple flowers in her hair 3
Same settings as point 4
Selections / Promote Selection to Layer
Layers / Arrange bring to Top
Layers / New Raster Layer
Flood Fill with Color 2
Selections / Modify / Contract by 2
Same Settings as point 4
Press the Delete Key on the Keyboard
Keep Selected
Activate the Small Circle
Layers / AP [Lines] - Lines SilverLining
same settings as point 4
Activate the Top Raster Layer
Layers / Merge Down
Selections / Select None
Effects / Plugins / Alien Skin Eye Candy 5: impact / Perspective Shadow
Same settings as point 4
7
If you are not on the Layer with the Small Circle then Activate it
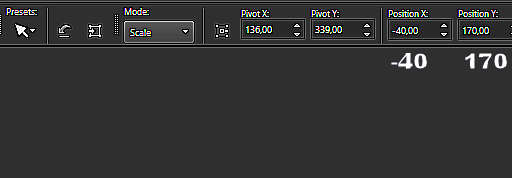
Activate the Pick Tool with these settings Position X -40 / and Position Y 170
Activate the Bottom of these two circles
Layers / Properties / Opacity 75
Activate the Top Circle
Layers / Properties / Opacity 65
6
Activate the Bottom Layer
Selections / Load/Save Selection / Load Selection from Disk
Locate / kw the lady with purple flowers in her hair 3
Same settings as point 4
Selections / Promote Selection to Layer
Layers / Arrange bring to Top
Layers / New Raster Layer
Flood Fill with Color 2
Selections / Modify / Contract by 2
Same Settings as point 4
Press the Delete Key on the Keyboard
Keep Selected
Activate the Small Circle
Layers / AP [Lines] - Lines SilverLining
same settings as point 4
Activate the Top Raster Layer
Layers / Merge Down
Selections / Select None
Effects / Plugins / Alien Skin Eye Candy 5: impact / Perspective Shadow
Same settings as point 4
7
If you are not on the Layer with the Small Circle then Activate it
Activate the Pick Tool with these settings Position X -40 / and Position Y 170
press m to exit
Layers / Arrange / Move / Move Down
Still on the Small Circle in the Middle
Layers / Duplicate
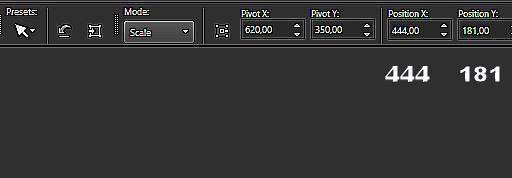
Activate the Pick Tool with these settings Position X 444 and Position Y 181
Layers / Arrange / Move / Move Down
Still on the Small Circle in the Middle
Layers / Duplicate
Activate the Pick Tool with these settings Position X 444 and Position Y 181
press m to exit
Layers / Merge / Merge Down 2x
Layers / Duplicate
Layers / Properties / Blend Mode / Dodge / Opacity 85
Layers / Merge / Merge Down
8
Open the tube Grisi_Woman_900.pspimage
Edit / Copy
Edit / Paste as a New Layer
Image / Mirror / Mirror Horizontal (Mirror in previous versions)
Image / Resize 1x / 85%
Repeat Image Resize but 1x 90%
Move over to the Right
Effects / Plugins / Alien Skin Eye Candy 5: impact / Perspective Shadow
same settings as point 4
9
Open the Tube / kw/flowers/31/1/21/13_orig
Edit / Copy
Edit / Paste as a New Layer
Effects / Plugins / Alien Skin Eye Candy 5: Impact / Perspective Shadow
same settings as point 4
10
Image / Add Borders 3-pixels In Color 3
Image / Add Borders 3-pixels in your Color 2
Image / Add Borders / 3-pixels Color 1
Image / Add Borders / 20-pixels Color 3
Image / Add Borders / 3-pixels Color 1
Image / Add Borders / 10-pixels Color 3
Image / Add Borders / 3-pixels Color 2
Image / Add Borders / 45-pixels Color 3
Image / Add Borders / 3-pixels Color 2
Add your name or watermark
Save as jpg
Hope you enjoyed my Tutorial
Hugs Dennis
