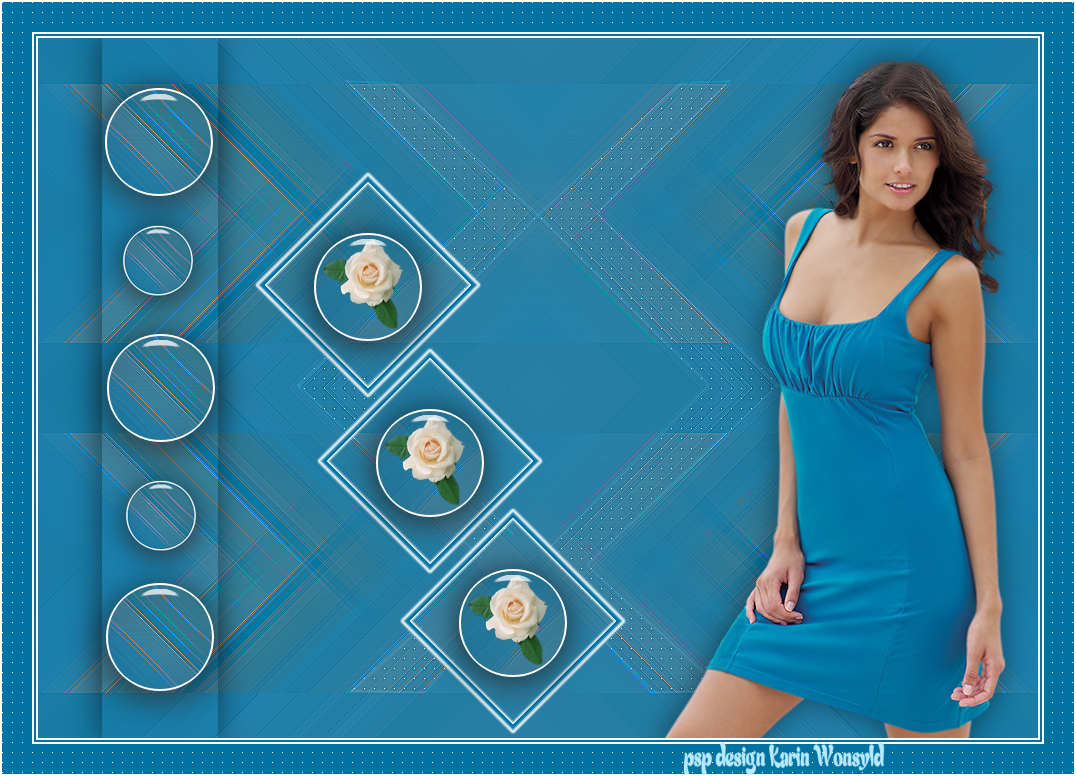
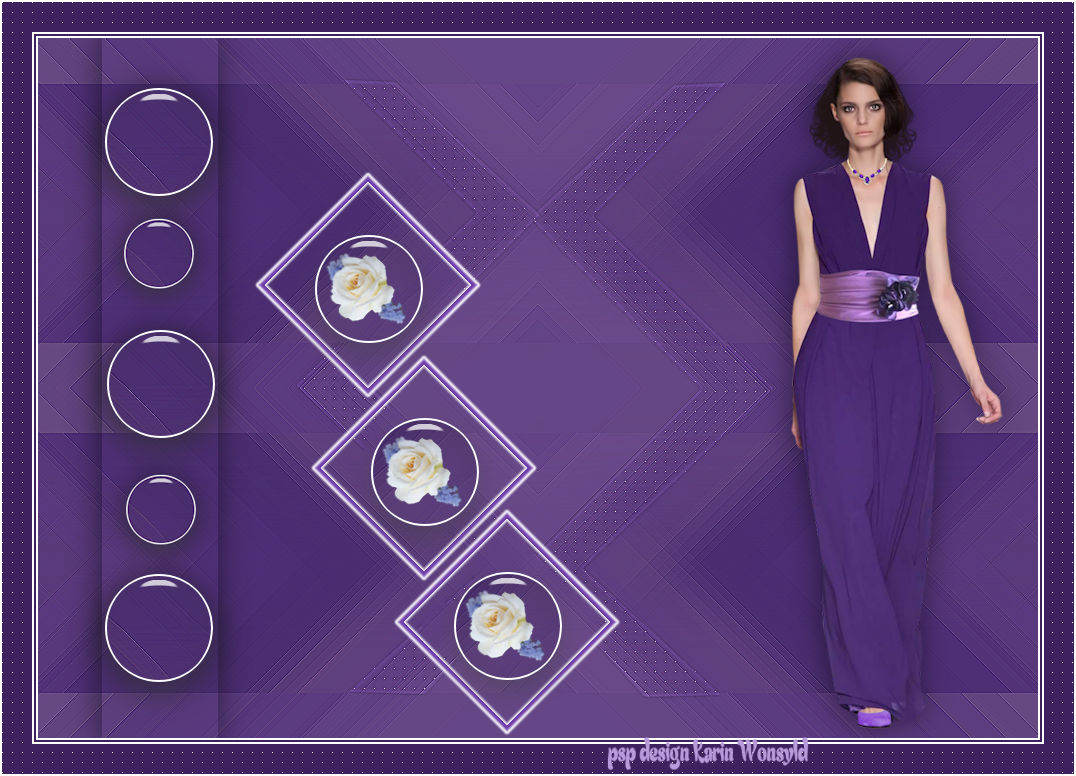
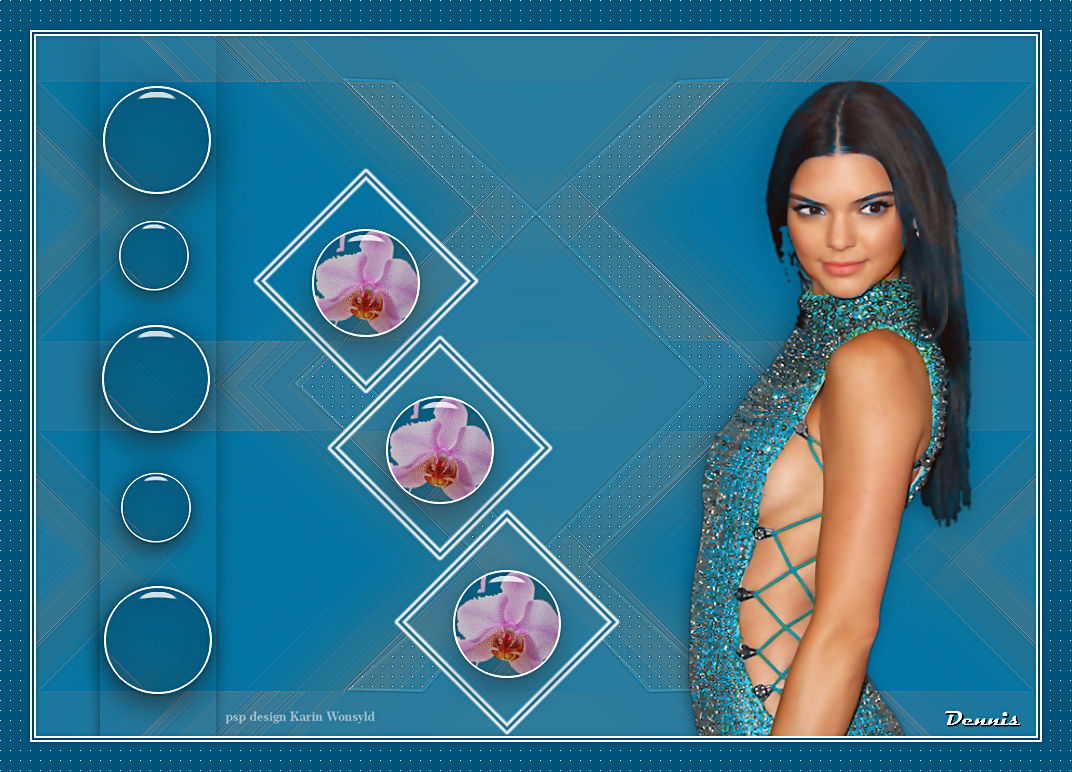
The Lady and Glass Effects
|
here you will find the original tutorials from Karin
|

|
|
You get the materials here
|
| ||
Thanks to Grisi because I can use her tubes in my tutorials.
Tubes from Grisi that are in this tutorial
may not be posted on other websites or forums
and do not share without her permission.
You get 1 Folder with Selections lady and glass effects, place them in the PSP Selections Folder
I used the following Colors
Color 1 #b6e9fe
Color 2 #70d3fe
Color 3 #02a6ee
Color 4 #015479

Let us begin
Set the Foreground Color to Color 2 #70d3fe
Set the Background Color 4 #015479
1
Open a New Raster Image 1000 x 700
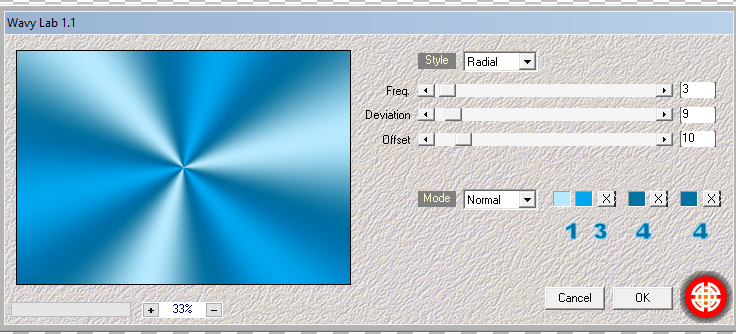
Effects / Plugins / Mehdi / Wavy Lab 1.1 (with the following settings)
Set the Foreground Color to Color 2 #70d3fe
Set the Background Color 4 #015479
1
Open a New Raster Image 1000 x 700
Effects / Plugins / Mehdi / Wavy Lab 1.1 (with the following settings)
2
Adjust / Blur / Gaussian Blur 30
Selections / Select All
Open the tube Grisi_Woman_783.pspimage
Activate the Selection Tool / make a Selection on the Image
(see the Example below)
Adjust / Blur / Gaussian Blur 30
Selections / Select All
Open the tube Grisi_Woman_783.pspimage
Activate the Selection Tool / make a Selection on the Image
(see the Example below)

Edit / Copy
Edit / Paste into Selection
Selections / Select None
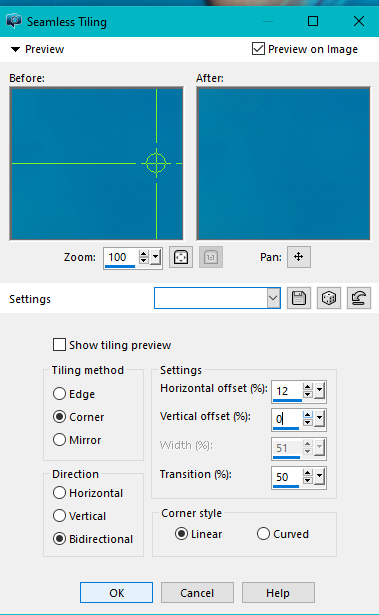
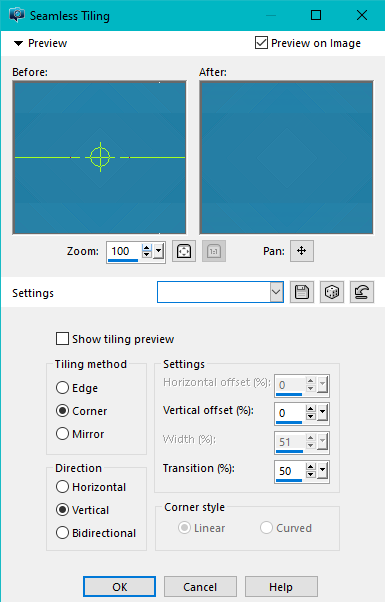
Effects / Image Effects / Seamless Tiling
Edit / Paste into Selection
Selections / Select None
Effects / Image Effects / Seamless Tiling
Adjust / Blur / Radial Blur

3
Effects / Plugins / Filters Unlimited 2.0 / Deformation / Alias Blur 28/28
Effects / Edge Effects / Enhance More
Effects / Plugins / Filters Unlimited 2.0 / °V° Kiwi's Oelfilter / Zig-Zack (with the following settings)
Effects / Plugins / Filters Unlimited 2.0 / Deformation / Alias Blur 28/28
Effects / Edge Effects / Enhance More
Effects / Plugins / Filters Unlimited 2.0 / °V° Kiwi's Oelfilter / Zig-Zack (with the following settings)

Effects / Plugins / Filters Unlimited 2.0 / Simple Top Left Mirror
Effects / Image Effects / Seamless Tiling
Effects / Image Effects / Seamless Tiling
4
Adjust / Sharpness / Sharpen More
Selections / Load/Save Selection / Load Selection from Disk
(with the following settings)
Locate / lady and glass effect
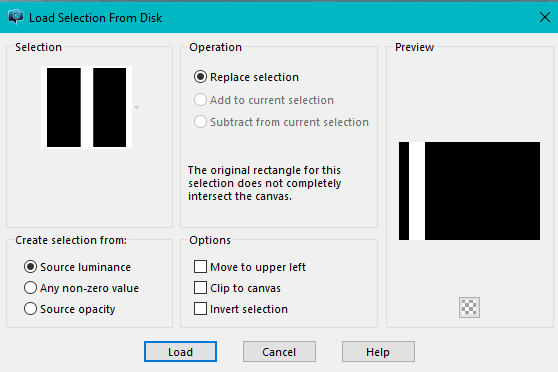
Selections / Promote Selections to Layer
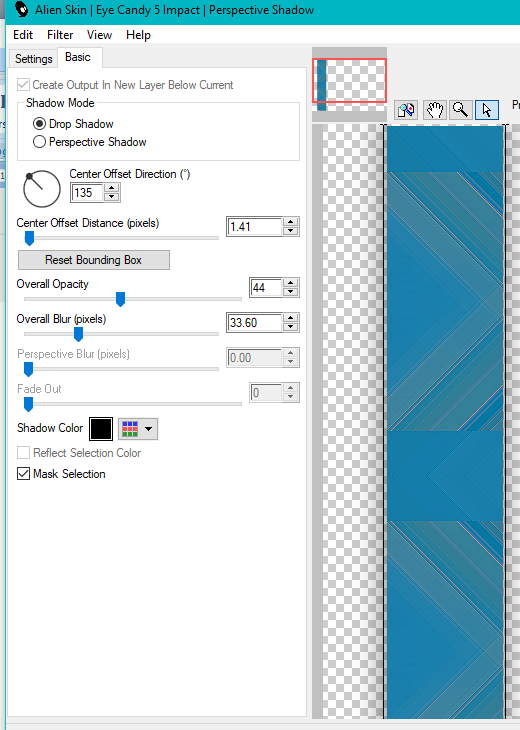
Effects / Plugins / Alien Skin Eye Candy 5 Impact / Perspective Shadow
(with the following settings)
Effects / Plugins / Alien Skin Eye Candy 5 Impact / Perspective Shadow
(with the following settings)
Selections / Select None
5
Selections / Load/Save Selection / Load Selection from Disk
(with the following settings)
Locate lady and glass effect 2
(The (Same settings as Step 4)
Selections / Promote Selection to Layer
Adjust / Sharpness / Sharpen More
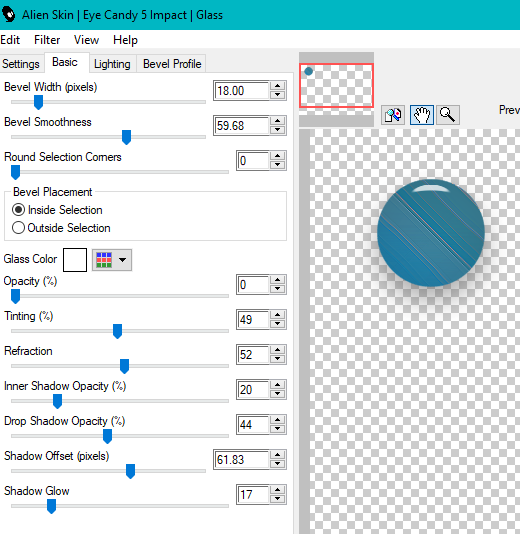
Effects / Plugins / Alien Skin Eye Candy 5 Impact / Glass
(with the following settings)
5
Selections / Load/Save Selection / Load Selection from Disk
(with the following settings)
Locate lady and glass effect 2
(The (Same settings as Step 4)
Selections / Promote Selection to Layer
Adjust / Sharpness / Sharpen More
Effects / Plugins / Alien Skin Eye Candy 5 Impact / Glass
(with the following settings)
Layers / New Raster Layer
Flood Fill with White
Selections / Modify / Contract by 2
Press Delete on the Keyboard
Selections / Select None
Layers / Merge Down
Layers / Duplicate 2x
(place as on the Example)
Layers / Duplicate
Image / Resize 65%
Layers / Duplicate
Place as in the Example
Use the Mover Tool (Do not flip)
Close the Eye on the 2 Lower Layers
Activate the Top Layer
Layers / Merge Visible
Open the Eye again on the 2 Lower Layers
Effects / Plugins / Alien Skin Eye Candy 5 Impact / Perspective Shadow
(Same settings as Step 4)
6
Layers / New Raster Layer
Selections / Load/Save Selection / Load Selection from Disk
Locate lady and glass effect 3
(Same settings as Step 4)
Flood Fill with White
Selections / Modify / Contract by 3
Flood Fill with Color 4 #015479
Selections / Modify / Contract by 3
Flood Fill with White
Selections / Modify / Contract by 3
Press Delete on the Keyboard
Selections / Select None
7
Activate the Bottom Raster Layer
Selections / Load/Save Selection / Load Selection from Disk
Locate lady and glass effect 4
(Same settings as Step 4)
Selections / Promote Selection to Layer
Open the tube of white rose
Edit / Copy
Edit / Paste as a New Layer
Image Resize 16%
Drag it into the Selection
Layers / Merge Down
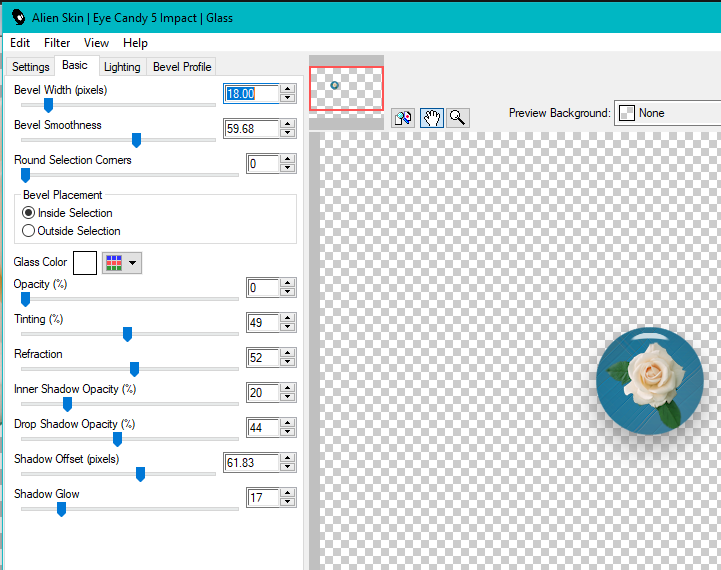
Effects / Plugins / Alien Skin Eye Candy 5 Impact / Glass
(with the following settings)
Flood Fill with White
Selections / Modify / Contract by 2
Press Delete on the Keyboard
Selections / Select None
Layers / Merge Down
Layers / Duplicate 2x
(place as on the Example)
Layers / Duplicate
Image / Resize 65%
Layers / Duplicate
Place as in the Example
Use the Mover Tool (Do not flip)
Close the Eye on the 2 Lower Layers
Activate the Top Layer
Layers / Merge Visible
Open the Eye again on the 2 Lower Layers
Effects / Plugins / Alien Skin Eye Candy 5 Impact / Perspective Shadow
(Same settings as Step 4)
6
Layers / New Raster Layer
Selections / Load/Save Selection / Load Selection from Disk
Locate lady and glass effect 3
(Same settings as Step 4)
Flood Fill with White
Selections / Modify / Contract by 3
Flood Fill with Color 4 #015479
Selections / Modify / Contract by 3
Flood Fill with White
Selections / Modify / Contract by 3
Press Delete on the Keyboard
Selections / Select None
7
Activate the Bottom Raster Layer
Selections / Load/Save Selection / Load Selection from Disk
Locate lady and glass effect 4
(Same settings as Step 4)
Selections / Promote Selection to Layer
Open the tube of white rose
Edit / Copy
Edit / Paste as a New Layer
Image Resize 16%
Drag it into the Selection
Layers / Merge Down
Effects / Plugins / Alien Skin Eye Candy 5 Impact / Glass
(with the following settings)
Effects / Plugins / Alien Skin Eye Candy 5 Impact / Perspective Shadow
(Same settings as Step 4)
Layers / New Raster Layer
Flood Fill with White
Selections / Modify / Contract by 2
Press Delete on the Keyboard
Selections / Select None
Layers / Merge / Merge Down
Layers / Arrange / Bring to Top
Layers / Merge Down
Layers Duplicate 2x
(place as in the Example)
8
Activate the Bottom Raster Layer
Selections / Load/Save Selection / Load Selection from Disk
Locate lady and glass effect 5
(Same settings as Step 4)
Selections / Promote Selections to Layer
Effects / Plugins / AP [Lines] Lines SilverLining
(with the following settings)
(Same settings as Step 4)
Layers / New Raster Layer
Flood Fill with White
Selections / Modify / Contract by 2
Press Delete on the Keyboard
Selections / Select None
Layers / Merge / Merge Down
Layers / Arrange / Bring to Top
Layers / Merge Down
Layers Duplicate 2x
(place as in the Example)
8
Activate the Bottom Raster Layer
Selections / Load/Save Selection / Load Selection from Disk
Locate lady and glass effect 5
(Same settings as Step 4)
Selections / Promote Selections to Layer
Effects / Plugins / AP [Lines] Lines SilverLining
(with the following settings)

Selections / Select None
Adjust / Sharpness / Sharpen More
Layers Duplicate
Image / Mirror Horizontal (Mirror in earlier versions)
Layers / Merge / Merge Down
Activate the Eraser Tool and Erase inside the square frame
9
Open the Tube Grisi_Woman_783
Edit / Copy
Edit / Paste as a New Layer
Image / Resize 85%
Place as in the Example
Effects / Plugins / Alien Skin Eye Candy 5 Impact / Perspective Shadow
(Same settings as Step 4)
10
Image / Add Borders 2-pixels White
Image /Add Borders 2-pixels Color 4 #015479
Image / Add Borders 2-pixels White
Image / Add Borders 30-pixels Color 4 #015479
Activate the Magic Wand and Select the Frame
Effects / Plugins AP [Lines] Lines SilverLining
(with the same settings as Step 8)
Selections / Select None
Image / Add Borders 2-pixels White
Add your name or watermark
Save as jpg
Hugs Dennis
|
Karins b tags
|
Dennis b udgave
|
