Tutorial Peonies

|
here you will find the original tutorials from Karin
|

|
|
You get the materials here
|
| ||
You get 6 Selections they should be placed in the PSP Selections Folder.
You get a deco 23 it needs to be placed in the PSP Textures Folder.
I used the following Colors
Color 1 #dfc3d4
Color 2 #a45978
You get a deco 23 it needs to be placed in the PSP Textures Folder.
I used the following Colors
Color 1 #dfc3d4
Color 2 #a45978

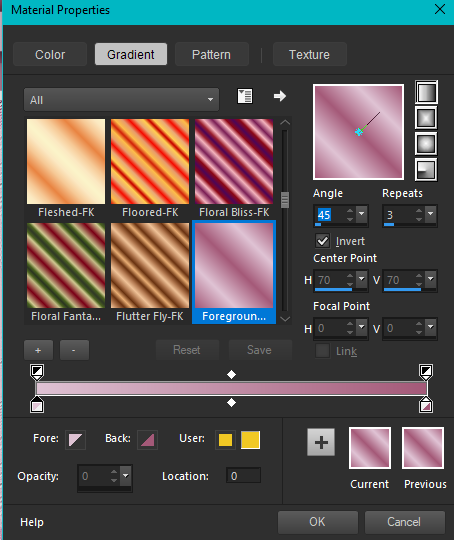
Foreground Color to Color 1 #dfc3d4
Background Color to Color 2 #a45978
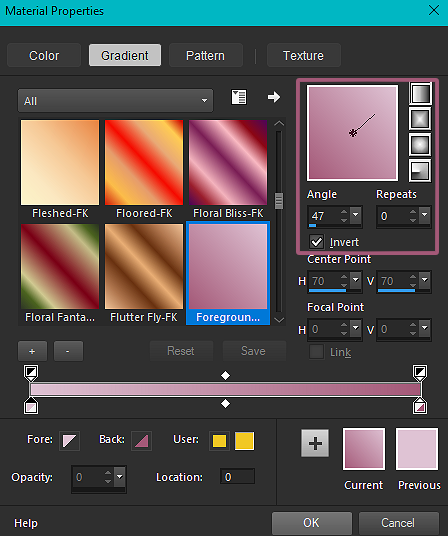
Make a Linear Gradient on the Foreground Color
(with these settings)
Background Color to Color 2 #a45978
Make a Linear Gradient on the Foreground Color
(with these settings)
Let us begin
1
Open a New Image 1000 x 700
Flood Fill with the Gradient
2
Layers / New Raster Layer
Selections / Load/Save Selection / Load Selection from Disk
Locate kw peonies 1
(with these settings)
1
Open a New Image 1000 x 700
Flood Fill with the Gradient
2
Layers / New Raster Layer
Selections / Load/Save Selection / Load Selection from Disk
Locate kw peonies 1
(with these settings)

flood fill with color 1
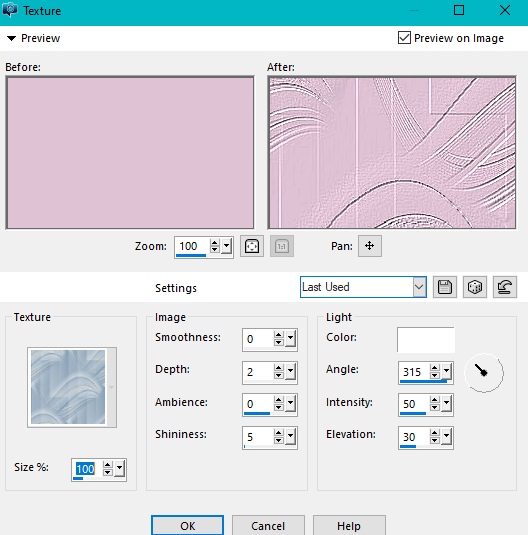
effects - texture effect texture with these settings
effects - texture effect texture with these settings
Layers / Properties / Blend Mode / Hard Light
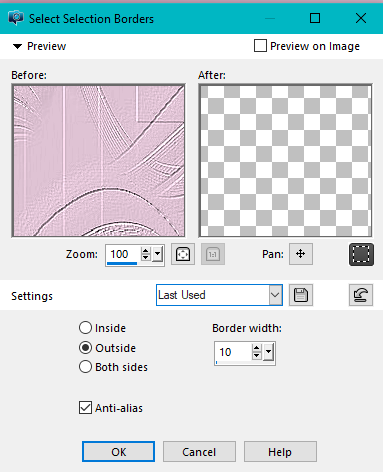
Selections / Modify / Select Selection Borders
(with these settings)
Selections / Modify / Select Selection Borders
(with these settings)
flood fill with white
selections select none
3
Layers / New Raster Layer
Selections / Load/Save Selection / Load Selection from Disk
Locate / kw peonies 2
Same settings as Step 1
Flood Fill with Color 2 #a45978
Effects / Texture Effects / Texture
same settings as Step 2
Selections / Modify / Select Selection Borders
same settings as Step 2
Flood Fill with White
Selections / Select None
Layers / Properties / Opacity 50
4
Layers / New Raster Layer
Selections / Load/Save Selection / Load Selection from Disk
Locate / kw peonies 3
same settings as Step 1
Flood Fill with Color 2 #a45978
Selections / Select None
5
Layers / New Raster Layers
Selections / Load/Save Selection / Load Selection from Disk
Locate / kw peonies 4
(same settings as Step 1)
Flood Fill with the Color 1 #dfc3d4
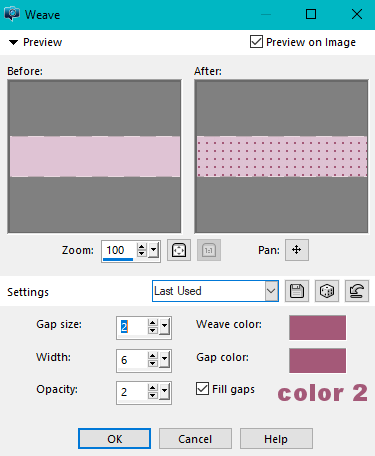
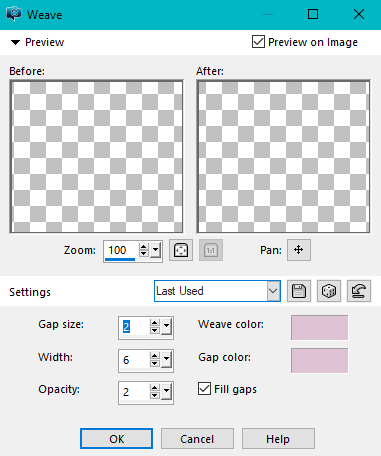
Effects / Texture Effects / Weave
(with these settings)
Layers / New Raster Layer
Selections / Load/Save Selection / Load Selection from Disk
Locate / kw peonies 3
same settings as Step 1
Flood Fill with Color 2 #a45978
Selections / Select None
5
Layers / New Raster Layers
Selections / Load/Save Selection / Load Selection from Disk
Locate / kw peonies 4
(same settings as Step 1)
Flood Fill with the Color 1 #dfc3d4
Effects / Texture Effects / Weave
(with these settings)
Selections / Select None
Effects / 3d Effects / Drop Shadow with this setting 5 / 6 / 50 / 25 Black
Repeat / Effects / 3d Effects / Drop Shadow with minus / -5 / -6 / 50 / 25 Black
Layers / Merge / Merge Down
Layers / Duplicate
Image / Mirror / Mirror Vertical (Flip in older versions)
6
Layers / New Raster Layer
Selections / Load/Save Selection / Load Selection from Disk
Locate / kw peonies 5
(same settings as Step 1)
Flood Fill with Color 2 #a45978
Effects / Texture Effects / Weave
this time with these settings / Foreground Color
Selections / Select None
7
Layers / New Raster Layer
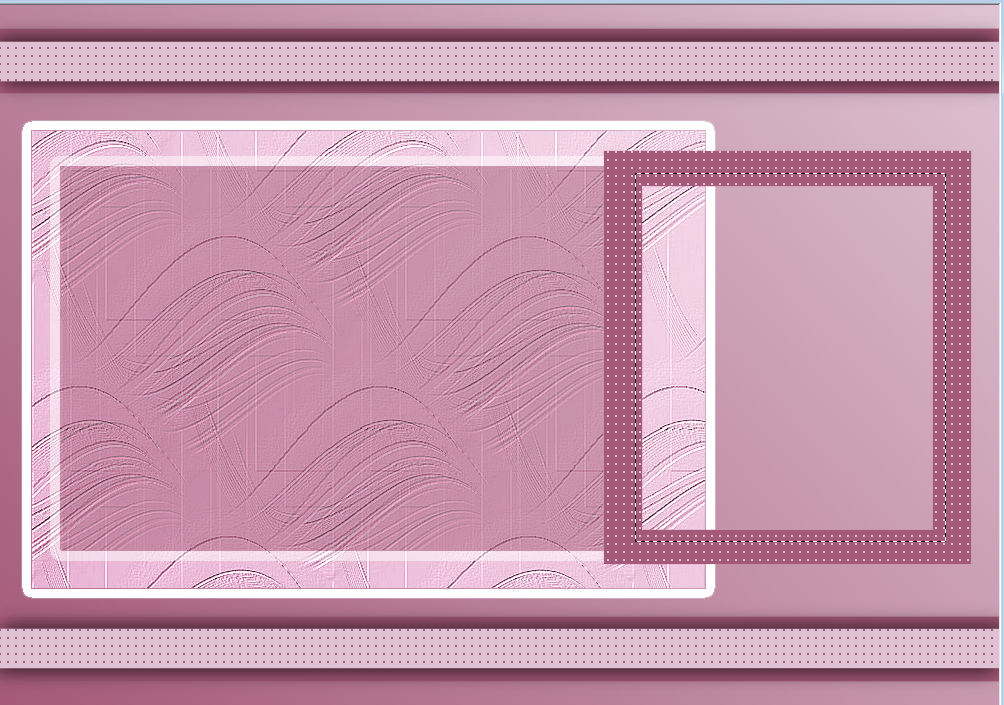
Activate the Selection Tool and make a Selections where I show in the below Example (in the dark border of the small frame)
7
Layers / New Raster Layer
Activate the Selection Tool and make a Selections where I show in the below Example (in the dark border of the small frame)
Flood Fill with the Gradient from the start
Selections / Select None
Layers / Arrange Move Down
Activate the Layer under the Frame
open the tube 6416/Luz Cristina.pspImage
Edit / Copy
Edit / Paste as New Layer
Image / Mirror
Image / Resize 1 x 85% and 1 x 90%
Place before the Frame
Activate the Easer Tool and Erase away What goes outside the frame
Since the lady is a little pale, she gets a treatment with
Brightness and Contrast / Levels
(with these settings)
Selections / Select None
Layers / Arrange Move Down
Activate the Layer under the Frame
open the tube 6416/Luz Cristina.pspImage
Edit / Copy
Edit / Paste as New Layer
Image / Mirror
Image / Resize 1 x 85% and 1 x 90%
Place before the Frame
Activate the Easer Tool and Erase away What goes outside the frame
Since the lady is a little pale, she gets a treatment with
Brightness and Contrast / Levels
(with these settings)

8
In the Materials Palette / change the settings of the Gradient still using the same Colors
In the Materials Palette / change the settings of the Gradient still using the same Colors
Layers / New Raster Layer
Selections Load/Save Selection / Load Selection from Disk
Locate / kw peonies 6
(same settings as Step 1)
Flood Fill with the Gradient
Layers / New Raster Layer
Flood Fill with Color 2 #a45978
Selections / Modify / Contract by 5
Press the Delete Key on the Keyboard
Flood Fill with Color 1 #dfc3d4
Selections / Modify / Contract by 20
Press the Delete Key on the Keyboard
Flood Fill with the Color 2 #a45978
Selections / Modify – Contract by 5
Press the Delete Key on the Keyboard
Selections / Select None
Layers / Merge Down
Layers / Duplicate
Place as in the Example
Layers / Merge Down
Effects / 3d Effects / Drop Shadow / 5 / 6 / 50 / 25 Black
9
Open the tube 246/mist/LB TUBES.pspImage
Edit / Copy
Edit / Paste as New Layer
Place as in the Example
10
Open the Tube / kw deco 1
Edit / Copy
Edit / Paste as New Layer
11
Image / Add Borders 2-pixels Color 2 #a45978
Image / Add Borders 2-pixels Color 1 #dfc3d4
Image / Add Borders 10-pixels White
Image / Add Borders 2-pixels Color 2 #a45978
Image / Add Borders 2-pixels Color 1 #dfc3d4
Image / Add Borders 2-pixels Color 2 #a45978
Image / Add Borders 20-pixels White
Image / Add Borders 20-pixels Color 2 #a45978
Image / Add Borders 2-pixels Color 1 #dfc3d4
Image / Add Borders 2-pixels Color 2 #a45978
Image / Add Borders 40-pixels White
Image / Add Borders 2-pixels Color 2 #a45978
12
Add your name or watermark
Save as jpg
