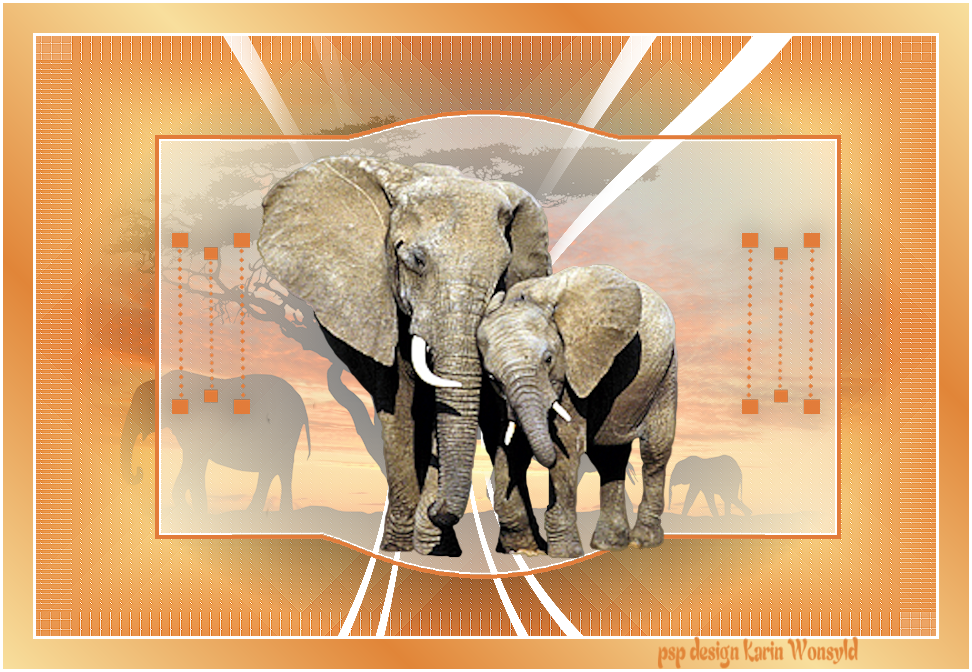
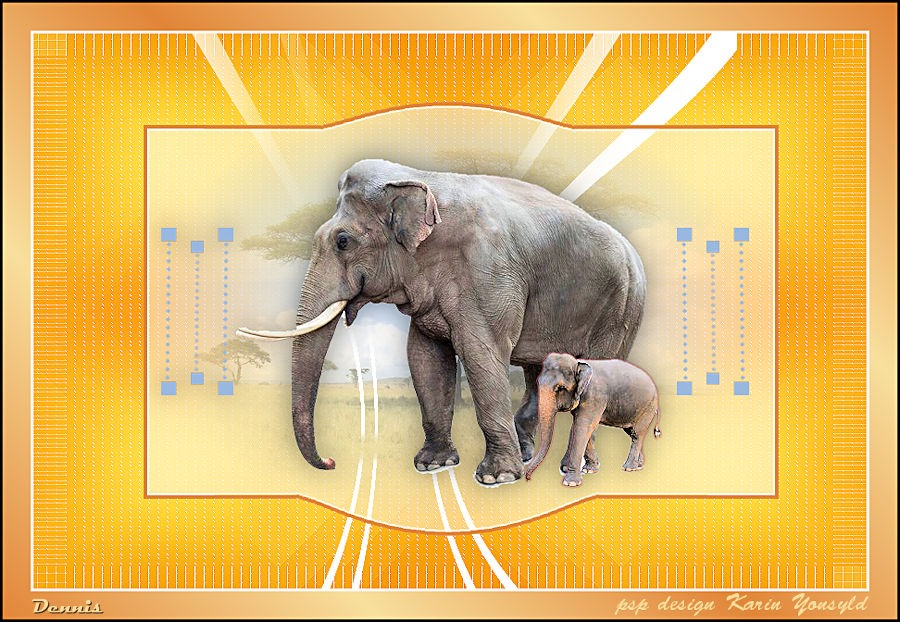
L'Elephant et les Jeunes
|
here you will find the original tutorials from Karin
|

|
|
materialer here
|
| ||
Thank you, Karin for allowing me to translate your tutorials
You will need the following Plugins
Mehdi / Wavy Lab 1.1 / Mehdi / Sorting Tiles
Ap [Lines] Lines SilverLining
Filter Unlimited 2.0 / & <Bkg Designer sf 10 1>
Plugins / Alien Skin / Eye Candy 5 Impact / Perspective Shadow
Included in the Materials are / 2 selections / Place them in the PSP Selections Folder
I used the following Colors
Color
1 #f8df9d
Color 2 #f6cd73
Color 3 #eeaf5f
Color 4 #e18538
and White #ffffff

Let us begin
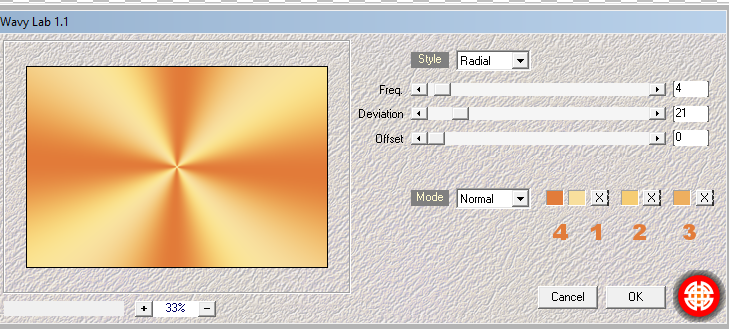
1.
Open a New Image 900 x 600
Plugins / Mehdi / Wavy Lab 1.1 (with the following settings)
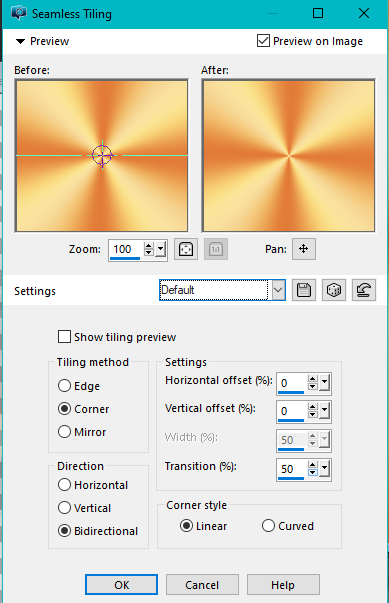
2.
Effects / Image Effects / Seamless Tiling (with the following settings)
Effects / Image Effects / Seamless Tiling (with the following settings)
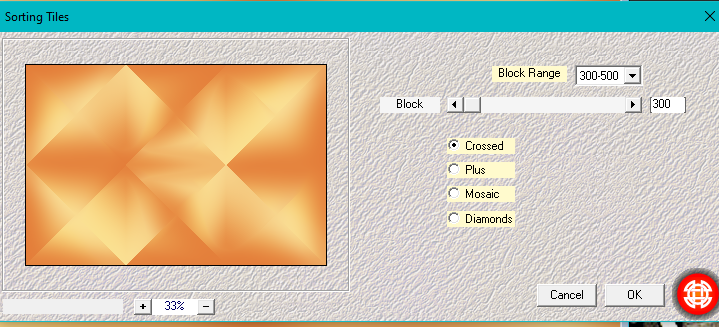
3.
Adjust / Blur Gaussian Blur 30
Plugins / Mehdi / Sorting Tiles (with the following settings)
4. Layers Duplicate
Image / Mirror / Mirror Horizontal (Mirror in earlier versions)
Layers / Properties / Opacity 50
Layers / Merge / Merge Down
5.
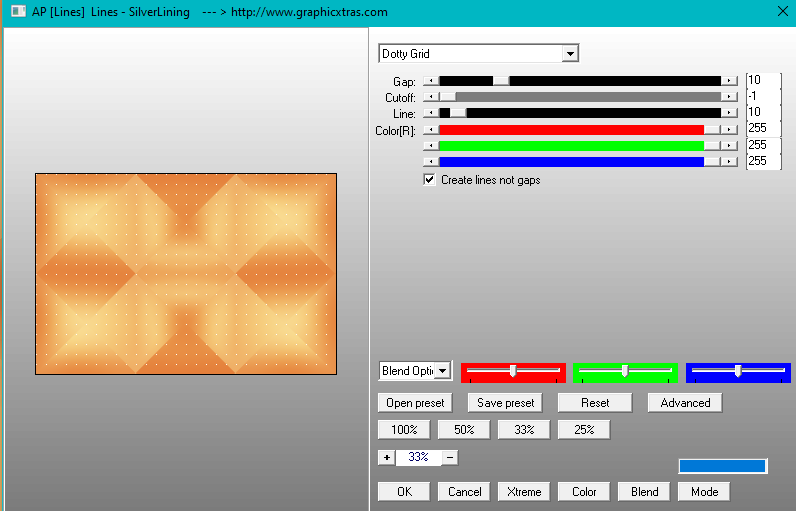
Plugins / AP [Lines] Lines SilverLining (with the following settings)
Effects / Plugins / Filters Unlimited 2.0 / & <Bkg Designer sf 10 1> / Cruncher (with the following settings 20/20)
Layers / Duplicate
Image / Mirror / Mirror Horizontal (Mirror in earlier versions)
Image / Mirror / Mirror Vertical (Flip in earlier versions)
Layers / Properties / Opacity 50
Layers Merge Down
Effects / Edge Effects / Enhance
6.
Open the tube MistedOlifanten.pspImage
Edit / Copy
Edit / Paste as New Layer
7.
Layers / New Raster Layer
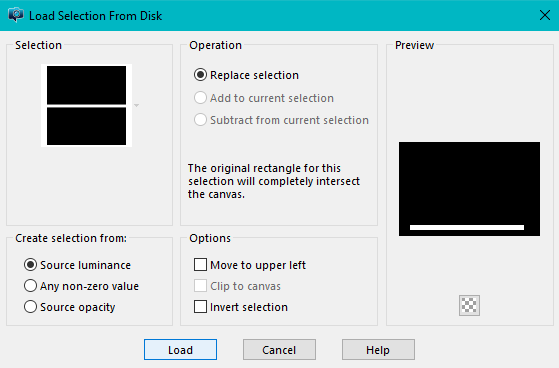
Selections / Load/Save Selection / Load Selection from Disk
Locate kw line (with the following settings)
Layers / Duplicate
Image / Mirror / Mirror Horizontal (Mirror in earlier versions)
Image / Mirror / Mirror Vertical (Flip in earlier versions)
Layers / Properties / Opacity 50
Layers Merge Down
Effects / Edge Effects / Enhance
6.
Open the tube MistedOlifanten.pspImage
Edit / Copy
Edit / Paste as New Layer
7.
Layers / New Raster Layer
Selections / Load/Save Selection / Load Selection from Disk
Locate kw line (with the following settings)
Flood Fill with White
Selections / Select None
Layers / Duplicate
Image / Mirror / Mirror Vertical (Flip in earlier versions)
Layers / Merge / Merge Down
Effects / Distortion Effects / Wind From Right 100
Effects / Distortion Effects / Wind From Left 100
Effects / Distortion Effects / Warp (with the following settings)
Selections / Select None
Layers / Duplicate
Image / Mirror / Mirror Vertical (Flip in earlier versions)
Layers / Merge / Merge Down
Effects / Distortion Effects / Wind From Right 100
Effects / Distortion Effects / Wind From Left 100
Effects / Distortion Effects / Warp (with the following settings)
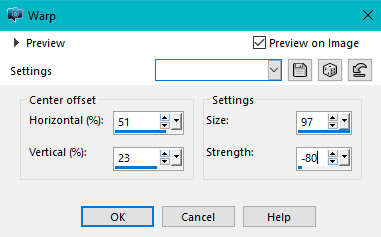
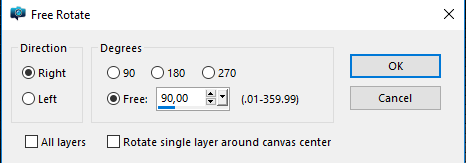
Image / Free Rotate / Right 90˚ (with the following settings)
Place as in the Example
8.
Foreground Color to White
Layers / New Raster Layer
Selections / Load/Save Selection / Load Selection from Disk
Locate kw frame (with the same settings as Step 8)
Activate the Flood Fill Tool and set the Opacity to 50
8.
Foreground Color to White
Layers / New Raster Layer
Selections / Load/Save Selection / Load Selection from Disk
Locate kw frame (with the same settings as Step 8)
Activate the Flood Fill Tool and set the Opacity to 50
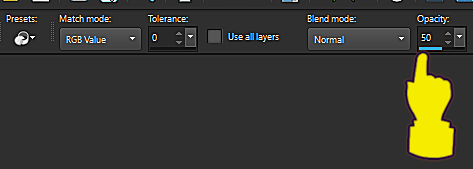
Flood Fill with White
Reset the Flood Fill Tool to 100
Keep Selected
Layers / New Raster Layer
Flood Fill with Color 4 #e18538
Selections / Modify / Contract by 4
Press Delete on your Keyboard
Flood Fill with White
Selections / Modify / Contract by 2
Press Delete on your Keyboard
Selections / Select None
9.
Open the tube Mother and child elephants
Edit / Copy
Edit / Paste as a New Layer
Image Resize 2 x 95%
Place as in the Example
10.
Open the tube kw deco l'éléphant et les jeunes
Edit / Copy
Edit / Paste as New Layer
Place on the left side as in the Example
Layers / Duplicate
Image / Mirror / Mirror Horizontal (Mirror is earlier Versions)
Layers / Merge Down
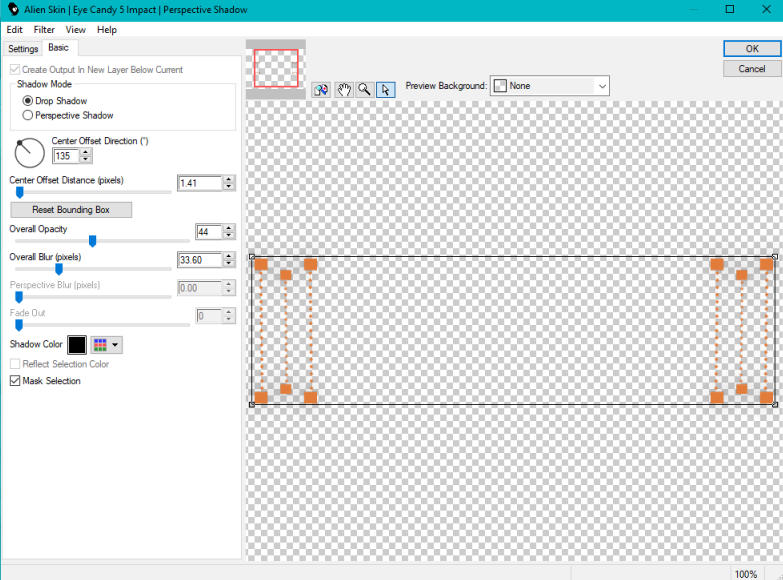
Effects / Plugins / Alien Skin / Eye Candy 5 Impact / Perspective Shadow
(with the following settings)
Reset the Flood Fill Tool to 100
Keep Selected
Layers / New Raster Layer
Flood Fill with Color 4 #e18538
Selections / Modify / Contract by 4
Press Delete on your Keyboard
Flood Fill with White
Selections / Modify / Contract by 2
Press Delete on your Keyboard
Selections / Select None
9.
Open the tube Mother and child elephants
Edit / Copy
Edit / Paste as a New Layer
Image Resize 2 x 95%
Place as in the Example
10.
Open the tube kw deco l'éléphant et les jeunes
Edit / Copy
Edit / Paste as New Layer
Place on the left side as in the Example
Layers / Duplicate
Image / Mirror / Mirror Horizontal (Mirror is earlier Versions)
Layers / Merge Down
Effects / Plugins / Alien Skin / Eye Candy 5 Impact / Perspective Shadow
(with the following settings)
11.
Set the Foreground Color to Color One #f8df9d
Background Color to Color Four #e18538
In the Materials Palette Make a Linear Gradient / 45 / 3
(with the following settings)
Set the Foreground Color to Color One #f8df9d
Background Color to Color Four #e18538
In the Materials Palette Make a Linear Gradient / 45 / 3
(with the following settings)
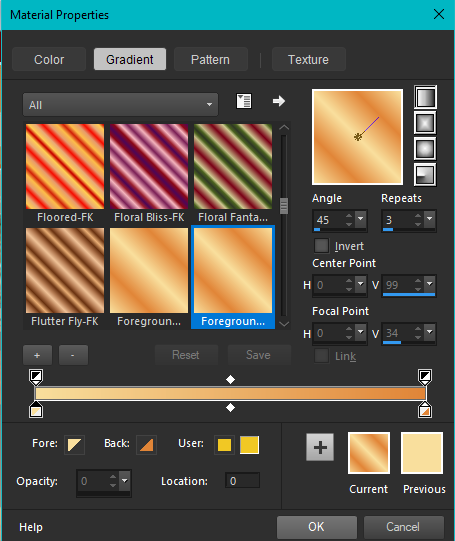
Image Add Borders 3-pixels White
Image / Add Borders 30-pixels in a neutral color
Activate the Magic Wand and Select the 30-pixels Border
Flood Fill with the Gradient
Selections / Select None
Image / Add Borders 3-pixels White
save as jpg
hugs Dennis
Image / Add Borders 30-pixels in a neutral color
Activate the Magic Wand and Select the 30-pixels Border
Flood Fill with the Gradient
Selections / Select None
Image / Add Borders 3-pixels White
save as jpg
hugs Dennis
|
dennis tags
|
